In part 1, we showed you we enabled our coding skills Learning Lab sample code to be testable. The next step is to show you how we enabled that code to be tested whenever we check in our code. To do this, we used a continuous integration (aka build) system.
Although there are many to choose from, based on it's popularity alone, we decided to try out travis-ci.org. With Travis CI, like many of the public build systems, you use an OAuth2 flow to authorize Travis CI to interact with GitHub. What that means is Travis CI has registered itself with GitHub, so GitHub knows it's really Travis CI asking as opposed to some other system. You then have to give the OK to GitHub.com to allow Travis CI to interact with GitHub.
Once you're through that, you have the opportunity to enable a web hook for a particular repository. A web hook is a mechanism for one web service to make an API call to another service based upon an event. In this case, the event is a check-in to your repository in GitHub.com. When you enable the web hook, Travis CI will establish itself as a place to notify when a checkin has occurred.
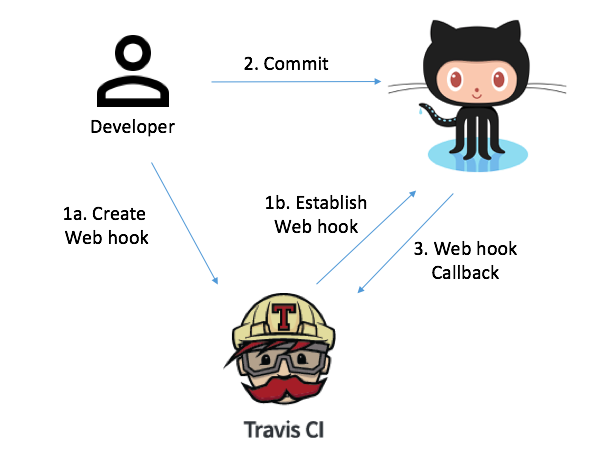
In Travis-CI, we just had to enable the web hook for our sample code repo.

Now that we've enabled the webook. We need to create a special .travis.yml file in our repository. While the .travis.yml has a bunch of stuff that it enables, we kept it really simple. This file tells travis-ci how to set up the test environment.
language: python
python:
  - "2.7"
# command to install dependencies, e.g. pip install -r requirements.txt --use-mirrors
install: pip install -r requirements.txt --use-mirrors
# command to run tests, e.g. python setup.py test
script: python coding102-REST-python/test_coding102.py
branches:
  only:
  - clus-updates
We defined five things.
- The first was the language of the application we're testing, in our case python.
- The second was what version of python we're testing.
- The third is the install command. Since we used the requests library in our code, we have to install it after the build system grabs the code. We haven't mentioned this previously, but you need to keep in mind that the web hook only notifies Travis CI that a change has occurred. Travis CI will subsequently check out your code from GitHub. So, it's just your source code, no dependencies have been downloaded. In python, this is where the requirements.txt file comes in. We used the pip freeze method to save the dependencies to the requirements.txt file. On the command line in our source directory, you execute pip freeze > requirements.txt.
- The fourth is the command to execute our tests.
- The fifth is the branch that we want to whitelist. We only used this because we weren't implementing this in the master branch.
We check-in and push the .travis.yml file to github, and boom a build will now start in Travis CI.

The observant reader might ask, well, why is it build #5 you're showing? Good question! Turns out it took us 5 builds to get all the configuration right.

See, we all make mistakes!
The last thing we did was to advertise the build status on our GitHub README.md (it could be any markdown file).
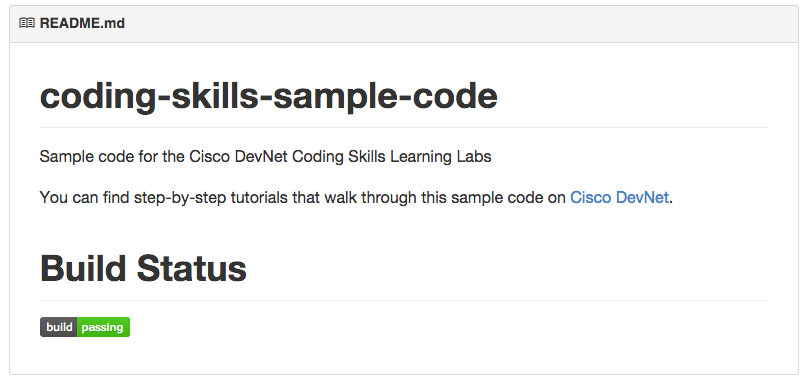
To accomplish that, we just had to copy some markdown (travis-ci generates that for you) that you get from your Travis CI project into your README.md.

In fact, I've embedded it here, just using HTML. I hope we don't break the build!

Happy coding & hope to see you at the DevNet Zone at Cisco Live US this year!
