Digitizing the Retail Experience
Recently, I wrote a blog entitled, “Digitizing Retail with Cisco DevNet”. That blog described a retail buying experience, created a use case, and went into some basic code. This time, let’s continue to digitize retail, add on to the use case and look at some more code. By doing this, we explore building blocks for digitizing your business.
Our Story
Last blog, we “used the app” in order to make part of our shopping experience go from 30 to 5 minutes. We didn’t use the sales associate. We used the app to buy the jeans in another store.
As you may gather, we wandered around the store, looking at things. What if you were the store management and you wanted to know what else we looked at in the store? That's what we're going to explore in this blog - retail analytics.
The Use Case
In this case, we want to analyze the customer movement through our store. What things caught their eye? But, it’s not just one customer. It’s all of them. Let’s use Cisco technology to figure out what’s hot and what’s not in our store.
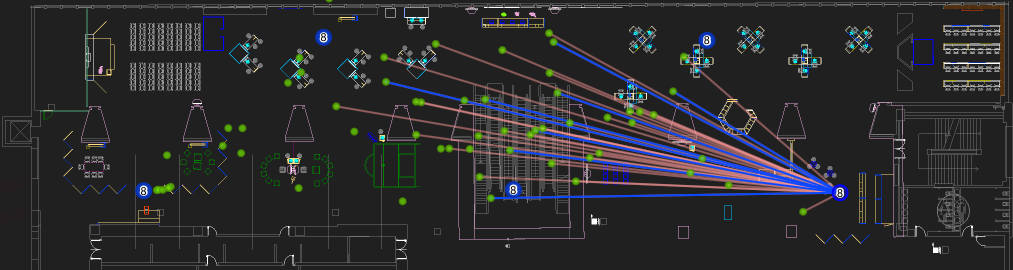
Assume we still have that excellent DNA network from the last blog. But, let’s add on. Now, we’re going inside the store and we’re adding access points. In the figure below, you can see that we’re adding eight of them. This is a typical layout that enables us to implement location services software, which uses triangulation and radio signal strength to locate the different clients (think: “smart phones”) in our venue. Below is our store map.

Again, our goal in this use case is learn what’s hot and what’s not in our store. Which locations are popular? Which ones are people walking by?
The Technology
In order to get accurate locations, and track people in our store, we use Cisco Mobile Experience (CMX) software. As mentioned above, CMX uses radio signal strength and triangulation to perform its job. Each cell phone is called a client and for our purposes, we are thinking of “clients” and “customers” as pretty much the same thing.
There are several ways to deploy CMX, including both cloud and on-premise versions. You can get a 60-day free trial of either version.
Diving into the Technology
You can learn more about CMX on Cisco DevNet. If you want to begin playing with CMX right away, you can go directly to our Sandbox. You will need to log in with username: “learning” and password: “learning”.
For the rest of this blog, we will use graphics from our sandbox. We have Cisco locations up and running. In terms of learning, it’s the same thing as the store. We’re looking at where customers spend their time. Our sandbox uses data we captured from a Cisco Live show. To see these pictures below, in the sandbox, navigate to the DevNetCampus -> DevNetBuilding -> DevNetZone on the left menu. Then use “Detect & Locate” or “Analytics” to follow along.
In the picture below (Detect & Locate), we see a couple of key ingredients we need in order to do the analysis. First, we see one of our access point and the clients that are being tracked. In the GUI, we can hover over, or click on things in order to get more information.
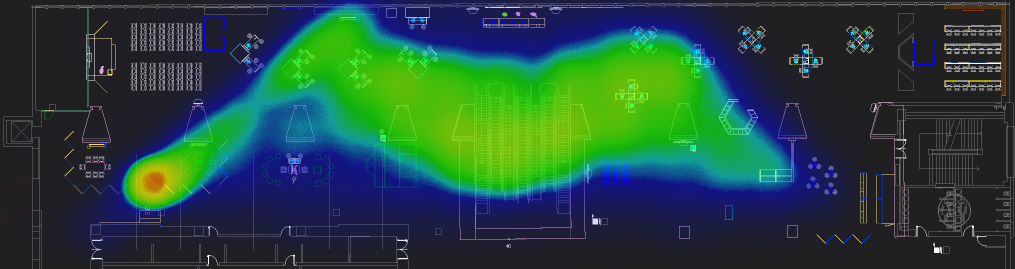
In the next picture below (Analytics -> Heatmap) you can see that there is a bright spot right about where the registration desk was located. From there, you can see that the heat runs up, right and then across the center. Some of the edges did not get all that much traffic – by comparison. Imagine what you could do if you had this information about the traffic in your business!
Without even going to the code, we have been able to get some good information. But, what if you wanted more? What if you wanted information about a particular person right now so you could send them a coupon for items right at their location? With CMX, all of the information in these pictures is also available via the API.
The Code
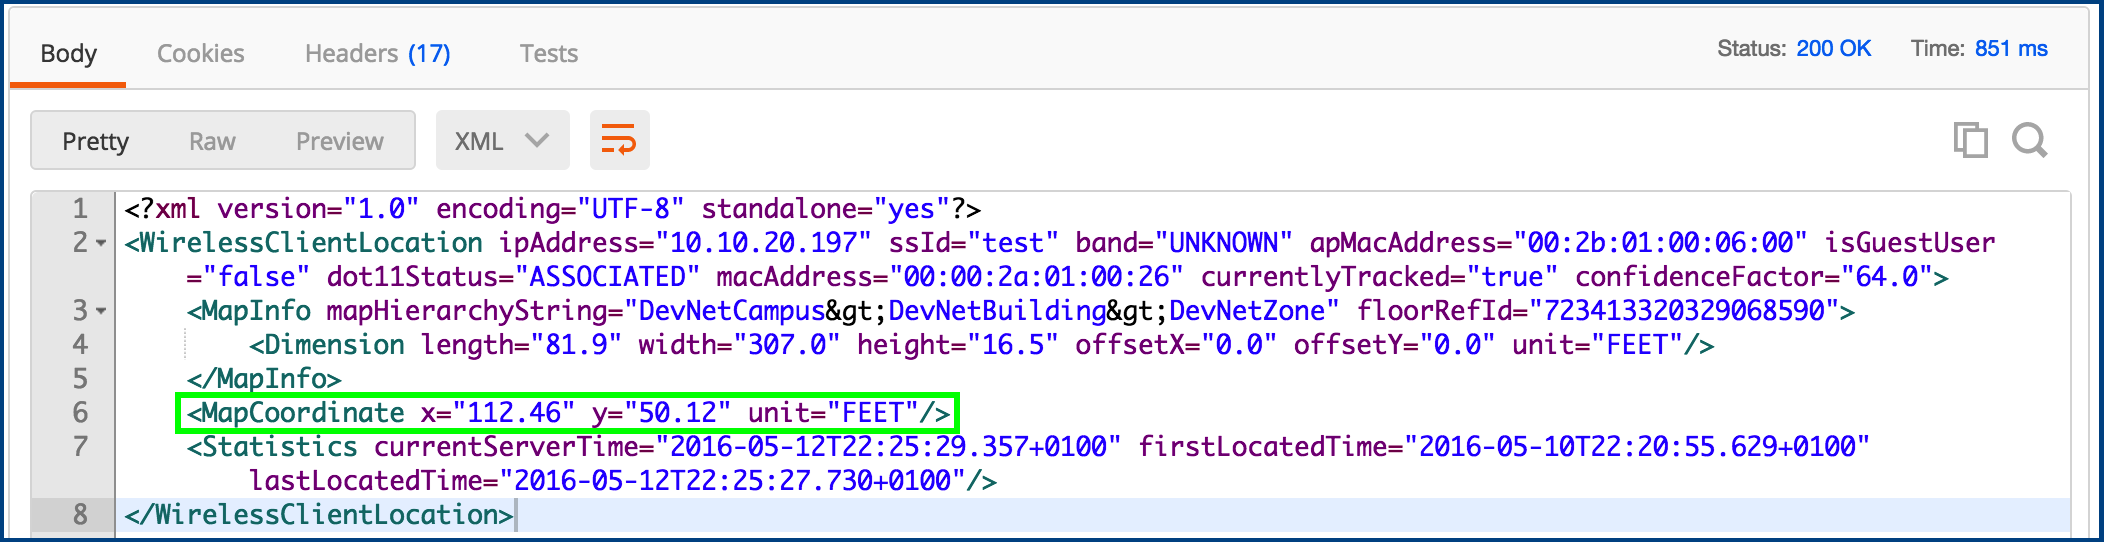
Let’s look at some actual code. Here’s an example of what you can do with the CMX API, which is easy because CMX has a REST API. The code, to get the X-Y coordinates of a client (by mac address):
https://msesandbox.cisco.com/api/contextaware/v1/location/clients/00:00:2a:01:00:26
It looks like this inside Postman:

That line of code would return the JSON payload below. The X-Y location is outlined in green:
For more fun with Location Services
If you haven’t already clicked on one of the links above, check out Cisco DevNet. We’re really hoping these blogs on digitizing your business with technology are useful. Let us know what you think.
Please, give us a rating right below this blog. We really want your input!
Thanks for reading,
@coggerin, @matfarre
