
Turn on suggestions
Auto-suggest helps you quickly narrow down your search results by suggesting possible matches as you type.
Showing results for
- Cisco Community
- Technology and Support
- DevNet Hub
- DevNet Networking
- Networking Blogs
- Network Automation with Plug and Play (PnP) – Part 2
7660
Views
14
Helpful
6
Comments
Options
- Subscribe to RSS Feed
- Mark as New
- Mark as Read
- Bookmark
- Subscribe
- Printer Friendly Page
- Report Inappropriate Content
06-21-2016
06:57 AM
Continuing the story
The first blogNetwork Automation with Plug and Play (PnP) – Part 1 in this series gave an overview of network Plug and Play and how it could be used on APIC-EM. This blog goes into the details required to automate the following steps:
- Automatic creation of Configuration files
- Automated uploading of configuration files to the controller
- Automated project creation
- Automated rule creation
The sample scripts used here are all available from this Github repository
For the purposes of clarity and learning, the steps will be covered individually in isolation. Each step will build on the previous one. For production use these steps could be combined, this will be covered in part 3 of the series.
Automatic Creation of Configuration Files
A jinja2 template is used to aid the generation of configuration files. The config_template.jnj file you can see there are two variables: "hostname" and "ipAddress". The variables correspond to columns in the inventory.csv file. You can have as many variables as you like.
hostname {{hostName|lower}}
enable password cisco123
!
username cisco password 0 cisco123
no aaa new-model
int vlan 1
ip address {{ipAddress}} 255.255.255.0
!
end
It is critical to have "end" as the last statement in the file.
Here is an example of running this script. The output files are stored in the "work_files/configs" directory. Notice that a suffix has been added to the filenames to make them unique. As the example scripts are using a sandboxapic in the cloud, multiple people can be running the scripts at a time. This suffix should be unique, so you do not clash with other users. In production you would not do this.
$ ./build_templates.py
{'platformId': 'WS-C2960X-48FPD-L', 'hostName': 'sw01', 'ipAddress': '10.10.10.101', 'site': 'Sydney', 'serialNumber': '12345678901'}
wrote file: work_files/configs/sw01-config-6130
{'platformId': 'WS-C2960X-48FPD-L', 'hostName': 'sw02', 'ipAddress': '10.10.10.102', 'site': 'Sydney', 'serialNumber': '22345678901'}
wrote file: work_files/configs/sw02-config-6130
{'platformId': 'WS-C2960X-48FPD-L', 'hostName': 'sw03', 'ipAddress': '10.10.10.103', 'site': 'Melbourne', 'serialNumber': '32345678901'}
Automated File Upload
Now the configuration files have been created, steps #2, #3, #4 require APIs on APIC-EM.
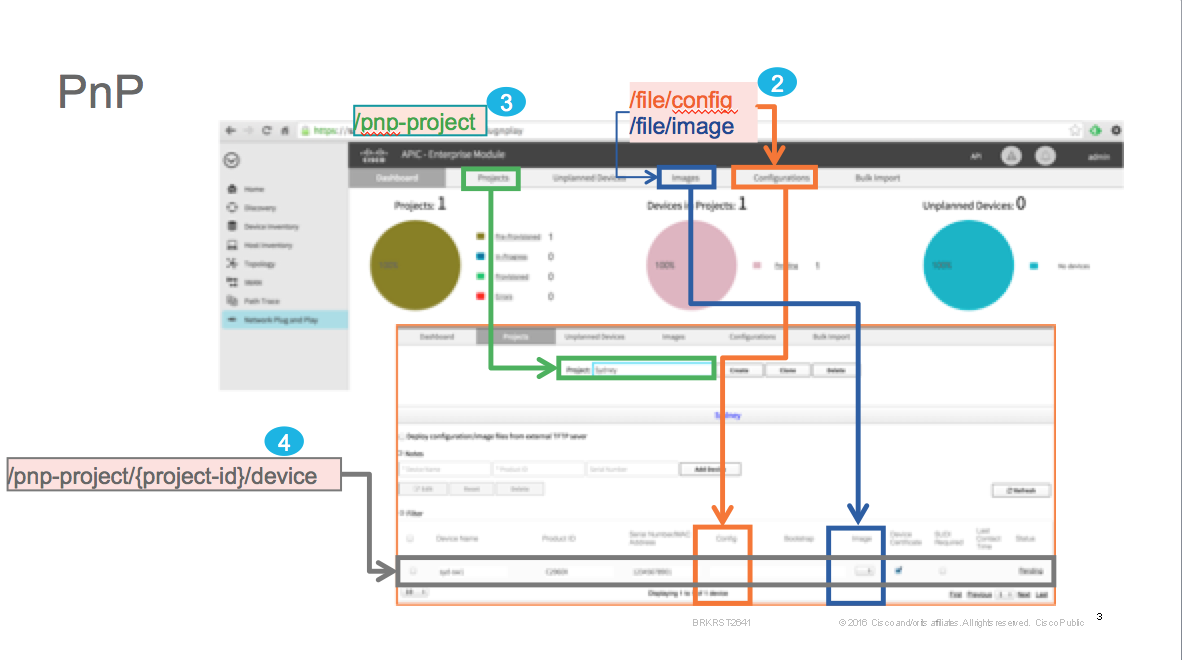
- File upload uses the /file/config API for configuration files
- Project creation uses the /pnp-project API
- Device Rule creation uses the /pnp-project/{project-id}/device API
The next step is to upload the configuration files to the controller. Unlike other API on APIC-EM, the file API are synchronous. They return a response straight away. Each file has a "id" associated with it. The "id" is used to refer to the file later on when it is assigned in a rule.
As mentioned earlier, filenames need to be unique. To achieve this a user specific suffix has been appended.
The URL for the file upload REST API contains a "nameSpace" (either "config" or "image"). A nameSpace differentiates configuration files from image files. In this example it is the "config" nameSpace which indicates a configuration file.
https://sandboxapic.cisco.com/api/v1/file/config
This is also reflected in the response to the POST with the "namespace" attribute. Image files have a namespace of "image"
$ ./upload_file.py -a
POST https://sandboxapic.cisco.com/api/v1/file/config
{
"downloadPath": "/file/d300a372-ce55-4b02-9aac-b49e9c0d6e20",
"name": "sw01-config-6130",
"sha1Checksum": "7262d0f18380878b1b71898aff364c57cdb9e5fe",
"nameSpace": "config",
"id": "d300a372-ce55-4b02-9aac-b49e9c0d6e20",
"fileSize": "136",
"fileFormat": "text/plain",
"md5Checksum": "d5d193eaeaa6d7a928215b6068d6d6dc"
}
POST https://sandboxapic.cisco.com/api/v1/file/config
{
"downloadPath": "/file/da101d17-0dfd-47e1-bbe0-ad707d1e89de",
"name": "sw02-config-6130",
"sha1Checksum": "656aee9f5fe7b0c6d70e97a8821eb1c01e6ea92f",
"nameSpace": "config",
"id": "da101d17-0dfd-47e1-bbe0-ad707d1e89de",
"fileSize": "136",
"fileFormat": "text/plain",
"md5Checksum": "e69890b5a6c6089d4bceae786e03c2ce"
}
POST https://sandboxapic.cisco.com/api/v1/file/config
{
"downloadPath": "/file/707a0f31-3190-4ff5-bedf-b800040105e4",
"name": "sw03-config-6130",
"sha1Checksum": "63ea1eb2ff210290a5718c90ca7deb946f97c8bd",
"nameSpace": "config",
"id": "707a0f31-3190-4ff5-bedf-b800040105e4",
"fileSize": "136",
"fileFormat": "text/plain",
"md5Checksum": "45295dff681e114a611f3162d813428b"
}
Automated Project Creation
The next step is to create some projects (like folders on your laptop) to contain rules.
Project creation, like most API calls is asynchronous. You have to poll a task to find out if the creation succeeded or not.
Again, there is a UUID ("id") associated with each project. This is in the
progress": "{\"message\":\"Success creating new site\",\"siteId\":\"946eede2-57cc-4833-85ce-c6069cbc9c63\"}", message.
In this case the UUID is 946eede2-57cc-4833-85ce-c6069cbc9c63.
$ ./create_project.py -a
POST URL https://sandboxapic.cisco.com/api/v1/pnp-project
Creating project Melbourne-6130
Waiting for Task 723289e0-564f-44b6-9b1b-1eb4bd31f2d0
{
"rootId": "723289e0-564f-44b6-9b1b-1eb4bd31f2d0",
"serviceType": "Ztd Service",
"id": "723289e0-564f-44b6-9b1b-1eb4bd31f2d0",
"version": 1466503447818,
"startTime": 1466503447818,
"progress": "{\"message\":\"Success creating new site\",\"siteId\":\"946eede2-57cc-4833-85ce-c6069cbc9c63\"}",
"endTime": 1466503447826,
"isError": false
}
POST URL https://sandboxapic.cisco.com/api/v1/pnp-project
Creating project Sydney-6130
Waiting for Task 393a72cc-ceb5-489b-94fb-e4c0af5e96f4
{
"rootId": "393a72cc-ceb5-489b-94fb-e4c0af5e96f4",
"serviceType": "Ztd Service",
"id": "393a72cc-ceb5-489b-94fb-e4c0af5e96f4",
"version": 1466503452082,
"startTime": 1466503452082,
"progress": "{\"message\":\"Success creating new site\",\"siteId\":\"60556ce0-8f79-402f-9343-d899a7059908\"}",
"endTime": 1466503452091,
"isError": false
}
Automated Rule Creation
The final step is to create rules for the devices. The information for rules comes from the inventory.csv file. The "serialNumber", "platformId" and "site" are mandatory attributes in a rule.
hostName,serialNumber,platformId,site,ipAddress
sw01,12345678901,WS-C2960X-48FPD-L,Sydney,10.10.10.101
sw02,22345678901,WS-C2960X-48FPD-L,Sydney,10.10.10.102
sw03,32345678901,WS-C2960X-48FPD-L,Melbourne,10.10.10.103
The configuration we created earlier will also be added to this rule. Software image files could optionally be treated in a similar way.
Instead of
"configId": "d300a372-ce55-4b02-9aac-b49e9c0d6e20"
A different attribute (and obviously different file UUID) is required for a IOS software image file.:
"imageId": "a320a776-3455-4452-332e-b4939c678520"
This step is slightly more complex as there are API calls to lookup the UUID for projectname and filename. In a production implementation you would integrate the steps together for simplicity.
The URL contains the project UUID (60556ce0-8f79-402f-9343-d899a7059908), and the POST body contains the configuration file UUID (d300a372-ce55-4b02-9aac-b49e9c0d6e20)
POST URL https://sandboxapic.cisco.com/api/v1/pnp-project/60556ce0-8f79-402f-9343-d899a7059908/device
[
{
"platformId": "WS-C2960X-48FPD-L",
"hostName": "sw01",
"serialNumber": "12345676130",
"configId": "d300a372-ce55-4b02-9aac-b49e9c0d6e20",
"pkiEnabled": true
}
The complete output appears below.
$ ./create_rule.py -a
Getting https://sandboxapic.cisco.com/api/v1/file/namespace/config
GET: https://sandboxapic.cisco.com/api/v1/pnp-project?siteName=Sydney-6130&offset=1&limit=10
POST URL https://sandboxapic.cisco.com/api/v1/pnp-project/60556ce0-8f79-402f-9343-d899a7059908/device
[
{
"platformId": "WS-C2960X-48FPD-L",
"hostName": "sw01",
"serialNumber": "12345676130",
"configId": "d300a372-ce55-4b02-9aac-b49e9c0d6e20",
"pkiEnabled": true
}
]
Waiting for Task b1e1df09-c28d-4edc-b95f-308e61565e76
{
"rootId": "b1e1df09-c28d-4edc-b95f-308e61565e76",
"serviceType": "Ztd Service",
"id": "b1e1df09-c28d-4edc-b95f-308e61565e76",
"version": 1466503537827,
"startTime": 1466503537827,
"progress": "{\"message\":\"Success creating new site device(rule)\",\"ruleId\":\"72e675d2-d2c5-4a68-8904-8128f3080aba\"}",
"endTime": 1466503537868,
"isError": false
}
GET: https://sandboxapic.cisco.com/api/v1/pnp-project?siteName=Sydney-6130&offset=1&limit=10
POST URL https://sandboxapic.cisco.com/api/v1/pnp-project/60556ce0-8f79-402f-9343-d899a7059908/device
[
{
"platformId": "WS-C2960X-48FPD-L",
"hostName": "sw02",
"serialNumber": "22345676130",
"configId": "da101d17-0dfd-47e1-bbe0-ad707d1e89de",
"pkiEnabled": true
}
]
Waiting for Task 6fd48cb1-2b5b-46cd-a0c8-ab8681ab6ea9
{
"rootId": "6fd48cb1-2b5b-46cd-a0c8-ab8681ab6ea9",
"serviceType": "Ztd Service",
"id": "6fd48cb1-2b5b-46cd-a0c8-ab8681ab6ea9",
"version": 1466503542128,
"startTime": 1466503542128,
"progress": "{\"message\":\"Success creating new site device(rule)\",\"ruleId\":\"90a52c4b-911c-4ab4-b53c-b4f1dc0a91f8\"}",
"endTime": 1466503542168,
"isError": false
}
GET: https://sandboxapic.cisco.com/api/v1/pnp-project?siteName=Melbourne-6130&offset=1&limit=10
POST URL https://sandboxapic.cisco.com/api/v1/pnp-project/946eede2-57cc-4833-85ce-c6069cbc9c63/device
[
{
"platformId": "WS-C2960X-48FPD-L",
"hostName": "sw03",
"serialNumber": "32345676130",
"configId": "707a0f31-3190-4ff5-bedf-b800040105e4",
"pkiEnabled": true
}
]
Waiting for Task 267f024e-20f4-4ba8-917f-131c5c91f97e
{
"rootId": "267f024e-20f4-4ba8-917f-131c5c91f97e",
"serviceType": "Ztd Service",
"id": "267f024e-20f4-4ba8-917f-131c5c91f97e",
"version": 1466503546730,
"startTime": 1466503546730,
"progress": "{\"message\":\"Success creating new site device(rule)\",\"ruleId\":\"a86c6247-4f39-4db9-b256-3017c856034e\"}",
"endTime": 1466503546789,
"isError": false
}
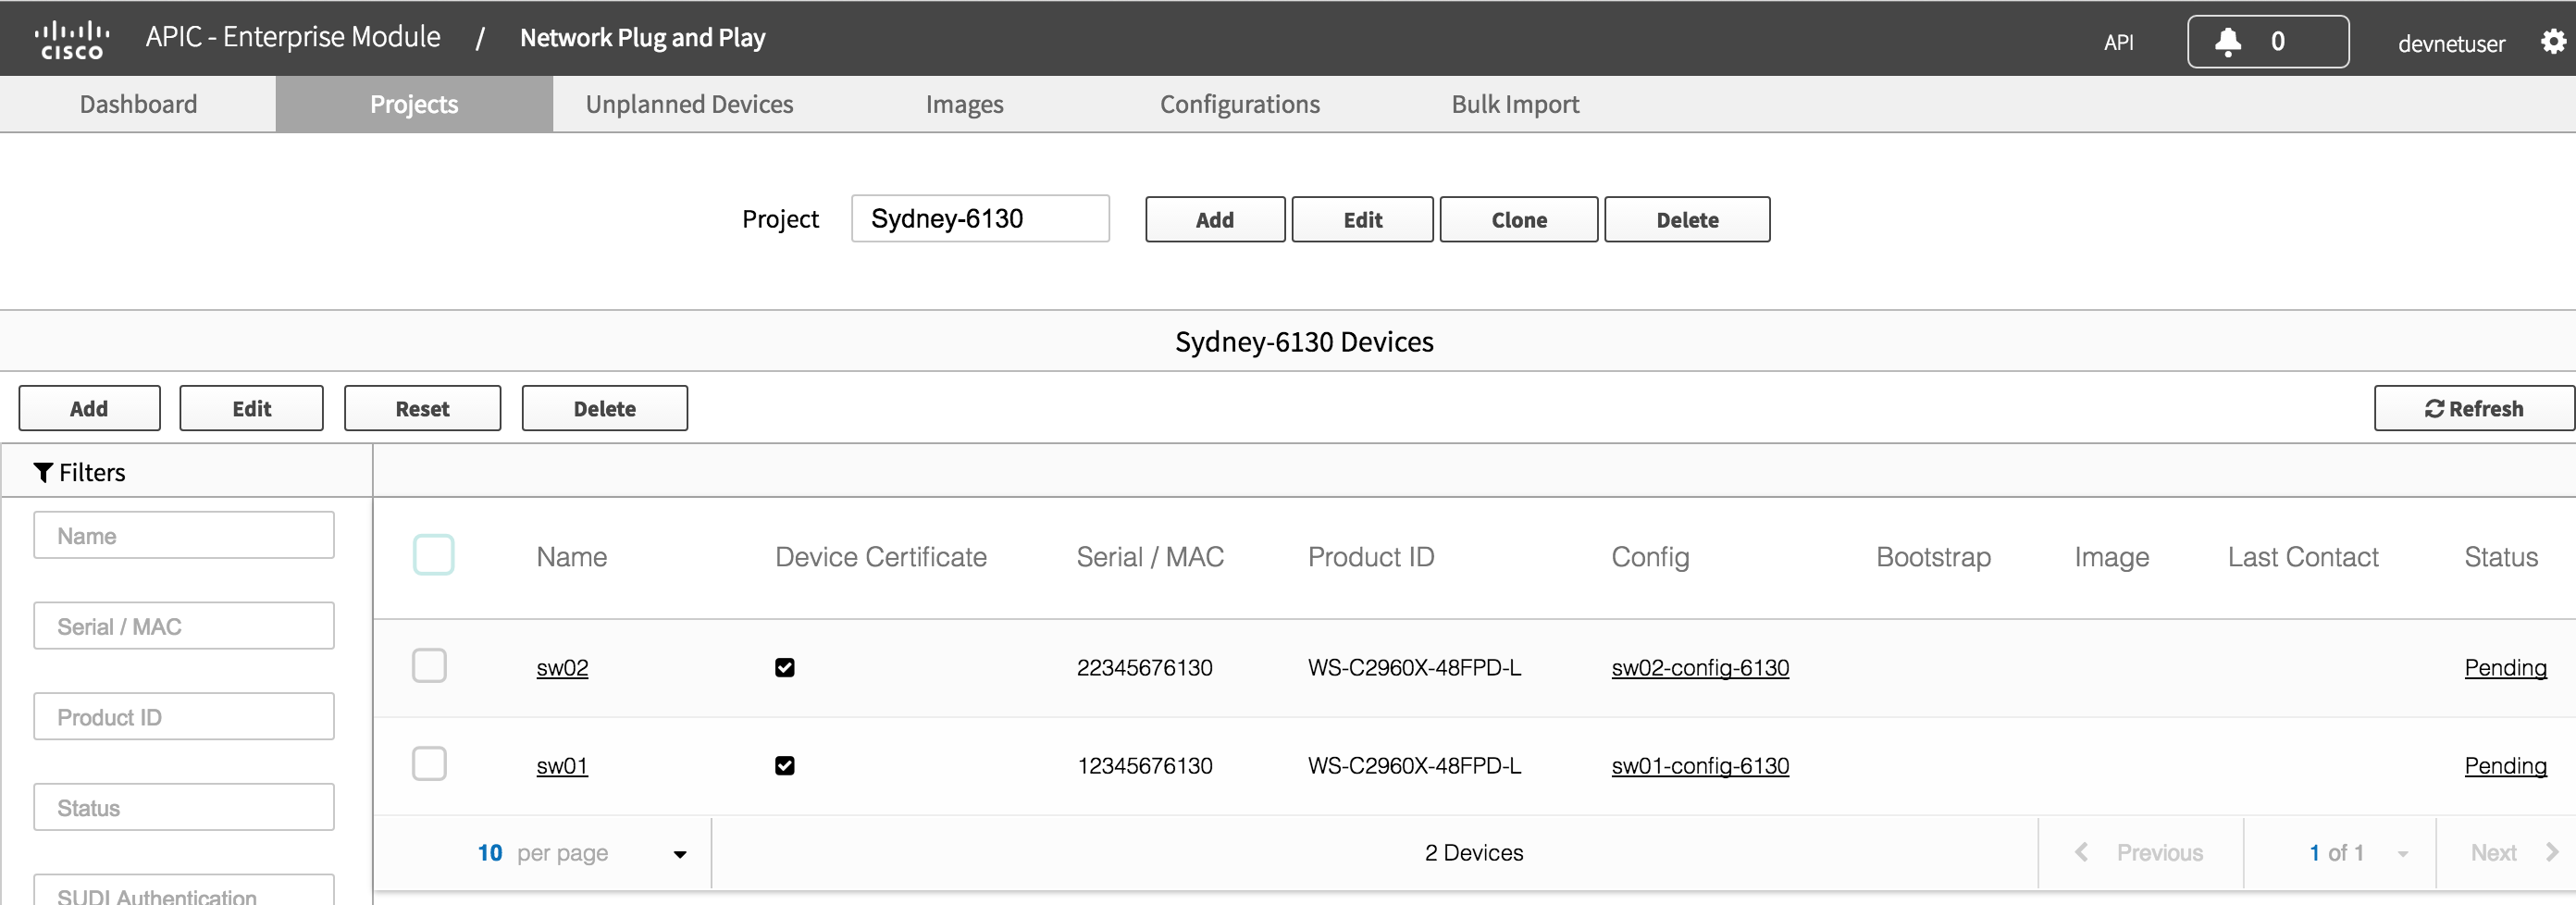
Here is a screenshot of APIC-EM PnP app showing the rules in the project Sydney-6130
What Next?
This blog shows how the PnP steps can be automated for greater efficiency. The next blog Network Automation with Plug and Play (PnP) – Part 3 will look at some more advanced topics such as embedded EEM scripts in the day zero configurations, using a client library (uniq) to make the code more efficient and integrating all of the components into a single tool.
In the meantime, if you would like to learn more about this, you could visit Cisco Devnet. DevNet has further explanations about this. In addition, we have a Github repository where you can get examples related to PnP.
Thanks for reading
Labels:
6 Comments
You must be a registered user to add a comment. If you've already registered, sign in. Otherwise, register and sign in.
Getting Started
Find answers to your questions by entering keywords or phrases in the Search bar above. New here? Use these resources to familiarize yourself with the community:
Customers Also Viewed These Support Documents