This blog has the steps to stack DevStack Newton on CentOS-7 in VirtualBox on Mac laptop.
Below are the versions used.
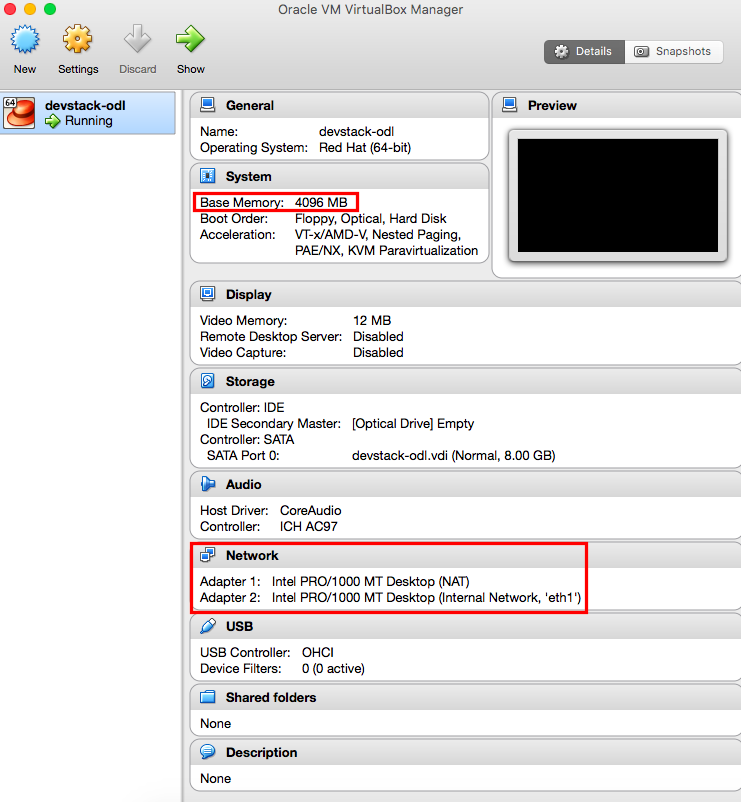
VirtualBox is installed on Mac laptop and the CentOS-7 VM is created in VirtualBox.
In VirtualBox, the CentOS-7-x86_64-Minimal-1511.iso image is used to boot a CentOS-7 VM with 4 GB RAM and the following two network adapters. A host-only adapter is not needed.
- eth0 as a NAT adapter
- eth1 as an internal network adapter
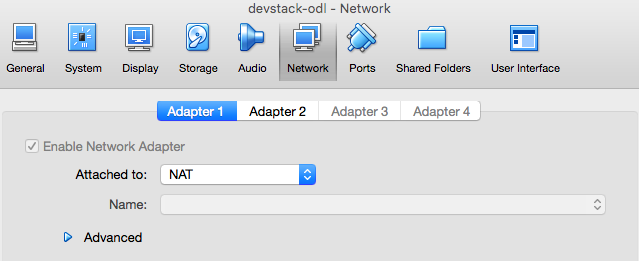
eth0 is a NAT adapter.
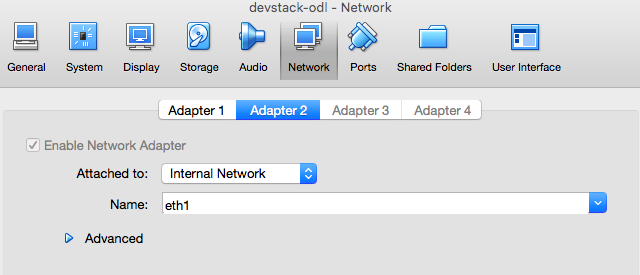
eth1 is an internal network adapter.
Run the following bash script to configure VirtualBox. It will forward the required TCP ports from the host (Mac laptop) to the guest (CentOS-7 VM) and will also create eth1 as an internal network adapter.
#!/bin/bash
# Forward TCP port 3022 on host to TCP port 22 on guest VM so
# that host can SSH into guest VM
if ! VBoxManage showvminfo devstack-odl | grep 3022 > /dev/null
then
    VBoxManage modifyvm devstack-odl --natpf1 "SSH,TCP,,3022,,22"
fi
# Forward TCP port 8080 on host to TCP port 80 on guest VM so
# that host can access OpenStack Horizon in browser
if ! VBoxManage showvminfo devstack-odl | grep 8080 > /dev/null
then
    VBoxManage modifyvm devstack-odl --natpf1 "HTTP,TCP,,8080,,80"
fi
# Forward TCP port 6080 on host to TCP port 6080 on guest VM so
# that host can access Nova VNC console in browser
if ! VBoxManage showvminfo devstack-odl | grep 6080 > /dev/null
then
    VBoxManage modifyvm devstack-odl --natpf1 "CONSOLE,TCP,,6080,,6080"
fi
# Add internal network adapter for guest VM
if ! VBoxManage showvminfo devstack-odl | grep eth1 > /dev/null
then
    VBoxManage modifyvm devstack-odl --nic2 intnet
    VBoxManage modifyvm devstack-odl --intnet2 "eth1"
fi
# Remove stale entry in ~/.ssh/known_hosts on host
if [ -f ~/.ssh/known_hosts ]; then
    sed -i '' '/\[127.0.0.1\]:3022/d' ~/.ssh/known_hosts
fi
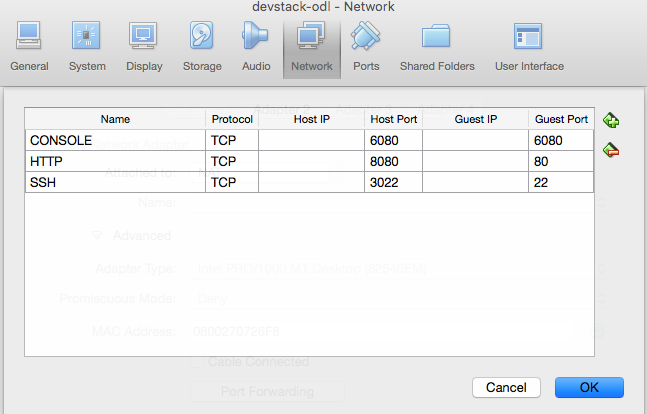
Below are the forwarded ports through eth0 (NAT interface) in VirtualBox. Host is the Mac laptop and the guest VM is CentOS-7 booted in VirtualBox.
- TCP port 3022 on host is forwarded to TCP port 22 on guest VM so that host can SSH into guest VM.
- TCP port 8080 on host is forwarded to TCP port 80 on guest VM so that host can access OpenStack Horizon in browser.
- TCP port 6080 on host is forwarded to TCP port 6080 on guest VM so that host can access Nova VNC console in browser.
Below is the screenshot of the forwarded ports through eth0 (NAT interface) in VirtualBox.

Now, boot the CentOS-7 VM in VirtualBox. Choose "VDI" as the disk format for the VM.
When booting the CentOS-7 VM in VirtualBox, press the Tab key and type the following kernel boot options. This keeps the interface names as eth0 and eth1 in the CentOS-7 VM instead of enp0s*.
net.ifnames=0 biosdevname=0
Once the CentOS-7 VM boots, login into it and check the interfaces ("ip a" or "ifconfig"). eth0 will have an IP address like 10.0.2.15 and eth1 will not have any IP address. Check the default gateway ("ip route"). 10.0.2.2 will be the default gateway. Make sure that you can ping a public DNS name like www.google.com and www.cisco.com.
Below are the output snippets of "ip a" and "ip route" inside the CentOS-7 VM.
$ ip a
2: eth0: <BROADCAST,MULTICAST,UP,LOWER_UP> mtu 1500 qdisc pfifo_fast state UP qlen 1000
inet 10.0.2.15/24 brd 10.0.2.255 scope global dynamic eth0
3: eth1: <BROADCAST,MULTICAST,UP,LOWER_UP> mtu 1500 qdisc pfifo_fast state UP qlen 1000
link/ether 08:00:27:60:77:7e brd ff:ff:ff:ff:ff:ff
$ ip route
default via 10.0.2.2 dev eth0 proto static metric 100
10.0.2.0/24 dev eth0 proto kernel scope link src 10.0.2.15 metric 100
192.168.122.0/24 dev virbr0 proto kernel scope link src 192.168.122.1
From the Mac laptop, SSH into the CentOS-7 VM using the forwarded port 3022. Use the root password to login.
ssh -p 3022 root@127.0.0.1
Clone the DevStack Newton repository.
git clone https://git.openstack.org/openstack-dev/devstack -b stable/newton
Create stack user for DevStack. Alternatively, you can use useradd and passwd to create a new stack user, and give sudo access to the stack user by typing visudo, adding "stack ALL=(ALL) ALL" under "root ALL=(ALL) ALL", and saving the file.
cd devstack
./tools/create-stack-user.sh
su stack
whoami
echo $HOME
cd
pwd
exit
exit
Copy the local.conf file below to the devstack directory. It has the OpenStack core services (Horizon, Keystone, Nova, Neutron, Glance, RabbitMQ and MySQL) enabled. It uses OpenvSwitch (OVS) as the virtual switch and VLAN for tenant networks. Remove "OFFLINE=True" below in local.conf if you are deploying DevStack for the very first time as it prevents DevStack from pulling the required OpenStack repos and configuration files.
[[local|localrc]]
OFFLINE=True
HORIZON_BRANCH=stable/newton
KEYSTONE_BRANCH=stable/newton
NOVA_BRANCH=stable/newton
NEUTRON_BRANCH=stable/newton
GLANCE_BRANCH=stable/newton

ADMIN_PASSWORD=nomoresecret
DATABASE_PASSWORD=stackdb
RABBIT_PASSWORD=stackqueue
SERVICE_PASSWORD=$ADMIN_PASSWORD
LOGDIR=$DEST/logs
LOGFILE=$DEST/logs/stack.sh.log
LOGDAYS=2

ENABLED_SERVICES=rabbit,mysql,key
ENABLED_SERVICES+=,n-api,n-crt,n-obj,n-cpu,n-cond,n-sch,n-novnc,n-cauth
ENABLED_SERVICES+=,g-api,g-reg
ENABLED_SERVICES+=,horizon

# Neutron
DISABLED_SERVICES=n-net
ENABLED_SERVICES+=,q-svc,q-agt,q-dhcp,q-l3,q-meta,q-metering,neutron
PUBLIC_INTERFACE=eth0
Q_PLUGIN=ml2
ENABLE_TENANT_VLANS=True
Now, exit and SSH back in as the stack user into the CentOS-7 VM.
ssh -p 3022 stack@127.0.0.1
Run stack.sh and stack DevStack Newton.
./stack.sh
Below is the output of stack.sh once it finishes.
This is your host IP address: 10.0.2.15
This is your host IPv6 address: ::1
Horizon is now available at http://10.0.2.15/dashboard
Keystone is serving at http://10.0.2.15/identity/
The default users are: admin and demo
The password: nomoresecret
Add security group rules to the "default" security group in order to SSH into and ping nova VMs. This can be done in Horizon as well.
cd devstack
source openrc
openstack security group rule create --protocol tcp --dst-port 22 default
openstack security group rule create --protocol icmp --dst-port -1 default
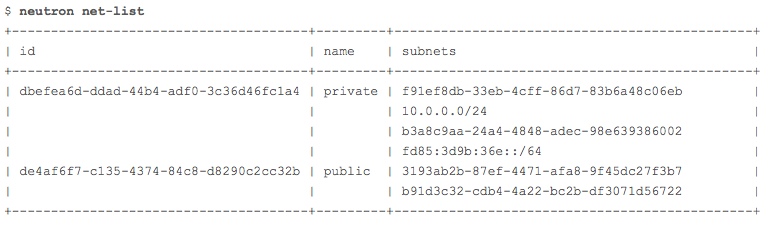
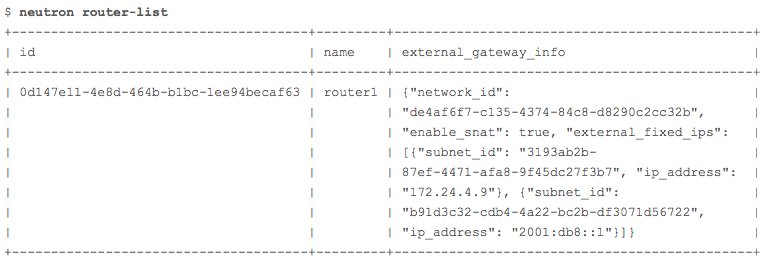
Check the two neutron networks and the neutron router created by DevStack.
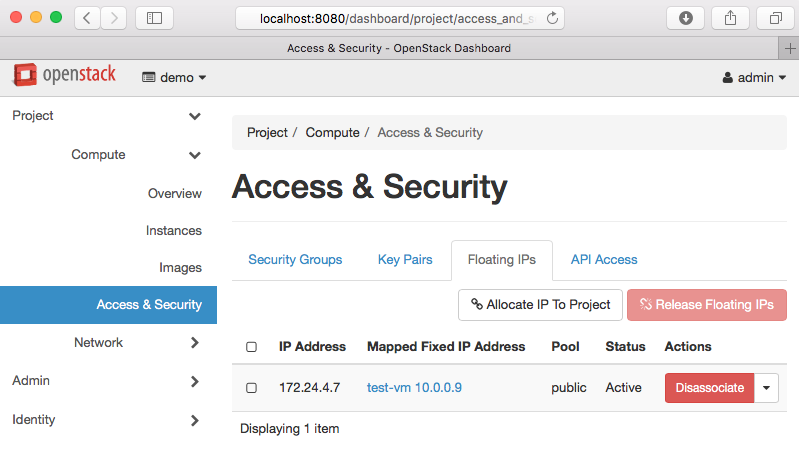
On the Mac laptop, enter http://localhost:8080 in a browser to access the Horizon GUI. Login as admin and use nomoresecret as the password. After logging into Horizon, in the upper left, select "demo" as the project.
Boot a nova VM (test-vm) using cirros image, m1.tiny flavor, and attach it to the private network. Also, create a floating IP in the public network and associate it to the nova VM. We can now SSH into the nova VM using the floating IP!
ssh cirros@172.24.4.7
password: cubswin:)
$ ip a
1: lo: <LOOPBACK,UP,LOWER_UP> mtu 16436 qdisc noqueue
link/loopback 00:00:00:00:00:00 brd 00:00:00:00:00:00
inet 127.0.0.1/8 scope host lo
inet6 ::1/128 scope host
valid_lft forever preferred_lft forever
2: eth0: <BROADCAST,MULTICAST,UP,LOWER_UP> mtu 1450 qdisc pfifo_fast qlen 1000
link/ether fa:16:3e:28:05:85 brd ff:ff:ff:ff:ff:ff
inet 10.0.0.9/24 brd 10.0.0.255 scope global eth0
inet6 fdc7:3411:13c6:0:f816:3eff:fe28:585/64 scope global dynamic
valid_lft 86375sec preferred_lft 14375sec
inet6 fe80::f816:3eff:fe28:585/64 scope link
valid_lft forever preferred_lft forever
172.24.4.7 above is the floating IP in the public network associated to test-vm and 10.0.0.9 is the private IP address of test-vm.
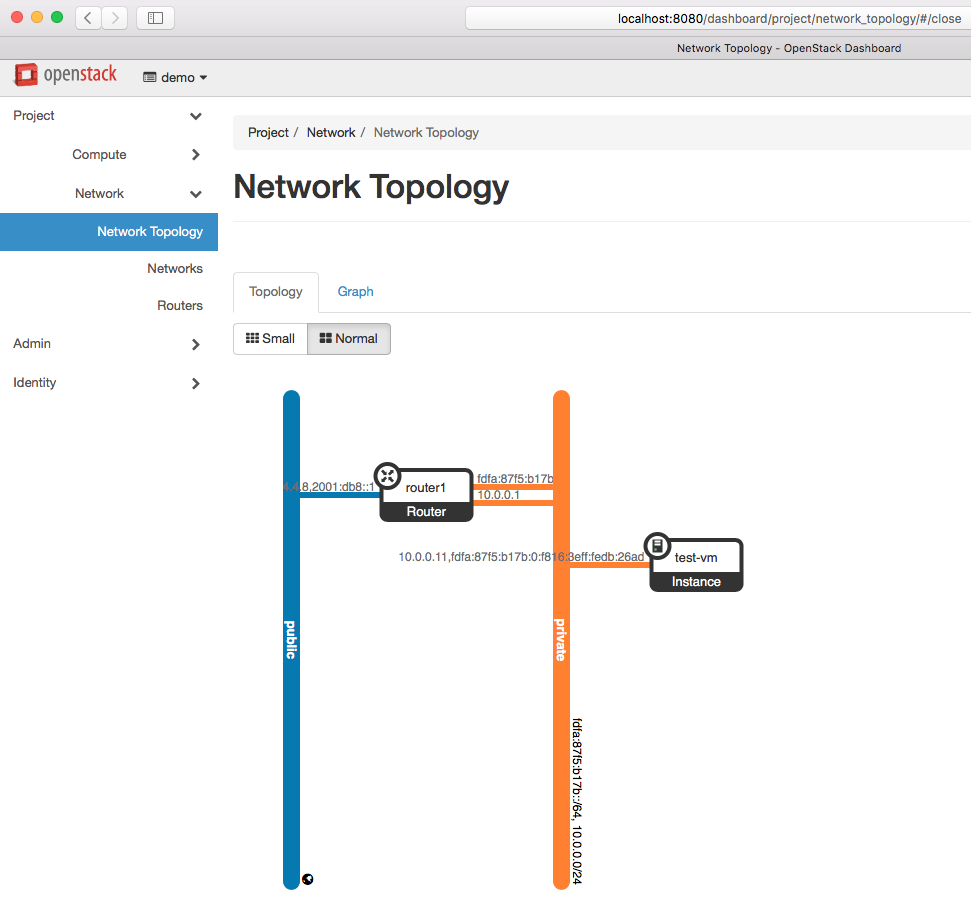
Below is the network topology of the nova VM test-vm attached to the private network. DevStack creates the public network, private network and the neutron router router1 that connects them.
In Horizon, go to Project --> Compute --> Instances --> test-vm --> Console and right click on the link "Click here to show only console" and click on "Open Link in New Tab".

Now, change the IP address in the new tab's web address from 10.0.2.15 to localhost as VirtualBox redirects TCP port 6080 from the host (Mac laptop) to the guest (CentOS-7 VM). Now, the nova VM's console can be accessed in Horizon!

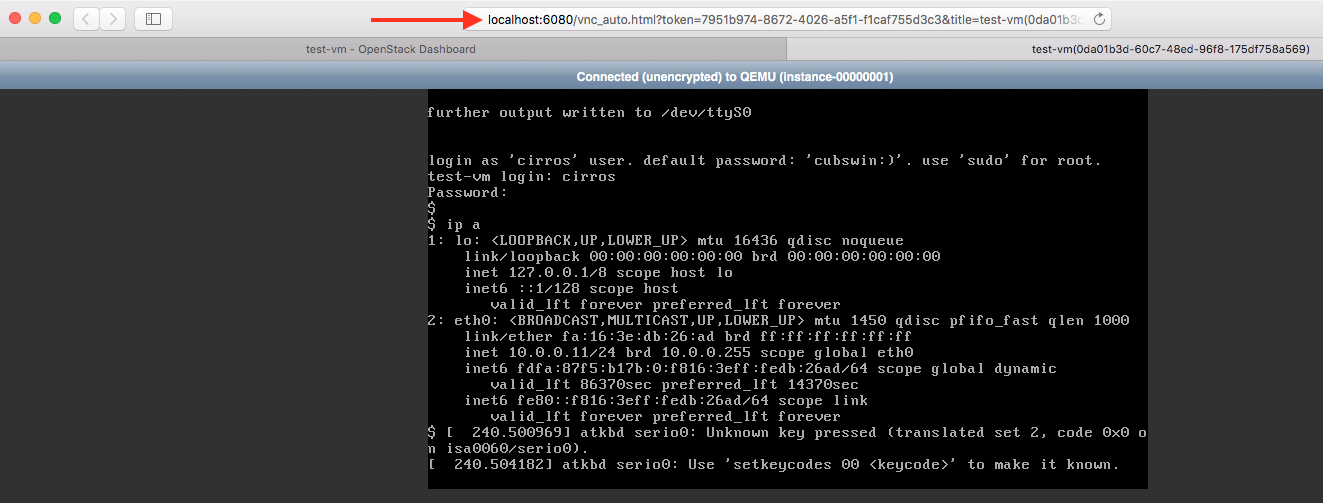
If a Cirros image is used to boot the nova VM, use the default credentials below to login into the console.
username: cirros
password: cubswin:)
In the CentOS-7 VM, the devstack logs will be /opt/stack/logs. Run ./unstack.sh to unstack Devstack.
The VirtualBox VDI file will be at /Users/<userID>/VirtualBox\ VMs/ on the Mac laptop. This VDI file is portable and can be re-used to boot the CentOS-7 VM in VirtualBox on any machine.
Hope this blog is helpful!
