OpenStack cinder provides block storage for nova instances. Cinder volumes are great to store files in a nova instance permanently. Without cinder volume, the data/files in a nova instance are ephemeral (temporary) and will be lost once the instance in deleted. Sometimes, we may need to save the data/files in an instance permanently even after the instance in deleted. Cinder volumes can also be used to share files among multiple instances in OpenStack.
This blog has the steps to:
- Create a cinder volume (using ceph backend)
- Attach this volume to a nova instance
- Check the attached volume in the instance
- Create an XFS filesystem/partition on this attached volume in the instance
- Mount the partitioned volume in the instance
- Write data into this mounted volume in the instance
- Unmount, detach the volume and make sure that data in the volume still exists even after the instance in deleted
1. Create a cinder volume (using ceph backend):
Here are few links about integrating OpenStack cinder with ceph backend.
Block Devices and OpenStack — Ceph Documentation
http://superuser.openstack.org/articles/ceph-as-storage-for-openstack/
In Horizon, Go to Project --> Compute --> Volumes --> Volumes --> Create Volume and enter all the info and click "Create Volume".

Make sure that the created volume is in "Available" state.

Create a nova instance in Horizon. Hope you know the steps for this  If not, please contact me at vhosakot@cisco.com
  .
.
Make sure that the instance is in "Active" state, can be pinged, and SSH'ed into with the right security groups (allow ICMP and SSH).
2. Attach this volume to a nova instance:
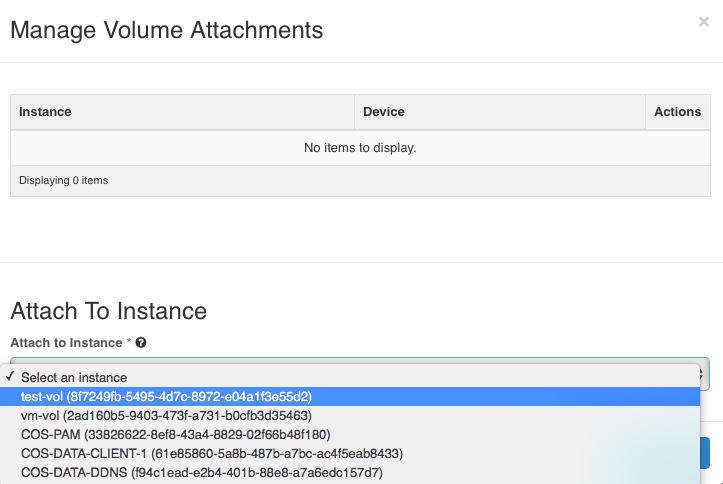
Go to Project --> Compute --> Volumes --> Volumes --> <Name of the volume> --> Edit Volume --> Manage Attachments.

Select the name of the instance in the "Attach to Instance" drop-down and click "Attach Volume".
Make sure that the volume is in "In-use" state and note the path to which the volume is attached in the "Attached To" column. Also, check the "Size" column and make sure that it is right.

3. Check the attached volume in the instance:
SSH into the instance and run the following commands.
Check the volume at /dev/vdb and make sure that it is fine.
$ lsblk
NAME   MAJ:MIN RM SIZE RO TYPE MOUNTPOINT
vda    253:0    0  40G  0 disk
|---vda1 253:1    0  40G  0 part /
vdb    253:16   0  20G  0 disk

$ sudo parted /dev/vdb 'print'
Error: /dev/vdb: unrecognised disk label
Model: Virtio Block Device (virtblk)
Disk /dev/vdb: 21.5GB
Sector size (logical/physical): 512B/512B
Partition Table: unknown
Disk Flags:

$ df -h /dev/vdb
Filesystem      Size  Used Avail Use% Mounted on
devtmpfs        1.9G     0  1.9G   0% /dev

$ ls -l /dev/vdb
brw-rw----. 1 root disk 253, 16 Jun 29 05:25 /dev/vdb

$ file /dev/vdb
/dev/vdb: block special
This attached volume is new and a raw block device without any filesystem. Hence, this attached volume must be partitioned and mounted before the instance can write data into the volume. The filesystem/partition should be created only the first time a new volume is attached to an instance, and NOT every time the volume is re-attached to an instance. Creating the filesystem will erase all the data in the volume. So, create the filesystem/partition only if you want to erase all the data in the attached volume.
4. Create an XFS filesystem/partition on this attached volume in the instance:
More information is at:
16.3. Accessing a Volume from a Running Instance
Deployment Guide — swift 2.12.1.dev28 documentation
$ sudo mkfs.xfs -f /dev/vdb
meta-data=/dev/vdb               isize=256    agcount=4, agsize=1310720 blks
         =                       sectsz=512   attr=2, projid32bit=1
         =                       crc=0        finobt=0
data     =                       bsize=4096   blocks=5242880, imaxpct=25
         =                       sunit=0      swidth=0 blks
naming   =version 2              bsize=4096   ascii-ci=0 ftype=0
log      =internal log           bsize=4096   blocks=2560, version=2
         =                       sectsz=512   sunit=0 blks, lazy-count=1
realtime =none                   extsz=4096   blocks=0, rtextents=0
Replace "xfs" above with "ext4" if an ext4 file system/partition is needed.
Check the partitioned XFS filesystem:
$ sudo parted /dev/vdb 'print'
Model: Virtio Block Device (virtblk)
Disk /dev/vdb: 21.5GB
Sector size (logical/physical): 512B/512B
Partition Table: loop
Disk Flags:
Number  Start  End     Size    File system  Flags
1      0.00B  21.5GB  21.5GB  xfs
5. Mount the partitioned volume in the instance:
Mount the volume at /dev/vdb to /mnt/volume.
$ sudo mkdir -p /mnt/volume

$ sudo mount /dev/vdb /mnt/volume
Make sure that the volume is correctly mounted and the mounted partition's size (20 GB in this case) and file system (XFS) are correct.
$ lsblk
NAME MAJ:MIN RM SIZE RO TYPE MOUNTPOINT
vda 253:0 0 40G 0 disk
|---vda1 253:1 0 40G 0 part /
vdb 253:16 0 20G 0 disk /mnt/volume
$ sudo parted /dev/vdb 'print'
Model: Virtio Block Device (virtblk)
Disk /dev/vdb: 21.5GB
Sector size (logical/physical): 512B/512B
Partition Table: loop
Disk Flags:
Number Start End Size File system Flags
1 0.00B 21.5GB 21.5GB xfs
$ df -h /dev/vdb
Filesystem Size Used Avail Use% Mounted on
/dev/vdb 20G 33M 20G 1% /mnt/volume
$ xfs_info /dev/vdb
meta-data=/dev/vdb isize=256 agcount=4, agsize=1310720 blks
= sectsz=512 attr=2, projid32bit=1
= crc=0 finobt=0
data = bsize=4096 blocks=5242880, imaxpct=25
= sunit=0 swidth=0 blks
naming =version 2 bsize=4096 ascii-ci=0 ftype=0
log =internal bsize=4096 blocks=2560, version=2
= sectsz=512 sunit=0 blks, lazy-count=1
realtime =none extsz=4096 blocks=0, rtextents=0
Now that the attached volume is partitioned and mounted, the instance can write data into the volume!
6. Write data into this mounted volume in the instance:
Write data (two files test_file_on_volume and large_file.txt) into the mounted volume at /mnt/volume in the instance!
$ cd /mnt/volume

$ df -h .
Filesystem      Size  Used Avail Use% Mounted on
/dev/vdb         20G   33M   20G   1% /mnt/volume

$ ls

$ echo 'test test' | sudo tee test_file_on_volume
test test

$ ls -lrt
total 4
-rw-r--r--. 1 root root 10 Jun 29 05:42 test_file_on_volume

$ cat test_file_on_volume
test test

$ sudo dd if=/dev/urandom of=large_file.txt bs=102400 count=100
100+0 records in
100+0 records out
10240000 bytes (10 MB) copied, 0.773203 s, 13.2 MB/s

$ ls -lrt
total 10004
-rw-r--r--. 1 root root       10 Jun 29 05:42 test_file_on_volume
-rw-r--r--. 1 root root 10240000 Jun 29 05:42 large_file.txt
These two files test_file_on_volume and large_file.txt will be transferred from the compute node (on which the instance is scheduled) into the ceph nodes and also replicated on all the ceph nodes over the network. These files should exist even after deleting the instance .
NOTE: Data written/read in the attached volume travels on the network. Hence, the network (NICs) must be fast in order to scale. I found that configuring jumbo frames (with MTU 9000 bytes) in OpenStack improves performance when a lot of data is quickly written by the instance into ceph. Please refer Jumbo Mumbo in OpenStack using Cisco's UCS servers and Nexus 9000 for steps to configure jumbo frames (with MTU 9000 bytes) in OpenStack.
7. Unmount, detach the volume and make sure that data in the volume still exists even after the instance in deleted:
Unmount the volume in the instance:
$ sudo umount /mnt/volume

$ lsblk
NAME   MAJ:MIN RM SIZE RO TYPE MOUNTPOINT
vda    253:0    0  40G  0 disk
|---vda1 253:1    0  40G  0 part /
vdb    253:16   0  20G  0 disk

$ df /dev/vdb
Filesystem     1K-blocks  Used Available Use% Mounted on
devtmpfs         1922568     0   1922568   0% /dev
Detach the volume from the instance:
Go to Project --> Compute --> Volumes --> Volumes --> <Name of the volume> --> Edit Volume --> Manage Attachments.
Select the instance and click "Detach volume" --> "Detach Volume".
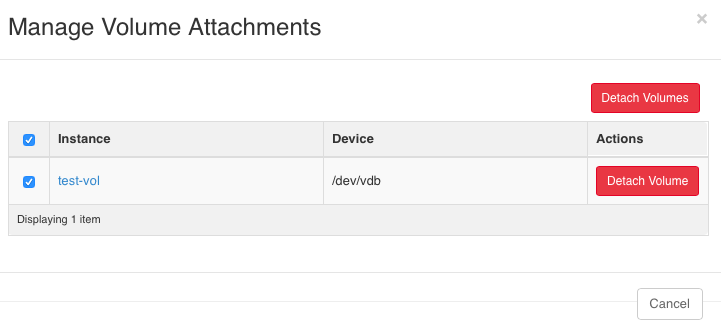
Make sure that the "Attached to" column is empty.

How to make sure that the data/files in the volume still exists even after the instance in deleted:
- Attach this volume to a nova instance (step 2 above)
- Check the attached volume in the instance (step 3 above)
- DO NOT create the XFS filesystem/partition again (step 4 above). The filesystem/partition should be created only the first time a new volume is attached to an instance, and NOT when the volume is re-attached to an instance. Creating the filesystem will erase all the data in the volume. So, create the filesystem/partition only if you want to erase all the data in the attached volume.
- Mount the partitioned volume in the instance (step 5 above)
- Read/write data in this mounted volume in the instance (step 6 above)
- Unmount and detach the volume from the instance (step 7 above)
Re-attach and mount the volume (steps 2 and 3 above) to the same/different instance and the files test_file_on_volume and large_file.txt will still be seen at /mnt/volume in the instance:
$ ls /mnt/volume
test_file_on_volume  large_file.txt
NOTE: Always unmount and detach the attached volume before deleting/terminating the instance.
To attach a cinder volume to an instance using cinder and nova CLIs, please refer OpenStack Docs: Launch an instance from a volume.
Hope this blog is helpful!
