Turn on suggestions
Auto-suggest helps you quickly narrow down your search results by suggesting possible matches as you type.
Showing results for
- Cisco Community
- Technology and Support
- DevNet Hub
- DevNet Collaboration
- Collaboration Blogs
- Building a Spark Automated Translator Without Writing Code
1570
Views
15
Helpful
0
Comments
Options
- Subscribe to RSS Feed
- Mark as New
- Mark as Read
- Bookmark
- Subscribe
- Printer Friendly Page
- Report Inappropriate Content
01-29-2016
02:49 PM
This is a guest post from Fred Nielsen. Nielsen is a long time convergence and collaboration architect working for ePlus, focused on delivering solutions that mesh seamlessly with customers' existing business environments. ePlus is actively developing solutions that integrate the innovate functionality provided by the Spark platform into existing business processes and technology. Contact Nielsen through Twitter at @fredless or by email at fnielsen@eplus.com
For those of us who have been working with Cisco’s collaboration product offerings for any significant period of time, the emergence of the Cisco Spark product within the portfolio represented something of a brave new world. Spark extended the reach of a powerful offering into new territory, and showcased Cisco’s distinctly cloud-first posture in bringing additional capabilities to market.
Cisco took us several steps further into this bright new future last December with their preview release of a new web API allowing anyone with a Spark account to weave their tools and solutions into the Cisco Spark platform. Rather than an off-the-shelf product that those of us who are consultants or partners could install and configure within our end-customers’ environments, the API gives us powerful building blocks to go out and create our own unique new solutions. These solutions can be very deeply embedded into existing workflows, or be used to create a completely standalone solution with unique new capabilities. Being in a position to create solutions from the ground up is something of a new challenge for many of us – including myself. I wrote this article to demonstrate how simple it is to get started leveraging these new capabilities, and how one simple idea can be implemented into a powerful use case.
As I started exploring the various functions documented here, I could immediately see what types of things the API allowed me to do. I began to have lots of ideas, but wasn’t sure I had the necessary skillset needed to implement them. Along the way I had heard a little about Cisco’s partnership with several iPaaS providers; including IFTTT, Zapier and Built.io’s Flow product – so began fiddling with the capabilities those offered next. Each are unique, but all feature simple interfaces that allow users to quickly create Spark test apps. What these products also have in common is that they make it simple to interconnect different apps – a message in your Office 365 mailbox can be used as a trigger to take some sort of action in Cisco Spark for example. More lightbulbs went off and I was on my way. What follows is an overview of one of those lightbulbs that I was able to implement in about 15 minutes – without a single line of code.
Anyone who has watched a few episodes of Star Trek has no doubt seen a crew member employ the Universal Translator – a magical device which somehow translates any language, known or unknown, into perfect Starfleet English. I’m a fan of the free browser based translation tools we have at our disposal today – but they offer a mostly manual solution to an old problem. I had the idea: what about a function that could monitor a Spark room, and if it detected a foreign language message, simply translate it? The obvious use case: allow participants with differing language fluencies to communicate more effectively.
After looking around at different translation providers offering web service APIs, I eventually found that Microsoft Translator could do what I needed with an OAuth token and single simple HTTP GET request, for example:

Translator attempts to automatically detect the source language and simply outputs back translated text in requested language as XML like so:

Now, how could I implement my idea into a workable solution? Zapier and IFTTT are both hard to beat tools for quickly building action\reaction workflows, but I needed to a few more steps and some conditional logic in my process to accomplish want I had in mind. This type of situation is where Built.io’s Flow shines. Flow offers a GUI interface in which multiple “Activities” can be connected together, with output from one activity feeding into subsequent steps. You can specify sophisticated conditional logic and incorporate just about anything you might need into your workflow.
I quickly assembled a new flow and dragged in the following Activities from the toolbar, connecting them together:

- Check the message sender – very important. For any process that is going to post content back to the room that triggered it, keep in mind this will in itself generate another trigger from Spark. You will want to implement a condition that prevents your process from acting on messages it creates – otherwise you may create an infinite loop condition. In Flow one way you can do this is by hovering over a connection and adjusting its settings. Here we modify the first connection to ensure that the personEmail provided by Spark in the triggering event does not match my process’s user. Something else we see here: Flow makes it easy to reference parameters provided by a received HTTP request, regardless of whether they were passed via URL parameters or inside something like a JSON string (which is how Spark happens to do it):

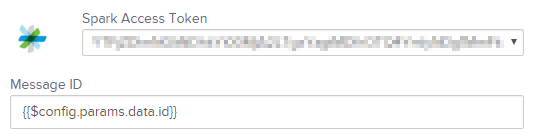
- Get the content of the message – as explained by the Spark webhook documentation, for security reasons the webhook HTTP POST from Spark does not actually contain any message content, only information about the message and a unique ID referencing the message itself. If your process needs to see what the message says, you need to use the received ID to go and retrieve the message contents. Flow includes a built-in Cisco Spark Get Message activity, making this easy to accomplish. Note the first time you build a flow with a Cisco Spark Activity you will need to “add” a Connection between Flow and Spark using your API authorization token, which can be obtained from the examples given on this website very easily:
- Get a token to use with Microsoft’s web services – Microsoft requires that a unique token be provided to associate requests to the Translation service against your account. This is clearly explained in their documentation, and was easy to build into my workflow using the “HTTP Request” activity in Flow:

- Request a translation – now that we’ve got the message text from Spark, and an OAuth token from Microsoft; it’s time to ask for our text to be translated. For that we’re using another HTTP Request activity. This time, take a look at the pane on the right – Flow makes it easy to incorporate outputs from previous activities as variables in new activities. In this case {{$a1.text}} [see A] is the body of the HTTP result we got when we asked Microsoft for a new token, and {{$a0.text}} [see B] represents the text of the message retrieved from Spark. The response from Microsoft happens to contain other information besides the token itself, but also follows standard JSON syntax - and since Flow has strong support for JavaScript throughout we can grab only the token very easily by specifying {{$a1.text.access_token}}:

- Convert XML to JSON – as mentioned above, the response from the Microsoft Translator API is XML formatted. As we saw in prior steps Flow can easily reference strings within JSON objects, but referencing values buried in XML strings doesn’t work in quite the same way. Flow offers two approaches: write some code OR use the handy XML to JSON Activity. This Activity takes in an XML string and spits out a JSON formatted object, turning the XML response we saw above into something like this:

- Check the translation result – here we implement one more Condition to see if we need to post a translation to the room. The way Microsoft’s Translator works: if it determines no translation is needed, then it returns back the same text as was input, if a translation was performed then it returns back a modified result instead. So if the result matches the original message, we shouldn’t do anything else - otherwise move on to the next step:

- Post translated text to the room – our final Activity will be the built-in Post New Message function, which creates a new message in the originating Spark room - based on everything we now know this is very straightforward:

After enabling the flow to accept webhooks in the Flow UI, and creating a new webhook event using Spark’s API, here is our end result:

Success! Now this is only a simple example, there is certainly more that could and should be done before we could call this production ready. Some of which might even involve some minor coding, but Built.io’s product offers lots more options than I’ve shown here. You can even construct your own Node.js code snippets and drop them anywhere into your process to tackle some of the hard stuff. It’s a surprisingly effective solution that sits squarely in between more simplistic drag-drop offers and custom web service development – bringing some of the best of both together.
I hope this opens your perspective on how very easy it is to get started developing applications with the Spark API, even for a non-developer. Come up with an idea and try it to work it out for yourself with the many tools we now have at our disposal. Everything I leveraged above is available free of charge for development. Most of Microsoft’s web APIs are free to use within certain monthly limits, and Built.io and Zapier both offer time-limited trial accounts allowing you to kick the tires. Hopefully we will see some of those vendors also introduce partner developer programs to make it even easier for us to continue learning, leveraging and advocating these types of solutions to our own end-customers in the future.
Labels:
You must be a registered user to add a comment. If you've already registered, sign in. Otherwise, register and sign in.
Getting Started
Find answers to your questions by entering keywords or phrases in the Search bar above. New here? Use these resources to familiarize yourself with the community:

Customers Also Viewed These Support Documents