- Cisco Community
- Technology and Support
- Security
- Security Knowledge Base
- How to Migrate ACS 5.x to ISE 2.x
- Subscribe to RSS Feed
- Mark as New
- Mark as Read
- Bookmark
- Subscribe
- Printer Friendly Page
- Report Inappropriate Content
- Subscribe to RSS Feed
- Mark as New
- Mark as Read
- Bookmark
- Subscribe
- Printer Friendly Page
- Report Inappropriate Content
on
02-18-2016
03:32 PM
- edited on
03-28-2019
09:26 AM
by
thomas
![]()
This is meant to understand all the aspects migration and also to guide you through different steps in the migration project for you and your customers. For complete information on ACS to ISE migration, top of the mind questions, quick answers to comparisons, video tutorials, demos, please view

Author: Krishnan Thiruvengadam
Table of Contents
- Introduction
- Background
- Planning Your Migration
- ACS vs ISE Feature Comparison
- ACS vs ISE Underlying Differences
- Migration Paths
- Migration from 5.x to ACS 5.5/ 5.6/ 5.7/ 5. 8
- Migration from ACS 4.x to ACS 5.x
- Deployment Considerations
- ACS vs ISE Deployment Comparison
- TACACS+ Topology Design
- Device Administration Model
- Deployment Options
- PSN Scale
- Licensing
- ISE VM Sizing for Log Retention
- Log retention and sizing MnT hard disks
- What happens if my logging requirements exceeds the example?
- Prepare Your Migration
- Configuration Maps and Exceptions
- Network Resources
- Users and Identity Stores
- Policy Elements
- Access Policies
- Monitoring and Reporting
- System Administration
- Staging Environment for Migration
- Migration Tool Requirements
- Installation and configuration of the Migration Tool
- Supported/Unsupported Objects for Migration
- Preparation for Migration from Cisco Secure ACS, Release 5.5+
- Migration Process with Migration Tool
- Exporting ACS Configuration
- Policy Gap Analysis
- Network Devices and Network Device Groups
- Importing ACS Configuration
- Verifying Migration of Access Policies
- For RADIUS
- For TACACS
- Supporting Chatty Devices (TACACS+ single connect)
- Final Steps
- Appendix A: ACS vs ISE Deployment Limits
- Appendix B: TACACS+ Performance per ISE Deployment
- Dedicated TACACS+ Only Deployment
- Shared deployment (RADIUS + TACACS+):
- Appendix C: ISE VM Sizing and Log retention
- TACACS+ guidance for size of syslogs:
- TACACS+ transactions, logs and storage
- TACACS+ log retention (# of days):
- Scripted device admin model
- Human admin – device admin using sample number of sessions and commands shown below.
- RADIUS Log retention (# of days)
- Appendix D: Unsupported Rule Elements
Introduction
This document provides partners, Cisco field engineers and TME’s with a guide to plan ACS to ISE migration. This document will also have procedure for migrating from Cisco Secure Access Control System (ACS) to Identity Services Engine (ISE) software. ISE 2.1 and above supports migration from ACS 5.5/ 5.6/ 5.7/ 5.8. ISE 2.0 supports migration from ACS 5.5 or ACS 5.6 only. ACS from prior versions need to be upgraded to these versions before migrating over to ISE 2.x.
This document will have 3 broad sections for performing ACS to ISE migration.
-
Planning your migration
-
Prepare your migration
-
Migration process
Planning your migration section covers the feature comparison and underlying differences between ACS vs ISE features. It provides options for topology design, device administration models to help scale PSN’s. It provides step by step guide to plan out your hardware capacity keeping the IT Audit needs for logs retention while migrating to new ISE environment.
Prepare your Migration section includes best practices and steps for operational tasks to prepare for your migration. This includes configuration maps that points to location of functional configuration in ACS and ISE calling in exceptions during migration of ACS to ISE with ways to fix issues. It also discusses on creating a staging environment for migration and preparing the tool/setup for migration.
Migration process is the core section that will cover the migration process and provides step by step procedure to export configuration, fix policy gaps and import configuration to ISE iteratively till the migration is successful.
Background
Cisco Secure Access Control System (ACS) is a centralized identity and access policy solution that ties together an enterprise's network access policy and identity strategy. Cisco Secure ACS operates as a RADIUS and TACACS+ server, combining user authentication, user and administrator device access control, and policy control in a centralized identity networking solution.
Cisco ISE is a consolidated policy-based access control system that incorporates a superset of features available in existing Cisco policy platforms. Cisco ISE performs the following functions:
- Consolidates the network access functionality of ACS and ties together profiling and posture compliance.
- On-boarding mobile device using secure BYOD (Bring your own device) flows.
- Provides for comprehensive guest access management for Cisco ISE administrators.
- Enforces endpoint compliance with comprehensive client provisioning.
- Discovery, profiling, policy-based placement, and monitoring of endpoint devices on the network
- Employs advanced enforcement capabilities with TrustSec using Secure Group Tags(SGT’s)
- Facilitates TACACS-enabled device administration through its Work Center. The Work Center menu contains a work flow for TACACS+ configuration, which acts as a single start point for ISE administrators.
Planning Your Migration
This section will give you information on the basic, top of the mind questions related to migration that includes ISE vs ACS feature comparison and underlying differences, migration paths to migrate from different versions of ACS, Deployment differences between ACS to ISE. It will also help you design with the best topology for your environment keeping in mind your current ACS deployment, device administration model and log retention needs of your IT environment.
ACS vs ISE Feature Comparison
The full feature comparison of ACS 5.x and ISE 2.x can be found in ACS vs ISE Comparison. ISE 2.0 has a full TACACS+ protocol implementation and feature sets have only few differences from ACS. ISE 2.1+ supports ACS parity items including scalability.
For TACACS+, ISE 2.x has a Device Administration Work Center that provides a nice work flow for the administrator to configure the device administration functionality. Migration Tool can be downloaded directly from work center to your Windows machine to perform migration between ACS and ISE. ISE provides robust reporting capability of TACACS + authentication, authorization, accounting and command accounting. ISE 2.3 included additional set of reports to complete the functionality on par with ACS.
ISE 2.3 included IPv6 support for TACACS+ and support for IP ranges in all IPv4 octets.
Policy Sets in ISE vs Access Service + Service Selection Policy in ACS:
ISE 2.x has a rule based policy model like ACS 5.x versions. ISE 2.x supports policy sets. Each policy set that has an entrance criteria for filtering incoming requests to apply to the corresponding Authentication and Authorization policies.
In ACS, access services lets you create a service policy structure based on service type (RADIUS/ TACACS+/external proxy) to create an Identity/Authorization policy. A Service Selection Policy provides a criteria to select the right access services. An access service is selected based on conditions where single or multiple Service Selection Rules can use the same service.
In ISE, you must enable Policy Sets on ISE UI from Administration ➡ System Settings ➡ Policy Settings to make them available on the Policy menu for RADIUS.
ACS vs ISE Underlying Differences
Both ACS 5.5+ and ISE 2.x have functionally similar policy engines, however to ensure proper and error free migration, there are several things to make note of in the underlying differences between ACS and ISE. The following features do not relate specifically to the TACACS+ protocol but are used in deployment solutions.
- Naming constraints: ISE 2.1 does not allow many special character’s in its object entities. For example, semicolon “:”, dot “.” depending on the type of entity.
Note: ISE 2.1 and ISE 2.0 patch 2 supports “.”). ISE typically allows alpha numeric characters, “_” and “– “character in its objects. Some objects such as username and authorization profile might support more characters. When ACS objects has special characters, these objects will be renamed by the migration tool and imported to ISE . This is discussed in depth in the next chapter.
-
Custom Conditions or Aliases: it is implemented in ISE 2.0 as regular inline custom conditions.
-
Policy Format/Alias: Tabular form of policy tables and hit counts are supported in ISE 2.3
-
Unsupported rule elements: ISE does not support certain elements that are part of rule or condition. This includes Unsupported attributes used by the policy, Unsupported AND/OR condition structure (mainly, once complex conditions are configured) and Unsupported operators. For example, ACS supports a combination of AND and OR in its compound condition used in an authorization policy. ISE 2.0 through ISE 2.2 supports either AND or in its authorization conditions in an authorization policy. This may cause policies not to get migrated. ACS authorization policy needs to be analyzed, split and additional policies should be added in view of this. For complete list of unsupported rule elements please see Appendix D.
Note: Combination of AND and OR operators is supported in ISE 2.3.
Note: It is not necessary to have special entity to make ISE 2.0 traverse different identity stores and fetch information.
Migration Paths
ISE 2.0 supports migration from ACS 5.6 or ACS 5.5 versions only.
ISE 2.1+ supports migration from ACS 5.5 / 5.6 / 5.7 and ACS 5.8.
Migration from 5.x to ACS 5.5/ 5.6/ 5.7/ 5. 8
If customers are in prior version of ACS 5.x, you have to upgrade to ACS 5.5 and ACS 5.6 first before migrating to ISE 2.0. For migrating to ISE 2.1 your customer be in one of the last 4 releases of ACS (ACS 5.5/ 5.6/ 5.7 or 5.8).
If your customers interim goal is to upgrade to the latest ACS version due to the EOL considerations shown below then upgrade to ACS 5.8.
| Version | End of Sale | End of Life | End of Support(Vulnerability fix) |
|---|---|---|---|
| 5.8 | Aug 30, 2017 | Aug 30, 2018 | Aug 31, 2020 |
| 5.7 | May 2, 2016 | May 2, 2017 | May 31, 2019 |
| 5.6 | Feb 16, 2016 | Feb 15, 2017 | February 28, 2019 |
| 5.5 | April 15, 2015 | April 14, 2016 | April 30, 2018 |
| 4.2 | October 27, 2011 | October 26, 2012 | October 31, 2014 |
| 3.3 | August 29, 2006 | August 29, 2007 | August 28, 2009 |
Please follow the link for detailed procedure for migrating to ACS 5.8. Here are the upgrade paths for the ACS 5.x versions. The versions that support migration to ISE is in black letters as shown below, rest in blue.
-
ACS 5.0ACS 5.2 ACS 5.4 ACS 5.6ACS 5.7 or ACS 5.8
-
ACS 5.1 ACS 5.3 ACS 5.5 ACS 5.6 or ACS 5.7 or ACS 5.8
-
ACS 5.2 ACS 5.4 ACS 5.6 ACS 5.7 or ACS 5.8
-
ACS 5.3 ACS 5.5 ACS 5.6 or ACS 5.7 or ACS 5.8
-
ACS 5.4 ACS 5.6 ACS 5.7 or ACS 5.8
Migration from ACS 4.x to ACS 5.x
ACS 4.x is an older version and cannot migrate to ISE directly. You must first upgrade from ACS 4.x to either ACS 5.5 or ACS 5.6 before migrating to ISE 2.0.
ACS 5.x has a significantly different architecture than ACS 4.x. The migration might not carry over a lot of configuration automatically. You might have to manually carry over configuration or use import/export tools. Here are the links that speaks about what objects are supported/not supported during migration.
If you need to migrate from ACS 4.x, best approach is to start clean, install ISE and do manual configuration. You can also use import/export tools that is supported in ISE for user identities/group identities, network devices, network devices groups etc. You can also use REST API for populating configuration in ISE.
For customers to migrate to ACS 5.5 or ACS 5.6, they need to be in one of the ACS 4.x versions
-
ACS 4.1.1.24
-
ACS 4.1.4
-
ACS 4.2.0.124
-
ACS 4.2.1
Please look at the ACS 4.x to 5.x migration doc for more details on architecture and the choices for migration based on your configuration sets.
Deployment Considerations
ISE supports standalone deployment for smaller networks. For larger networks, ISE supports distributed deployment to support services including network access, profiling, BYOD, Guest, Posture Compliance and TrustSec. ISE 2.x supports TACACS+ service for providing device admin and audit control supporting 30k network device objects in ISE 2.0 and 100k network devices in ISE 2.1+ in a single deployment.
ACS vs ISE Deployment Comparison
ISE deployment is slightly different from ACS that has either primary or secondary instances in three functional roles Primary, Secondary or dedicated logging (Primary or Secondary). In ACS deployment, the primary and secondary are both active and take part in providing AAA services in a network. AAA client traffic is primarily distributed by the network devices across the ACS instances for balancing the load.
A Cisco ISE node is a dedicated appliance or Virtual Machine that supports different functional roles or personas such as Administration, Policy Service, Monitoring, and PxGrid. Details about the functional roles are described here. These functional roles can be combined or separated in dedicated nodes to optimize the distribution of endpoint connections based on geography, based on the type of services used etc. Each of the personas can be part of a standalone or in a distributed deployment.
Simple 2 Node Deployment – ACS vs ISE
In a simple 2 node ISE deployment with redundancy, ISE node can have an active/standby pair for Administration and active/active Monitoring personas. Policy services persona is also part of the same node for standalone deployment. Policy Service persona is the work horse of ISE providing network access, posture, BYOD, guest access, client provisioning, and profiling services. A two nodes deployment of ACS is shown below for comparison.


Figure 1. Basic 2 Node Setup ISE(Left), ACS (Right)
In ISE deployment, each persona can be a dedicated node with separate Administration, Monitoring and Policy Services nodes or a combination as shown in Figure 2 below. Policy Services Node provides AAA services including RADIUS services, TACACS services. Policy Services persona evaluates the policies and makes all the decisions in an ISE deployment. You can have more than one node assuming this persona.

Figure 2. Single ISE node with one more Personas
ACS vs ISE Distributed Deployment
ACS has a flatter deployment model for dispersing the ACS instances across the network. ACS deployment scalability works by including additional backup servers based on the performance and logging requirement. ACS deployment supports robust replication, full synchronization and incremental replication. As the number of ACS scales up for large deployment, a dedicated syslog server is recommended with a total deployment supporting 22 ACS instances.

Figure 3. ACS Distributed Deployment
Basic Distributed Deployment
In ISE, expanding the 2 node setup above to a basic distributed deployment, for a network that spans across geographies, business units you can add up to 5 dedicated PSN’s to the 2 node setup in Figure 4 as shown below. In this topology, you have two PAN/ MnT nodes as primary and secondary in a redundant setup in the same datacenter. This setup supports to a maximum of 20,000 endpoints across PSN’s across different geographies. This is similar to a small to medium sized deployment of with few instances of ACS as shown above in Figure 3 above.

Figure 4. Basic Distributed Deployment (ISE)
Fully Distributed Deployment
In a fully distributed deployment, the administration and monitoring personas are separated in different nodes with 2 Admin nodes and 2 MnT nodes. In a large network, the primary, secondary admin and monitoring nodes are dedicated nodes that can be in different datacenters as shown in Figure 5. below.

Figure 5. Fully Distributed Deployment
The full distributed topology requires datacenters to be connected with a high speed and low latency links. With ISE 2.1, a maximum of 50 PSN’s with 2 PAN and 2 MnT’s are supported with a maximum of 500,000 endpoints across PSN’s (250k endpoints for ISE 2.0). Policy services nodes in the same location can be part of a node group called cluster that will help with high availability in case of PSN failures. This can be useful for services such as profiling etc.
Appendix A provides comparison on the deployment limits of ACS vs ISE and can be used as a reference to determine to scale your deployment.
TACACS+ Topology Design
ISE topology design needs to account for the scalability needs of the customer. There are a few differences between ACS and ISE deployment scalability limits as in Appendix A .
When migrating ACS deployment to ISE, you need to comprehend the deployment considerations mentioned in the section above for one or both Network Access (RADIUS) and Device Administration (TACACS+) services. Whether you dedicate a separate node for TACACS+ is more of a security and operational policy decision. If separated in ACS deployment today, then continue doing so if that model serves you well.
Tip: If you wish to combine both TACACS+ Device Administration and RADIUS into same deployment, then dedicating nodes to TACACS+ service may be the best option for a large organization to prevent user services from impacting device admin services and vice versa.
Device Administration Model
The main question here is whether RADIUS and Device Admin (TACACS+) should co-exist in the same node or as independent nodes. Here is some general guidance that will help you answer the question:
-
For programmatic device admin model, recommend dedicated PSN nodes for Device Admin service.
-
For human device admin model where individual admin users manually login and manage network devices, consider the following example:
-
20 Device admins concurrent sessions @ 1 command/s = 40 TPS (command authorization + accounting record)
-
In this scenario, it would be acceptable to run Device Admin service on PSNs running other core endpoint services.
-
If you expect a much higher level of activity – much higher number of concurrent admins or transactions – then consider dedicating PSN.
Deployment Options
There are 3 ways you can deploy TACACS+/ RADIUS services with ISE simple or distributed deployment. These are dedicated deployment, dedicated PSN’s and Integrated deployment as described below. Each has its own pros and cons and use cases.
The illustration below will give further details on each of the above options:
| Dedicated Deployment | Dedicated PSNs | Integrated |
|---|---|---|
  |
 |
 |
|
Separate deployments for RADIUS and TACACS+. This includes a separate Administration Node (PAN) for managing policies, users/groups, network devices etc., a separate Monitoring Node (MnT) for managing TACACS+ logs and dedicated Policy Services Node for supporting TACACS+ or RADIUS service. |
The ISE Administration Node (PAN) and Monitoring Node (MNT) are shared for managing policies, policy elements, logging and other configuration for both TACACS+ and RADIUS. However you will still have a dedicated PSNs for addressing incoming TACACS+ or RADIUS requests and they are not shared. |
Shared Policy services node(PSN), admin (PAN) and Monitoring node (MnT) for TACACS+ and RADIUS. For medium/small sized companies where device administration and network access managed by same group. For Device admin model using only human admin users. Where seperation of Network access and Device admin users are not critical. |
|
Pros:
Cons:
|
Pros:
Cons:
|
Pros:
Cons:
|
To plan and run your ACS to ISE migration, you need to perform several steps. The document will guide you through these steps necessary based on the type of customer, deployment needs etc.
-
Choose the deployment model that fits your need based on the information in the section above.
-
Choose the type of deployment, 2 Node Dedicated vs Simple or fully distributed deployment based on the Deployment considerations
PSN Scale
Once a suitable deployment method is chosen,
- For TACACS+ only, to determine the number of PSN’s for scripted device administration model as discussed above, you can replace each ACS authentication server with an ISE PSN node. This is a simple, fool proof approach.
- For Endpoint services(Secure access and other services using RADIUS, when determining number of PSN’s for a RADIUS deployment, please use ‘Maximum Concurrent Endpoints’ as the main guideline as discussed in Appendix B: Shared deployment (RADIUS + TACACS+):.
- If your ACS is oversubscribed use the Performance Metrics in the Appendix at the end of the doc.
From Appendix C: TACACS+ transactions, logs and storage , select the right Device Administration model to determine the transactions per second (TPS) for TACACS+ controls (Authentication, session authorization, accounting (or) Command accounting only (or) for everything) in your environment. Please pay attention to the peak TPS based on the model.
Then refer Appendix B and look at the table at the bottom to know the peak TPS supported across different appliance to choose the hardware needed for the PSN’s. Please remember to scale PSN’s considering redundancy, location/geography and other factors as outlined in in ACS vs ISE Distributed deployment section above.
Tip: Please pay attention to TACACS+ performance in Appendix B for dedicated and shared deployments which will be the key to determine the number of PSN’s. Remember that all other transactions happens once during the TACACS + session except for command authorization and accounting.
Licensing
When migrating from ACS deployment using a 35xx appliance/ legacy appliance or VM, use the ISE ordering guide for information about licensing. Go to ‘Migration appliance ordering information’ section for your specific needs.
TACACS+ functionality requires a perpetual license for the entire ISE deployment and does not have a migration license. You also need for a minimum number of Base license e.g.: Base license for 100 endpoints to access the UI functionality of TACACS+ and to turn on TACACS+ service.
To expand ISE deployment for more than TACACS+, please use the ordering guide mentioned above as reference. Please take a look at the ‘Cisco ISE migration Licenses’ and the ‘License consumption’ section in the ordering guide for more information.
ISE VM Sizing for Log Retention
Log size becomes an important factor to consider while designing the hardware and VM Hard disk sizing for the ISE MnT servers. This is especially for large enterprises where logging requirements might vary in your environment based on IT and audit policies of your network.
In ISE, monitoring persona (MnT) is responsible for collecting logs, generating reports and for troubleshooting ISE deployments. Based on the logging needs of an enterprise you can choose remote syslog servers for log storage.
For TACACS+ logging requirements, there are two use cases to consider based on device administration performed either by a human administrator or by an automated script/ robot. Logs are collected in the MnT and purged based on the log retention needs and hard disk size. Here is a sample log size calculation per day for these use cases:
- Use case 1: Human administrator managing devices: For e.g.: 50 Administrators opening 50 sessions per day with 10 commands/session; Log size per day = 50 * 50 * (5k +10*3k) = 87500KB = 85.4MB per day.
- Use case 2: Managing devices using scripted device administration: An automated script to run against 30K network devices. For e.g.: @ 4 times per day with 5 commands per session; Log size per day = (5K +5 * 3K) * 30000 * 4 = 2400000KB ~ 2.3GB per day.
Log retention and sizing MnT hard disks
Log retention should be calculated for both TACACS+ and RADIUS separately.
-
For TACACS+, start by calculating the logs generated by your network devices for TACACS+ based on the device administration model in your environment. Please use the examples in the use cases mentioned above as reference. Use Appendix C to determine the log size per day for TACACS+. For RADIUS, logs are based on number of authentication.
-
Now gather information on the log retention needs of your environment (based on your audit needs etc.). Go back and refer to log retention tables in Appendix C and determine the hard disk size of MnT. This is especially important when you are using an ISE virtual machine.
What happens if my logging requirements exceeds the example?
If amount of logs per day as in Use case 2 above exceeds 2.3GB also shown in Appendix C – steps should be taken to reduce the logs sent to MnT based on the following.
-
Revise and minimize duplicate incoming log traffic: To avoid duplication of entries in AAA logs are generated by automated scripts (For the same user name and/or originated form the same IP address) use MnT collection filters in ISE (From ISE UI browse to SystemLoggingCollection Filters for this.) to filter incoming logs from scripts, “pings” or “keep-alive” to be masked out..
-
Consider separation of incoming traffic between ISE MnT and external 3rd party Syslog collector: ISE administrator can create as many remote Logging Targets (SystemLoggingRemote Logging Targets) as necessary, to a generic Unix Syslog or to a third party SIEM software such as SPLUNK. After that each individual logging category may be routed to the specific Logging Target. (From ISE UI, browser to SystemLoggingLogging categories for this).
-
From ISE UI, go to Administration System Settings Protocols RADIUS and enable log suppression by enabling the last three options as shown here.

Prepare Your Migration
Outdated, redundant or stale policy or rule cleanup: As part of migration effort, revise and clean existing policy and rule set in ACS. Some of the policies might be inactive, obsolete and no longer relevant. Same goes true for users and Network devices. Observing Hit Count on ACS can help verifying this. Reset the Hit Count several months before migration. If Hit Count is equal to zero for a long time, this policy is a good candidate to be marked as disabled, moved to the end of list or removed at all. Consolidating and optimizing several policies into one is a good way to make configuration more manageable, more scalable and less prone to mistakes.
Configuration Maps and Exceptions
The tables below shows configuration map for ACS and ISE that includes location of configuration objects, exceptions that are observed during migration and ways to fix/get around those exceptions. For e.g.: As part of pre-migration, please clean up object names in ACS to make sure it does not have special characters not supported by ISE. Please see the details in the table below. The following tables are organized like the flow in the ACS UI for easy readability.
Network Resources
| ACS 5 configuration | ISE Configuration | Exceptions and Fixes |
|---|---|---|
|
Network Resources ➡ Network Device Groups Network Resources ➡ Network Devices |
Work Centers ➡ Device Administration ➡ Network Device Groups. (A valid NDG name can contain alphanumeric, Hyphen(-), Underscore(_), period(.) and space characters) Work Centers ➡ Device Administration ➡ Network Resources ➡ Network Devices. (A valid Network Device name can contain alphanumeric, Hyphen(-), Underscore(_)) Migration tool will automatically convert the unsupported characters to supported ones in ISE 2.2+. |
Naming constraints. Need to fix names during policy gap analysis. IP range not supported in ISE 2.0/2.1(convert the range into subnets if possible). ISE 2.2 supports IP ranges in the last octet. IP exclusions supported by “overlapping IPs”. ISE 2.3 supports IP ranges in all octets. If you change the default name of in ACS, it will not get migrated. ISE 2.1 supports Network devices name with “.” character. |
| Network Resources ➡ Default Network Device | Administration ➡ Network Resources ➡ Default Network Device | ISE must have RADIUS enabled (ISE 2.0 only). Fixed in ISE 2.1. |
| Network Resources ➡ External Proxy Servers |
Work Centers ➡ Device Admin ➡ Network resources ➡ TACACS Proxy Servers Administration ➡ Network resources ➡ External Radius server |
When ‘Cisco Secure ACS’ is external proxy, a prefix ‘TACACS_’ or ‘RADIUS_’ is added to the name before moving it to the correct location in ISE |
| Network Resources ➡ OCSP Services | - | Not Supported |
Users and Identity Stores
| ACS 5 Element | ISE Element | Exceptions and Fixes |
|---|---|---|
| Users and Identity Stores Internal Identity Stores Users
Users and Identity Stores Identity groups |
Administration ➡ Identity Management ➡ Identity ➡ Users
Administration ➡ Identity Management ➡ User Identity Groups ➡ User identity Groups. (A valid User and User Identity group name can contain alphanumeric and ~@# $&*_+.- characters.) |
Account disable policy, Password type not supported in ISE 2.0 (Supported in ISE 2.1).
Disable password hashing for users if using ACS 5.7/5.8 Naming constraints. If using ISE 2.0/2.1, need to fix names during policy gap analysis. |
| Enable password option: Users and Identity Stores ➡ Internal Identity Stores ➡ Users (create user) | Enable Password option: (Workcenter ➡ Device Admin ➡ Identity ➡ Users (Add Users) | Check the password policy for defaults, password history, password Lifetime. |
| Users and Identity Stores ➡ Internal Identity Stores ➡ Hosts | Administration ➡ Identity Management ➡ Identity ➡ Endpoints.
(A valid MAC address consists of six octets, separated by ':','.' or '-'. Valid octets contain 0-9,a-f,or A-F only.) |
Wild cards are not supported in ISE. |
| User Identity Stores ➡ External Identity Store | Administration ➡ Identity Management ➡ External Identity Store | Description, RSA instance file, Display RSA missing secret will not be migrated.
RSA sdopts.rec file and secondary information are not migrated. |
| User Identity Stores ➡ Certificate Authorities | Administration ➡ Certificates ➡ Certificate Management ➡ Trusted Certificates | Migration not supported. |
| User Identity Stores ➡ Certificate Authentication profile | Administration ➡ Identity Management ➡ External Identity Store ➡ Certificate Authentication Profile
(A valid name can contain alphanumeric and underscore(_) characters.) |
Name Constraints. If using ISE 2.0/2.1, fix name mismatch in ACS. |
| User and Identity Store ➡ Identity Store Sequence | Administration ➡ Identity Management ➡ Identity Store Sequence | Additional Attribute retrieval not supported in ISE. See 1 for more details. |
Policy Elements
| ACS 5 Element | ISE Element | Exceptions and Fixes |
|---|---|---|
| Policy Elements ➡ Authorization and Permissions ➡ Network Access ➡ Authorization Profiles | Policy ➡ Policy Elements ➡ Results ➡ Authorization profile | Unique name required. Name Conflicts (shared namespace in ISE) |
| Policy Elements ➡ Authorization and Permissions ➡ Named Permission Objects ➡ Downloadable ACL | Policy ➡ Policy Elements ➡ Results ➡ Downloadable ACL | Unique name required. |
| Policy Elements ➡ Device Administration ➡ Shell Profiles | Work Centers ➡ Device Administration ➡ Policy Results ➡ TACACS Profiles | No Callback verify, No hangup, Callback line, CallBack Rotary is not supported in ISE.
Unique name required. Recommend using a prefix for Device admin Authorization Results. |
| Policy Elements ➡ Device Administration ➡ Command Sets | Work Centers ➡ Device Administration ➡ Policy Results ➡ TACACS Command Sets | Unique name required. |
Access Policies
| ACS 5 Element | ISE Element | Exceptions and Fixes |
|---|---|---|
| Access policies ➡ Access Services with external proxy + Service selection rule with Proxy Service | TACACS+: Work Center ➡ Device Admin Policy Sets + Proxy Sequence + Proxy server sequence.
RADIUS: Policy ➡ Policy Sets ➡ Authentication policy |
|
| Access policies ➡ Access Services ➡ Allowed protocols | Policy ➡ Policy Elements ➡ Results ➡ Authentication ➡ Allowed Protocols | |
Access policies ➡ Access Service
|
Device Admin Policy Sets
|
Policy model difference. Group mapping not supported in ISE. See 1 for more details.
ISE 2.0 through ISE 2.2 does not support rule condition that has different operators. See Appendix D for information on supported rule elements. Cleanup the Authorization rule conditions in ACS to eliminate combination (AND and OR). |
| Policy Elements ➡ Max User Sessions | - | Not Supported in ISE 2.0 and ISE 2.1. |
Monitoring and Reporting
| ACS 5 Element | ISE Element | Exceptions and Fixes |
|---|---|---|
| Monitoring and Reports ➡ Launch Monitoring and Report viewer | Operations ➡ RADIUS, Operations ➡ TACACS+, Operations ➡ Reports | Migration not supported |
System Administration
| ACS 5 Element | ISE Element | Exceptions and Fixes |
|---|---|---|
| System Administration ➡ Configuration ➡ Global System Options ➡ TACACS+ Settings | Work Center ➡ Device Admin ➡ Settings | None. |
|
System Administration ➡ Operations ➡ Software repositories, System Administration ➡ Operations ➡ Distributed system information |
Administration ➡ System ➡ Maintenance ➡ Repository Administration ➡ System ➡ Deployment ➡ Deployment |
Migration not supported |
| System Administration ➡ Operations Scheduled Backups | Administration ➡ Sytem ➡ Backup and Restore | Migration not supported |
| System Administration ➡ Administrators ➡ Accounts, Roles and Administrators settings | Administration ➡ System ➡ Admin Access ➡ Administrators, Authentication, Settings | Migration not supported |
| System Administration ➡ Configuration ➡ Local Certificates | Administration ➡ System ➡ Certificates ➡ Certificate Management ➡ System Certificates | Migration not supported |
| System Administration ➡ Configuration ➡ Log Configuration | Administration ➡ System ➡ Logging | Migration not supported |
| System Administration ➡ Configuration ➡ Dictionaries ➡ Identity users, Hosts |
Policy ➡ Policy Elements ➡ Dictionaries ➡ Users Policy ➡ Policy Elements ➡ Dictionaries ➡ Systems ➡ Endpoints |
Identity and host attributes that are of type date are not supported in ISE. This is supported in ISE 2.3. Identity Dictionary attribute Maximum length, default value, Mandatory fields, Add policy condition and Policy condition display name not supported in ISE. |
|
System Administration ➡ Configuration ➡ Dictionaries ➡ Protocols ➡ RADIUS RADIUS IETF System Administration ➡ Configuration ➡ Dictionaries ➡ Protocols ➡ RADIUS VSA |
Policy ➡ Policy Elements ➡ Dictionaries ➡ System ➡ RADIUS ➡ RADIUS IETF Policy ➡ Policy Elements ➡ Dictionaries ➡ System ➡ RADIUS ➡ RADIUS VSA |
Not migrated. Only RADIUS VSA not in ISE will be migrated. |
If your configuration object is not in the list above, here is the complete list of data mapping of objects that are supported for migration between ACS and ISE 2.0. Please get familiarized with this so as to understand the gaps and results during and after the migration process.
Staging Environment for Migration
Create separate instance of ACS server for staging the migration to perform tests in the lab and necessary changes in the configuration. In this case, all changes will be done in that staging environment and will not affect production environment.
Install ISE server in standalone mode using the instruction here . The migration process will be successful with a clean installation on a standalone ISE node with bootstrap configuration. It is recommended to take a clean ISE configuration backup of the default configuration state in case the migration process is disrupted during the import process.
It is highly recommended to use staging environment to test resulted configuration. If lab environment allows ISE 2.x should be connected to external ID store such as LDAP or AD then test authentication/authorization request to see that ISE 2.x performs basic functionality as expected. Please also download the AD/LDAP groups and attributes used in your existing ACS configuration.
Migration Tool Requirements
Migration tool is a separate tool available for download on each ISE web interface from the Device admin work center. You can download the migTool.zip file in the following ways.
- By entering the following URL on the browser address bar: of ISE >/admin/migTool.zip
- Alternately, you can navigate to the Work Centers ➡ Device Administration ➡ Overview page, and click the migration tool in the Prepare section to download the migration tool.
- Migration tool requires specific version of the migration tool for specific ISE versions. If you are using ISE 2.2 and above, please go to the software download center for the specific version of ISE and download the migration tool.
This is aimed to assist with configuration migration from ACS 5.5+ to ISE 2.x. Migration tool is supported in both Windows and Linux machines. For large deployment please make sure you have 2GB RAM and 1 GB hard disk to run the migration. Migration Tool uses Java run-time executable (JRE7 and not below) and libraries and can be run on supported Windows and Linux platform.
Installation and configuration of the Migration Tool
The Migration Tool establishes secure communication to ACS, for exporting configuration and to ISE for importing configuration. For that purpose, migration tool uses system/local certificates (for self-signed certificates) or root CA certificates (for CA signed certificates) that have to be exported from ACS 5 and from ISE 2.0.
- After downloading the tool save it to a local folder on your Windows machine, migration tool need to be unzipped into empty working folder where it will have its folder structure for binaries, logs and configuration files.
- Edit the config.bat file to set the initial amount of memory allocated for the java Heap Sizes. (Set the initial amount of memory allocated for the java Heap Sizes for the migration process in the config.bat file. The attribute to set the heap size in config.bat is: _Xms = 64 and _Xmx = 1024 (The memory is 64 and 1024 megabytes, respectively).
- In ACS, the local certificate can be found in the UI when you go to System Administration ➡ Configuration ➡ Local Server Certificates ➡ Local Certificates. From the list of entries, the entry which has Protocol “Management Interface”, need to be exported.
Note: Only certificate (not private key) need to be exported. - Browse ISE 2.x UI and go to system certificate by going to Administration ➡ System ➡ Certificates ➡ System Certificates. Observe the entry that has usage “admin”. This certificate need to be exported.
- Copy the ISE and ACS trusted certificate on the Windows client machine running the tool. Click migration.bat from the migTool folder to launch the migration process. Click Yes to display a list of unsupported and partially supported objects. Click Close.
Note: To run the migration tool please make sure that you use super admin credentials - Go to Settings ➡ Trusted Certificates, click Add, choose the root certificate to add, the certificate will appear in the list.
Tip: The root CA certificate of the ACS server certificate that got restored in the staging ACS server needs to be added to the migration tool. - Enable the migration interface in ACS and ISE with the following commands from the CLI:
From ACS CLI, Enteracs config-web-interface migration enable
From ISE CLI, Enter:application configure ise
Enter 11 for Enable/Disable ACS Migration.
Enter Y - Migration tool uses DN host name (FQDN in ISE) to establish communication between itself and ACS or ISE, hence hostnames of ACS and ISE machines need to be DNS resolvable.
Tip: Make sure to have a DNS entry for the hostnames for proper resolution. Remember to use the hostname and not the IP address in the tool dialog box while importing/exporting. This hostname should match the name in the server certificate. - If DNS resolution does not work, create an entry in the host file on your Windows machine. Please make sure the DN in the certificate matches the IP address and hostname entries in hosts file in your Windows machine (location: C:\Windows\system32\drivers\etc).
Note: You might get an error message if any of the above are not complete. Please also make sure you have ACS service running with a compatible license.
Warning: It is recommended to build dedicated temporary ACS machine for staging the migration. Please do not use the production environment.
Supported/Unsupported Objects for Migration
The migration tool will automatically migrate ACS 5 supported entities to the ISE 2.x. Here is a complete list of objects supported, not supported and partially supported. Please take time to get familiar with this.
There are unsupported/ partially supported list on key areas that appears as a dialog box when you start the tool. You can also find this when you click the Help menu from the tool. This does not cover logs, backup and other management areas. For a more complete listing please use the link above.
Preparation for Migration from Cisco Secure ACS, Release 5.5+
You must consider the following before you start migrating Cisco Secure ACS data to Cisco ISE:
-
Migrate Cisco Secure ACS, Release 5.5+ configuration data only when the Policy Set mode in Cisco ISE, Release 2.0 is configured. Enable Policy set in ISE UI by browsing to Administration ➡ System ➡ Settings ➡ Policy sets
-
Migrate on a fresh installation of Cisco ISE, Release 2.x.
-
Generate one policy set per an enabled rule in the Service Selection Policy (SSP) and order them according to the order of the SSP rules.
We recommend that you do not change to Simple mode after a successful migration from Cisco Secure ACS. Because, you might lose all the migrated policies in Cisco ISE. You cannot retrieve those migrated polices, but you can switch to Policy Set mode from Simple mode.
It is important understand the differences between the Service selection policies in ACS and policy sets in ISE. The policy set migration guidelines provides a list of considerations as part of pre-migration to help migrate Access services and service selection rules from ACS to ISE.
Migration Process with Migration Tool
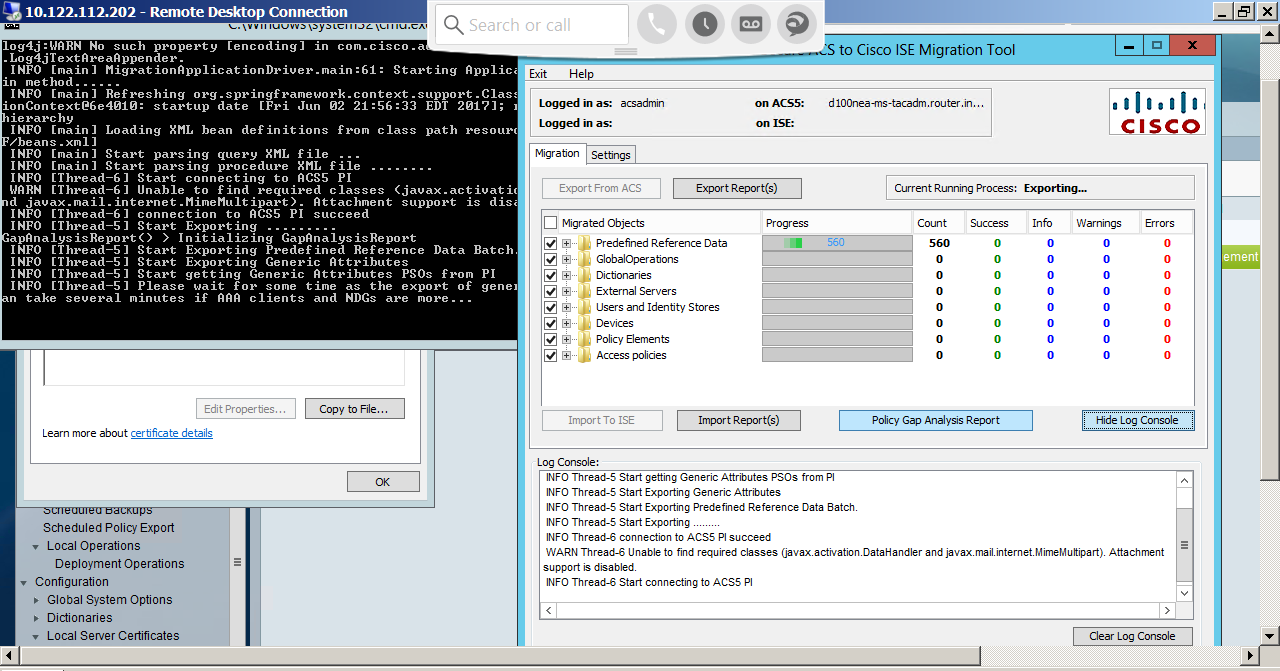
Migration tool is the heart of automatic migration. Migration can also be done manually or using import/export utilities. For simplicity, we discuss the automatic migration process in this document using migration tool. Here are some tips how to use on the migration tool UI. A screen shot of the migration tool is shown below.

-
The Migrated objects will have main container such as Policy Elements etc. Please click on the container to open it to view the objects migrated.
-
You can see that all the containers have a progress bar . The objects under the containers have a status bar in green showing the status of the import or export.
-
The Count shows the number of object imported/exported.
-
The Warnings and Errors count will appear if there is a warning or error during the import and export phase of the migration.
-
By clicking on the error/warning count you can open the corresponding report.
-
The Policy gap analysis report shows the gap analysis in the policies between ACS and ISE as part of import/ export process.
-
The Import Reports and Export Reports button will open up the corresponding reports to understand and analyze errors/warnings during the import and export phase.
-
The Settings tab is used for importing CA certificates and for default settings for migration. Please do not change the default settings unless absolutely necessary.
-
Log console displays the activity log that includes tracks the tool process and issue warning/errors. This is stored in migration.txt file under the migTool folder.
Migration is an iterative process, consisting 3 phases, exporting configuration, gap analysis and finally the import process. The export process needs to be repeated since there may be exceptions and errors that will appear during exporting. Corrective actions need to be taken based on the exceptions that appear on the reports.

Exporting ACS Configuration
Warning: You cannot use NAT between the migration machine and the ACS 5.x server.
- Please use the tables after step 9 to understand the types of the objects before exporting objects from ACS. Click ‘Export from ACS’ button to start the export.
- Type in the ACS host name, admin user name and password, click Connect.
- Observe the progress of exporting via progress bars per container and per individual objects. Time spent for export process greatly depends on configuration size and amount of entities to be exported.
Note: Migration tool will export or import all the supported object once and lists the gaps, errors if an objects are not supported in ISE (or) if ISE already has the objects available (or) if the character set does not support it etc. You cannot stop the migration tool in-between. However you can exit out of it and it should start from where it stopped. - To get more information about a warning or an error that occurred during the export process, click any on the link under ‘Warnings’ or ‘Errors’ column on the Migrations tab. The ‘Object Errors and Warnings Details’ window displays the result of a warning or an error during export. It provides the object group, the type, and the date and time of a warning or an error.
- Data export process may take long time depending the configuration. If you have a large number of network devices it (for e.g.: 15k it will take up to 4-5hours). When the data export process has completed, the Cisco Secure ACS to Cisco ISE Migration Tool window displays the status of export that Exporting finished.
Note: It was observed that sometimes the progress bar across the objects shows complete but the export process status does not change to Export finished. In such case, please open the export report to see the status of the export at the bottom of the report to proceed. - Open the export report by clicking on the Export report(s) button as shown in the screenshot above. Export report will have information that will help do gap analysis.
Policy Gap Analysis
Upon export completion, administrator should analyze results by reviewing ‘Export Report”, “policy gap report”, fix listed errors in the ACS configuration and should re-run process ones again. When errors are fixed, warnings and other issues are addressed and understood, administrator should perform export once again and use the data for importing.
Important: Please make a copy of these reports every time you run the tool for comparison. The policy gap report gets overwritten when you run the import on the next step.
Note: Log files are stored in the “reports” sub-folder where migration tool running. This can be reviewed, archived and shared for auditing purposes. These are the files available to review export_report.txt, import_report.txt, policy_gap_report.txt. Please rename the policy_gap_report.txt file since this will be overwritten during the import process.
Here are some sample output from the export report showing name constraints on objects.
==========================================
Object Type: Users
==========================================
> 2016.01.27 18:24:56'561 : 'america\sample.adm' will not be exported because the name contains special characters or space that are not supported by ISE.
The valid name can contain alphanumeric and ~@# $&*_+.- characters
==========================================
Object Type: Certificate Authentication Profile
==========================================
> 2016.01.27 18:24:57'996 : 'CN Username' will not be exported because the name contains space or special characters that are not supported by ISE.
The valid name can contain alphanumeric and underscore(_)
Object Type: Network Devices
==========================================
> 2016.01.27 18:30:03'024 : 'sample.device.us' will not be exported because the name contains special characters that are not supported by ISE.
The valid name can contain alphanumeric, hyphen(-) and underscore(_)
=========================================
Object Type: Authorization Profiles
==========================================
> 2016.01.27 18:30:49'605 : 'DenyAccess': will not be exported because it is predefined in ISE.
> 2016.01.27 18:30:49'621 : 'Deny Access' will not be exported because the name contains special characters that are not supported by ISE.
The valid name can contain alphanumeric, space and !@#$%&()-_+{};'<>.?/~ characters
For parity gaps observed per configuration set between ACS and ISE. Reconciliation is possible for some of these, for others alternate method needs to be chosen. Please see the tables from Step 9 for details to fix the parity gaps. Future versions of ISE is expected to close the gap. Here is the sample behavior for Network Devices/ Network Device Groups below during reconciliation.
Network Devices and Network Device Groups
Reconciliation flow for Migration Tool
- If Device does not exist in ISE (Defined by no overlap of IP configuration)
- Then it will be added during migration.
- If Device does exist (IP/subnet exactly matches) and (name exactly matches)
- Then migration will updates detail to add TACACS+ elements
- If only approximate match. (name matches exactly, or IP/subnet matches exactly, but not both)
- Then migration tool reports error.
Warning: The migration tool migrates all the policies when they are compatible. However, it will not migrate any of the policies if one or more are incompatible. Please make sure to fix all the access policies for error by analyzing the policy gap report.
Once the errors/warnings are reviewed and corrected start the export process once again. Go back to the Exporting configuration: section above. Start the export process again. Go through the Policy gap analysis and make sure that it is clean after looking at all exceptions and go the next step.
Importing ACS Configuration
- Administrator should connect to target ISE 2.x using FQDN and should start import configuration into ISE. Click on “Import to ISE” button from the screenshot above to start the import. During importing, the migration tool will create a report that can be opened from the menu. Generally, if ACS configuration is clean, import process does not produce any errors.
- In the LDAP Identity Store drop-down list, select the identity store to which you want to add attributes, and click Add Attribute. These attributes will be imported from the ID store during migration. Alternatively, you can Cancel it to skip adding LDAP attribute. Skip the next step and go the following step to proceed further.
- Enter a name in the Attribute Name field, choose an attribute type from the Attribute Type drop-down list, enter a value in the Default Value field, and click Save & Exit.
- When you have finished adding attributes, click Import to ISE, enter the Cisco ISE Fully Qualified Domain Name (FQDN), username, and password in the ISE Credentials window and click Connect. The migration tool checks that the Hostname/FQDN matches the CN in the SSL certificate. You will see an error if does not match. Please make sure your DNS hostname of ISE is the same as CN of the certificate being used.
- Data import process will take time to complete depending on the configuration. When the data import process has completed, the Cisco Secure ACS to Cisco ISE Migration Tool window displays the status of import that Importing finished.
- To view a complete report on the imported data, click Import Report(s).
- To get more information about a warning or an error that occurred during the import process, click any underlined numbers in the Warnings or Errors column on the Migrations tab.
- To analyze the policy gap between Cisco Secure ACS and Cisco ISE, click Policy Gap Analysis Report.
- At any time, click View Log Console to display a real-time view of the export or import operations.
Warning: If you have multiple deployments of ACS and are merging to ISE then migration tool will only add configuration not merge with the exception of Network devices. Even for Network devices if there are two separate deployments one for RADIUS and another for TACACS+, migration tool will add configuration to the same entry. This may change in the future. It is highly recommended to start import on clean ISE configuration.
Upon completion, it is necessary to review results in ISE 2.x UI for consistency and integrity. All policies have to be based on existing rules, which, in turn should create existing and logically sound results, for e.g. shell profiles, commands sets and authorization profiles.
Once the migration is complete and successful, and take an ISE backup of all the configuration imported from ACS and name it suitably.
Verifying Migration of Access Policies
Migrating policies is a most important and crucial phase of the whole process. While translating policies from ACS to ISE user need to take into considerations following:
ACS has so called “Service Selection Rule(s)” and “Service Selection Policies” which are not present in ISE. ISE 2.x has “Policy sets” and rules under that are automatically created while migration from ACS to ISE. Picture below shows mapping between ACS “Service Selection Policies” and ISE “Policy Set”.
On the screenshot below, Rule1 represents Service Selection Rule which is matching RADIUS protocol used in “Radius Authentication” service.

Rule 1 from the Service selection policy will be migrated to Policy ➡ Policy Sets as new Policy Set for RADIUS(observe the screenshot below). Rule 2 will be migrated to Work Center ➡ Device Administration ➡ Device Admin policy sets in TACACS+ work center as shown below.

In ACS, Service Selection policy will result in an access service. For e.g., Rule 4 for TACACSAMERICAS from screenshot above resulted in “PA-AMERICAS Network Device” as access service. Every access services consists of two parts, Identity and Authorization. As an example we see how Rule 4 from screenshots above was migrated from ACS to ISE.
Identity Rule in ACS

Authorization Rule in ACS.

Next screenshot from ISE 2.0 will show how ACS rules translated into ISE Policy Sets after migration.

This example was sample of real world configuration, though same idea will be applied to set of rules of any complexity.
RADIUS Access policies: RADIUS access policies can be verified the same way however for RADIUS flows the policy will have a different Network access protocol. Authorization policy shown in the screenshot above will be mapped to Authorization profile instead of command sets and Shell profiles. From ISE UI, please go to Policy ➡ Policy Sets for this.
External Proxies: When adding an external proxy server or verifying the configuration. Here are the steps
For RADIUS
- Create/verify external RADIUS server configuration by visiting Administration ➡ Network Resources ➡ External Radius Server from ISE UI.
- Verify that the Access Services selection for service type external proxy in ACS are migrated to Administration ➡ Network Resources ➡ RADIUS Server Sequences in ISE. In ACS, you have go to Access services and click on the external proxy policy for the configuration.
- Verify that the Service Selection Rules from ACS for external proxy is migrated to Policy ➡ Policy Sets in ISE. Adding proxy sequence is part of the authentication policy in ISE UI. You can create one by editing authentication policy, clicking on “Allowed protocols” drop down for the authentication policy, click RADIUS Server sequence and select the correct name.

For TACACS
- Verify the external TACACS server and TACACS+ Server sequences has entries by browsing ISE UI , go to Work Centers ➡ Device Administration ➡ Network Resources. Check that the Access Services Selection for service type external proxy in ACS is migrated to TACACS+ Server sequences.
- For TACACS+ proxy sequence, go to Work Centers ➡ Device Administration ➡ Policy Sets under the policy set criteria. Make sure the Proxy sequence is selected and the correct TACACS+ Server sequence entry is selected from the dropdown.

Supporting Chatty Devices (TACACS+ single connect)
“Single connect” feature in ISE has two modes RFC standard and (compatibility) mode. When ‘single connect’ feature is turned on per device, it will negotiate, sustain TCP connection and will pass multiple TACACS+ transactions to ISE. Such connection will stay considerably longer than regular TCP connections. This will help “chatty” devices pass-through TACACS+ transactions once a connection is established and the TCP link is sustained in a most effective way. Other devices where this option is not turned on will establish TCP link by demand. This will help “chatty devices” in getting higher preference during high load condition.
During upgrade preparation, network administrator should create a list of most active Network devices (NAS’s), ACS can provide such reports and statistics – this list may contain up to several thousand devices. It is recommended to make those NASs to talk to ISE PSN with TACACS+ single connect enabled. Rest of the NASs will not use single connect.
- You have to login to ISE UI, browse to Work Centers ➡ Device Administration ➡ Network Resources ➡ Network Devices and go to TACACS+ authentication settings to enable this per device.
Note: It is very important to estimate number of simultaneous connections that might be established to single ISE PSN in order to avoid TCP socket starvation. -
This is post-migration activity to improve TACACS + efficiency for chatty devices. Create a list of chatty network devices and enable single connect mode for them with the TACACS+ draft option enabled as shown in the screenshot above.
-
ISE allows you to export and import “Network devices” list. Export the existing network device list as a csv file. Open the csv file in Microsoft Excel or other spreadsheet supporting software.
-
Change the values of the column ‘TACACS:Connect Mode Options:String (OFF|ON_LEGACY|ON_DRAFT_COMPLIANT)’ for the list of chatty devices to “ON_DRAFT_COMPLIANT”. Save the file as csv.
-
Import this csv to ISE. The export and import process takes time depending the number of network devices. Please be patient while importing or exporting large sets of devices.
-
Take an ISE backup of all the configuration imported from ACS and name it suitably. ISE configuration can be restored into production with backup/restore process in ISE software. While doing this please make sure the ISE versions and patch level are the same in your staging and production system.
Note: For CA signed certificates, please make sure you create the server certificates in advance based on the number of servers including PAN, MnT and PSN’s.

Final Steps
-
Once the ISE server (PAN) is in production, install additional nodes (MnT and PSN’s) and allow it to replicate.
-
Change the TACACS+ and/or the RADIUS configuration on few Network devices to point to ISE server (Policy Services Node) in normal business hours for a few days. Observe for any inconsistencies before changing the configuration settings on the next set of network devices. Please move the network devices from ACS to ISE in batches to avoid disruptions.
-
Once you successfully moved all the network devices to the ISE server, monitor your daily log size for TACACS+ until you move all the network devices for first two months to tune it based on the traffic needs. Visit the ‘What happens if my logging requirements exceeds the example?’ section of this document for recommendation on log size considerations.
You have now completed Migration from ACS to ISE!
Appendix A: ACS vs ISE Deployment Limits
The table below provides the scalability limits of ACS 5.x vs ISE 2.x for planning the ISE deployment.
<th">ISE 2.2 Limits<td">54(2 PANs, 2 MnTs, 50 PSNs)<td">500,000 concurrent sessions(not specific to Endpoint or Users)1.5M Total endpoints<td">300,000 Internal Users<td">-<td">-<td">500(User), 500(End-point ID)<td">50<td">1000<td">100,000<td">100(10k in ISE 2.3)<td">- (6 in ISE 2.3)<td">-<td">100(Simple mode)200( Policy set mode - 2 rules + default)<td">600 (Simple mode)700 ( Policy set mode)<td">8<td">600<td">100(Policy sets)<td">N/A<td">8000ACL’s<td">4,000<td">2,500<td">500,000/deployment ( 2 SXPSNs)
| Attributes | ACS 5.x Limits | ISE 2.0 Limits | ISE 2.1 Limits |
|---|---|---|---|
| Nodes | 22 | 44 (2 PANs, 2 MnTs, 40 PSNs) | 54(2 PANs, 2 MnTs, 50 PSNs) |
| Endpoints | 150,000 | 250,000 concurrent endpoints 1 M total endpoints |
500,000 concurrent sessions(not specific to Endpoint or Users) 1.5M Total endpoints |
| Users | 300,000 | 25,000 Internal Users 1 million Internal Guests |
300,000 Internal Users |
| Admins | 50 | - | - |
| Admin Roles | 9 | - | - |
| Identity Groups | 1,000 | 500(User), 500(End-point ID) | 500(User), 500(End-point ID) |
| Active Directory Join Points | 1 join point per node | 50 | 50 |
| Active Directory Group Retrieval | 1,500 | 1000 | 1000 |
| Network Devices |
100,000 150,000(35xx) |
30,000 (network objects not IP’s) | 100,000 |
| Network Device Groups | 10000 | 100 | 100 |
| Network Device Hierarchies | 6 | - | - |
| Services | 25 | - | - |
| Authentication Rules | - | 100 | 100 |
| Authorization Rules | 320 | 600 (<100 recommended) | 600 |
| Conditions | 8 | 8 | 8 |
| Authorization Profile | 600 | 600 ( < 100 recommended) | 600 |
| Service Selection Policy (SSP) | 50 | N/A | 40(Policy sets) |
| Network Conditions (NARs) | 3,000, 10000 (ACS 5.8.1) | N/A | N/A |
| dACLs | 600 dACL with 100 ACEs each | 8000ACL’s | 8000ACL’s |
| TrustSec Security Group Tags (SGT) | - | 4,000 | 4,000 |
| TrustSec Security Group ACLs (SGACLs) | - | 2,500 | 2,500 |
| Maximum number of SXP bindings | N/A | 100,000 | 500,000 |
Appendix B: TACACS+ Performance per ISE Deployment
Dedicated TACACS+ Only Deployment
Max Concurrent TACACS+ Sessions/TPS by Deployment Model and Platform
| Deployment Model | Platform | Max # Dedicated PSNs
( # recommended) |
Max RADIUS Endpoints per Deployment | Max T+ Sessions/TPS (TPS for recommended PSN’s) |
|---|---|---|---|---|
| Standalone (all personas on same node) (2 nodes redundant) |
3415 | 0 | N/A | 500 |
| 3495 | 0 | N/A | 1,000 | |
| 3515 | 0 | N/A | 1,000 | |
| 3595 | 0 | N/A | 1,500 | |
| Basic Distributed: Admin + MnT on same node; Dedicated PSN
(Minimum 4 nodes redundant) |
3415 as Admin+MNT | **5 (2 rec.) | N/A | 2,500 (1,000) |
| 3495 as Admin+MNT | **5 (2 rec.) | N/A | 5,000 (2,000) | |
| 3515 as Admin+MNT | **5 (2 rec.) | N/A | * 5,000 (2,000) | |
| 3595 as Admin+MNT | **5 (2 rec.) | N/A | * 7,500 (3,000) | |
| Fully Distributed: Dedicated Admin and MnT nodes
(Minimum 6 nodes redundant) |
3495 as Admin and MNT | **40 (2 rec.) | N/A | 20,000 (2,000) |
| 3595 as Admin and MNT | **50 (2 rec.) | N/A | *25,000 (3,000) |
*Under ISE 2.0.x, scaling for small and large 35x5 appliance same as small and large 34x5 appliance.
** Device Admin service can be enabled on each PSN; minimally 2 for redundancy, but 2 often sufficient.
Red indicates TPS that will cause performance hits on MnT and is not recommended.
| Scaling per PSN | Platform | Max RADIUS Endpoints per PSN | Max T+ Sessions/TPS |
|---|---|---|---|
| Dedicated Policy nodes (Max Endpoints Gated by Total Deployment Size) |
SNS-3415 | N/A | 500 |
| SNS-3495 | N/A | 1,000 | |
| SNS-3515 | N/A | * 1,000 | |
| SNS-3595 | N/A | * 1,500 |
Shared deployment (RADIUS + TACACS+):
Integrated PSNs: PSNs that share RADIUS and TACACS+ service and sharing same Admin + MnT node.
Dedicated PSNs: PSNs that are dedicated for RADIUS only or TACACS+ only service sharing same Admin + MnT.
Max Concurrent RADIUS Sessions / TACACS+ TPS by Deployment Model and Platform
| Deployment Model | Platform | Max #PSNs: Integrated / Dedicated PSNs( Radius + TACACS+) | Max RADIUS Endpoints per Deployment | Max TACACS+ TPS (Integrated / dedicated T+ PSNs) |
|---|---|---|---|---|
| Standalone (all personas on same node) (2 nodes redundant) |
3415 | 0 | 5,000 | 50 |
| 3495 | 0 | 10,000 | 50 | |
| 3515 | 0 | 7,500 | 50 | |
| 3595 | 0 | 20,000 | 50 | |
| Basic Distributed: Admin + MnT on same node;
Integrated / Dedicated PSNs (Minimum 4 nodes redundant) |
3415 as Admin+MNT | **5 / 3+2 | 5,000 | 100 / 500 |
| 3495 as Admin+MNT | **5 / 3+2 | 10,000 | 100 / 1,000 | |
| 3515 as Admin+MNT | **5 / 3+2 | 7,500 | * 100 / 1,000 | |
| 3595 as Admin+MNT | **5 / 3+2 | 20,000 | * 100 / 1,500 | |
| Fully Distributed: Dedicated Admin and MnT nodes;
Integrated / Dedicated PSNs (Minimum 6 nodes redundant) |
3495 as Admin and MNT | **40 / 38+2 | 250,000 | 1,000 / 2,000 |
| 3595 as Admin and MNT | *50* / 48+2 | 500,000 | * 1,000 / 3,000 |
** Device Admin service enabled on same PSNs also used for RADIUS OR dedicated RADIUS and T+ PSNs.
* Under ISE 2.0.x, scaling for Small and Large 35x5 appliance same as Small and Large 34x5 appliance.
| Scaling per PSN | Platform | Max RADIUS Endpoints per PSN | Max TACACS+ TPS |
|---|---|---|---|
| Dedicated Policy nodes (Max Endpoints Gated by Total Deployment Size) |
SNS-3415 | 5,000 | 500 |
| SNS-3495 | 20,000 | 1,000 | |
| SNS-3515 | 7,500 | 1,000 | |
| SNS-3595 | 40,000(ISE 2.1+) | 1,500 |
Appendix C: ISE VM Sizing and Log retention
TACACS+ guidance for size of syslogs:
| Message size per TACACS+ Session | Message Size per Command Authorization (per session) |
|---|---|
| Authentication: 2kB | Command Authorization: 2kB |
| Session Authorization: 2kB | Command Accounting: 1kB |
| Session Accounting: 1kB |
TACACS+ transactions, logs and storage
Human Administrators and Scripted device administrator (Robot) model
| Session Authentication and Accounting Only | Command Accounting Only (10 Commands / Session) |
Auth. + Session + Command Authorization + Accounting (10 Commands / Session) |
||||||||||
|---|---|---|---|---|---|---|---|---|---|---|---|---|
| Avg TPS | Peak TPS | Logs/ Day | Storage/ day |
Avg TPS | Peak TPS | Logs/ Day | Storage/ day |
Avg TPS | Peak TPS | Logs/ Day | Storage/ day |
|
| # Admins | Based on 50 Admin Sessions per Day – Human Admin model | |||||||||||
| 1 | < 1 | < 1 | 150 | < 1MB | < 1 | < 1 | 650 | 1MB | < 1 | <1 | 1.2k | 2MB |
| 5 | < 1 | < 1 | 750 | 1MB | < 1 | < 1 | 3.3k | 4MB | < 1 | <1 | 5.8k | 9MB |
| 10 | < 1 | < 1 | 1.5k | 3MB | < 1 | < 1 | 6.5k | 8MB | < 1 | 1 | 11.5k | 17MB |
| 25 | < 1 | < 1 | 3.8k | 7MB | < 1 | 1 | 16.3k | 19MB | < 1 | 2 | 28.8k | 43MB |
| 50 | < 1 | 1 | 7.5k | 13MB | < 1 | 2 | 32.5k | 37MB | 1 | 4 | 57.5k | 86MB |
| 100 | < 1 | 1 | 15k | 25MB | 1 | 4 | 65k | 73MB | 2 | 8 | 115k | 171MB |
| # NADs | Based on 4 Scripted Sessions per Day – Scripted Device Admin model | |||||||||||
| 500 | < 1 | 5 | 6k | 10MB | < 1 | 22 | 26k | 30MB | 1 | 38 | 46k | 70MB |
| 1,000 | < 1 | 10 | 12k | 20MB | 1 | 43 | 52k | 60MB | 1 | 77 | 92k | 140MB |
| 5,000 | < 1 | 50 | 60k | 100MB | 3 | 217 | 260k | 300MB | 5 | 383 | 460k | 700MB |
| 10,000 | 1 | 100 | 120k | 200MB | 6 | 433 | 520k | 600MB | 11 | 767 | 920k | 1.4GB |
| 20,000 | 3 | 200 | 240k | 400MB | 12 | 867 | 1.04M | 1.2GB | 21 | 1.5k | 1.84M | 2.7GB |
| 30,000 | 5 | 300 | 360k | 600MB | 18 | 1.3k | 1.56M | 1.7GB | 32 | 2.3k | 2.76M | 4.0GB |
| 50,000 | 7 | 500 | 600k | 1GB | 30 | 2.2k | 2.6M | 2.9GB | 53 | 3.8k | *4.6M | 6.7GB |
*Red indicates logs/ day that will cause performance hits and slowness in log processing.
TACACS+ log retention (# of days):
Please see the static tables below for easy use. If you are an advanced user and would like to customize number of commands/sessions etc., please use the ISE MnT Log sizing calculator for TACACS+ and RADIUS .
Scripted device admin model
Number of sessions per day: 4
Number of commands: 10
Message Size /session (KB) = 5kB + Number of commands/session *3kB
Automated access(single script) log size calculation = n Number of devices * 4 Sessions * Message size
E.g. : Log Size for 30k Network devices = 4GB/day
ISE 2.1(20% allocation):
| # of Network Devices in the deployment | MnT Disk Size(GB) | ||||
|---|---|---|---|---|---|
| 200 | 400 | 600 | 1024 | 2048 | |
| 500 | 480 | 959 | 1439 | 2455 | 4909 |
| 1000 | 240 | 480 | 720 | 1228 | 2455 |
| 5000 | 48 | 96 | 144 | 246 | 491 |
| 10000 | 24 | 48 | 72 | 123 | 246 |
| 20000 | 12 | 24 | 36 | 62 | 123 |
| 30000 | 8 | 16 | 24 | 41 | 82 |
| 50000 | 5 | 10 | 15 | 25 | 50 |
ISE 2.2 (60% disk allocation):
| # Network Devices | 200 GB (days) | 400 GB (days) | 600 GB (days) | 1024 GB (days) | 2048 GB (days) |
|---|---|---|---|---|---|
| 100 | 12,583 | 25,166 | 37,749 | 64,425 | 128,850 |
| 500 | 2,517 | 5,034 | 7,550 | 12,885 | 25,770 |
| 1,000 | 1,259 | 2,517 | 3,775 | 6,443 | 12,885 |
| 5,000 | 252 | 504 | 755 | 1,289 | 2,577 |
| 10,000 | 126 | 252 | 378 | 645 | 1,289 |
| 25,000 | 51 | 101 | 151 | 258 | 516 |
| 50,000 | 26 | 51 | 76 | 129 | 258 |
| 75,000 | 17 | 34 | 51 | 86 | 172 |
| 100,000 | 13 | 26 | 38 | 65 | 129 |
Human admin – device admin using sample number of sessions and commands shown below.
Number of sessions: 50
Number of Commands/session: 10
Message Size /session (KB) = 5kB + Number of commands/session *3kB
Manual access log size calculation = 50 Sessions * N Admins * Message size
E.g. : Log Size for 50 admins = 85.4MB/ day
| Number of Admins\ Disk Size(GB) | MnT Disk Size (GB) | ||||
|---|---|---|---|---|---|
| 200 | 400 | 600 | 1024 | 2048 | |
| 5 | 3835 | 7670 | 11505 | 19635 | 39269 |
| 10 | 1918 | 3835 | 5753 | 9818 | 19635 |
| 20 | 959 | 1918 | 2877 | 4909 | 9818 |
| 30 | 640 | 1279 | 1918 | 3273 | 6545 |
| 40 | 480 | 959 | 1439 | 2455 | 4909 |
| 50 | 384 | 767 | 1151 | 1964 | 3927 |
RADIUS Log retention (# of days)
Number of Authentications per day per endpoint: 100
Custom Disk Size (GB): 500
Max. Allocated MnT Tablespace (GB): 120
Message size per Auth. (KB): 4
Log Size/day: Number of Endpoints * 10 auth./day * Message Size
ISE 2.1 – (30% disk allocation)
| Number of Endpoints | MnT Disk Size (GB) | |||||
|---|---|---|---|---|---|---|
| 200 | 400 | 600 | 1024 | 2048 | Custom | |
| 10,000 | 126 | 252 | 378 | 645 | 1,289 | 315 |
| 20,000 | 63 | 126 | 189 | 323 | 645 | 158 |
| 30,000 | 42 | 84 | 126 | 215 | 430 | 105 |
| 40,000 | 32 | 63 | 95 | 162 | 323 | 79 |
| 50,000 | 26 | 51 | 76 | 129 | 258 | 63 |
| 100,000 | 13 | 26 | 38 | 65 | 129 | 32 |
| 150,000 | 9 | 17 | 26 | 43 | 86 | 21 |
| 200,000 | 7 | 13 | 19 | 33 | 65 | 16 |
| 250,000 | 6 | 11 | 16 | 26 | 52 | 13 |
Note: Above values are based on controlled criteria including event suppression, duplicate detection, message size, re-authentication interval, etc. and result may vary depending on the environment.
ISE 2.2 – (60% disk allocation)
| Total Endpoints | 200 GB
(days) |
400 GB
(days) |
600 GB
(days) |
1024 GB
(days) |
2048 GB
(days) |
|---|---|---|---|---|---|
| 5,000 | 504 | 1007 | 1510 | 2577 | 5154 |
| 10,000 | 252 | 504 | 755 | 1289 | 2577 |
| 25,000 | 101 | 202 | 302 | 516 | 1031 |
| 50,000 | 51 | 101 | 151 | 258 | 516 |
| 100,000 | 26 | 51 | 76 | 129 | 258 |
| 150,000 | 17 | 34 | 51 | 86 | 172 |
| 200,000 | 13 | 26 | 38 | 65 | 129 |
| 250,000 | 11 | 21 | 31 | 52 | 104 |
| 500,000 | 6 | 11 | 16 | 26 | 52 |
Appendix D: Unsupported Rule Elements
Cisco Secure ACS and Cisco ISE are based on different policy models, and there is a gap between pieces of Cisco Secure ACS data when it is migrated to Cisco ISE. When Cisco Secure ACS and Cisco ISE release versions change, not all Cisco Secure ACS policies and rules can be migrated due to:
Unsupported attributes used by the policy
Unsupported AND/OR condition structure (mainly, once complex conditions are configured)
Unsupported operators
| Rule Elements | Status of Support | Description |
|---|---|---|
| Date and Time | Supported in ISE 2.3 | Date and time conditions in an authorization policy that have a weekly recurrence setting, are not migrated to Cisco ISE. As a result, the rules are also not migrated. |
| Date and Time | Supported in ISE 2.3 | Date and time conditions in an authentication policy are not migrated to Cisco ISE. As a result, the rules are also not migrated. |
| In | Supported | The "In" operator is converted to STARTS_WITH. |
| Not In | Supported | The "Not In" operator is converted to NOT_STARTS_WITH. |
| Contains Any | Supported | The "Contains Any" operator is converted to a compound condition with EQUALS & OR operators.
Example: In ACS, AD ExternalGrp Contains Any (A, B) is converted to (AD ExternalGrp Equals A) OR (AD ExternalGrp Equals B) in Cisco ISE. |
| Contains All | Supported | The "Contains All" operator is converted to a compound condition with EQUALS & AND operators.
Example: In ACS AD:ExternalGrp contains all A;B is converted to (AD ExternalGrp Equals A) AND (AD ExternalGrp Equals B) in Cisco ISE. |
| Combination of logical expressions | Supported in ISE 2.3 | Rules that use these operators in their conditions are not migrated:
Authentication policies that include compound conditions that have different logical expressions other than a || b || c || … and/or a && b && c && … such as (a || b) && c. Authorization policies that include compound conditions that have different local expressions other than a && b && c && are not migrated as part of the rule condition. Workaround: You can manually use library compound conditions in ISE for some advanced logical expressions. You can also split the compound condition such as (a || b) && c to two simpler rules with a || b and c. |
| Network conditions | Supported in ISE 2.2 | Rules that include only network conditions are not migrated. In case the condition includes network conditions and other supported conditions, the network conditions are ignored and are not migrated as part of the rule condition.
Workaround: Can use authorization condition for the attributes. |
| User attributes | Partially Supported | Rules with conditions that include user attributes with a data type other than the “String” data type are not migrated. |
| Host attributes | Not Supported | Authentication fails in case the condition refers to host attributes.
Authorization policies that include a condition that has host (endpoint) attributes are not migrated to Cisco ISE authorization policies. Please see supported attributes and data types for additional information on User, Host and Radius attributes. |
- Mark as Read
- Mark as New
- Bookmark
- Permalink
- Report Inappropriate Content
I am trying to migrate a config from AC 5.8.1. to ISE 2.2. The migration tool starts exporting the ACS config OK, but then it hangs forever at "Predefined Reference Data", after counting to some 560 objects.
What I am doing wrong here ?
- Mark as Read
- Mark as New
- Bookmark
- Permalink
- Report Inappropriate Content
HI Dragan,
Hoping that this was resolved. Just for the sake of clarity I am answering the question.
"Predefined reference data" takes a long time if you have large number of users and devices. I have covered this in the Part 3 of ACS to ISE Migration videos in the following community page ACS to ISE Migration.
Please ask your questions in ISE or ACS communities in future so that we can track this.
Thanks
Krishnan
- Mark as Read
- Mark as New
- Bookmark
- Permalink
- Report Inappropriate Content
Customer would like to migrate from ACS5.6 to ISE2.x. Customer ACS deployment is with an SNS-3415 appliance. Request is to upgrade to ISE2.x but maintaining the SNS-3415. Is this supported? If yes, what licensing migration SKU's can I use? If no, what are my options?
Please advice. Thank you.
Find answers to your questions by entering keywords or phrases in the Search bar above. New here? Use these resources to familiarize yourself with the community: