- Cisco Community
- Technology and Support
- Security
- Security Knowledge Base
- Notes on Azure AD as SAML IdP
- Subscribe to RSS Feed
- Mark as New
- Mark as Read
- Bookmark
- Subscribe
- Printer Friendly Page
- Report Inappropriate Content
- Subscribe to RSS Feed
- Mark as New
- Mark as Read
- Bookmark
- Subscribe
- Printer Friendly Page
- Report Inappropriate Content
04-11-2016 09:34 PM - edited 04-28-2019 05:47 PM
- [Screen Capture Video on 2017-Nov-24 to show the newer Azure Portal]
- Step 1. Create new IdP instance in ISE. (NOTE: Single IdP configuration in ISE can support multiple ISE web portals, each mapped to a separate Azure app).
- Step 2. Configure a new web portal (one of ISE My Devices, Certificate Provisioning, Guest, and Sponsor portals) and use the newly created IdP as the authentication method.
- Step 3. Multiple ISE policy service nodes (PSN):
- In case of an ISE deployment with multiple PSNs, a load balancer can be considered – so the IdP’s response is redirected to the load balancer and from there it will be reach out to the ISE nodes.
- Using Fully Qualified Domain Name (FQDN) (at the portal setting) may provide similar functionality by providing different DNS resolution for each ISE node in different subnets.
- Step 4. Return to the IdP settings. If using a load balancer, enable it in the IdP. Then, export the [ Service Provider Info ] and save it (zip file) to the local file system.
- Step 5. Export the ISE system certificate for SAML.
- Step 6. Extract the Service Provider Info zip file. Open the XML file in a text editor and locate
- entityID="http://CiscoISE/ab1320c0-0050-11e6-8136-1e6f3efa95fe" (the value here is an example. The URI is an XML namespace but not an actual website.)
- AssertionConsumerService Locations
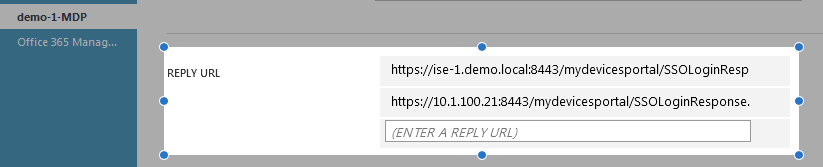
- <md:AssertionConsumerService Binding="urn:oasis:names:tc:SAML:2.0:bindings:HTTP-POST" Location="https://mydevices.demo.local:8443/mydevicesportal/SSOLoginResponse.action" index="0"/>
- <md:AssertionConsumerService Binding="urn:oasis:names:tc:SAML:2.0:bindings:HTTP-POST" Location="https://10.1.100.21:8443/mydevicesportal/SSOLoginResponse.action" index="1"/>
- <md:AssertionConsumerService Binding="urn:oasis:names:tc:SAML:2.0:bindings:HTTP-POST" Location="https://ise-1.demo.local:8443/mydevicesportal/SSOLoginResponse.action" index="2"/>
Azure Configuration Notes:
- Reference:
- For MSDN subscribers, Microsoft appears to provide some monthly Azure credits. For example, my MSDN platforms subscription has $100 USD monthly credits on Azure services.

To register a new application in the Azure classic portal
- Sign in to the Azure classic portal.
- Click on the Active Directory icon on the left menu, and then click on the desired directory.
- On the top menu, click Applications. If no apps have been added to your directory, this page will only show the Add an App link. Click on the link, or alternatively you can click on the Add button on the command bar.
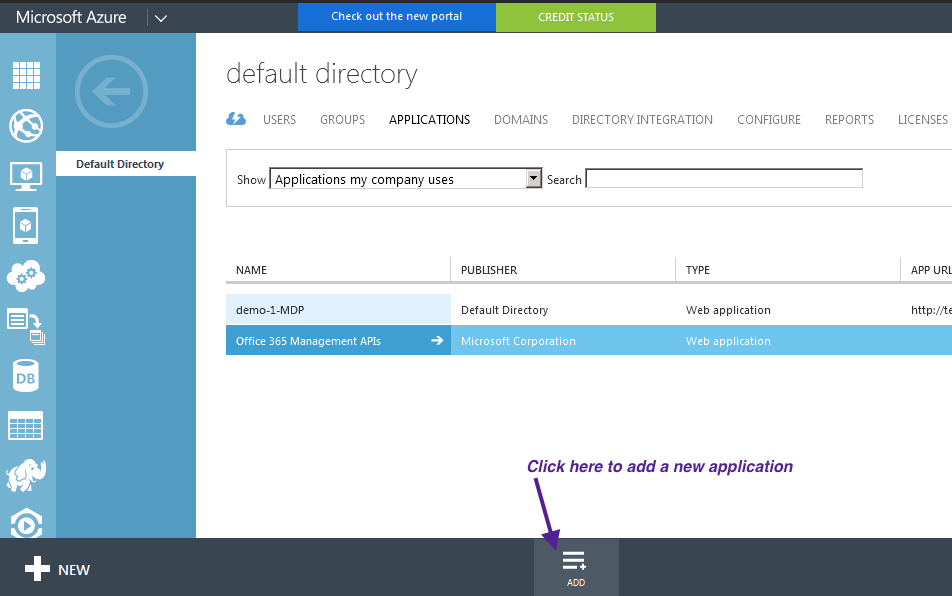
- On the What do you want to do page, click on the link to Add an application my organization is developing.
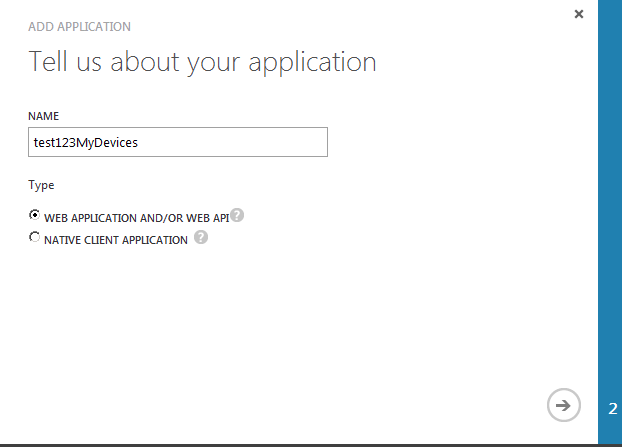
- On the Tell us about your application page, you must specify a name for your application as well as indicate the type of application you are registering with Azure AD. You can choose from a Web application and/or Web API (default, known as a confidential client in OAuth2) or Native client application which represents an application that is installed on a device such as a phone or computer (known as a public client in OAuth2). Once finished, click the arrow icon on the bottom-right corner of the page.
- On the App properties page, provide the Sign-on URL and App ID URI if you’re registering a Web application or just the Redirect URI for a Native client application, then click the checkbox in the bottom-right hand corner of the page.

- Sign-on URL is usually related to how Microsoft provisions it. For example, I logged using my MSDN account and see this as part of the URL in the current page --> https://manage.windowsazure.com/@abc.onmicrosoft.com#Workspaces/ActiveDirectoryExtension/Directory/.../apps
- So, I pick http://abc.onmicrosoft.com/demo-1-MDP where demo-1-MDP needs to be unique for the Azure account
- APP ID URI is the value of the entityID from Step 6.
- Sign-on URL is usually related to how Microsoft provisions it. For example, I logged using my MSDN account and see this as part of the URL in the current page --> https://manage.windowsazure.com/@abc.onmicrosoft.com#Workspaces/ActiveDirectoryExtension/Directory/.../apps
- Your application has been added, and you will be taken to the Quick Start page for your application....
- Select the Cloud icon if not already in the overview page
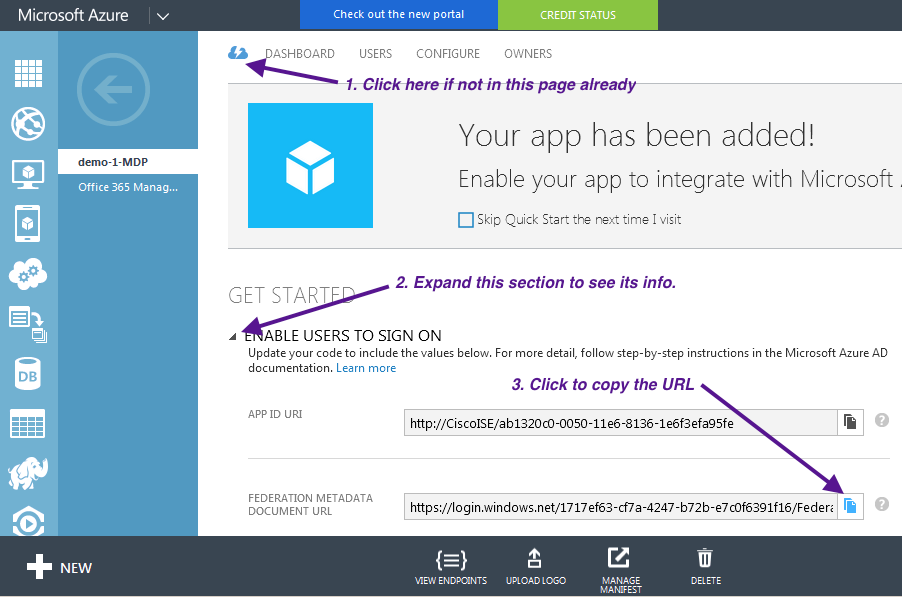
- Open a browser tab or new window, paste the URL, and save the resulting page to a file as .XML.
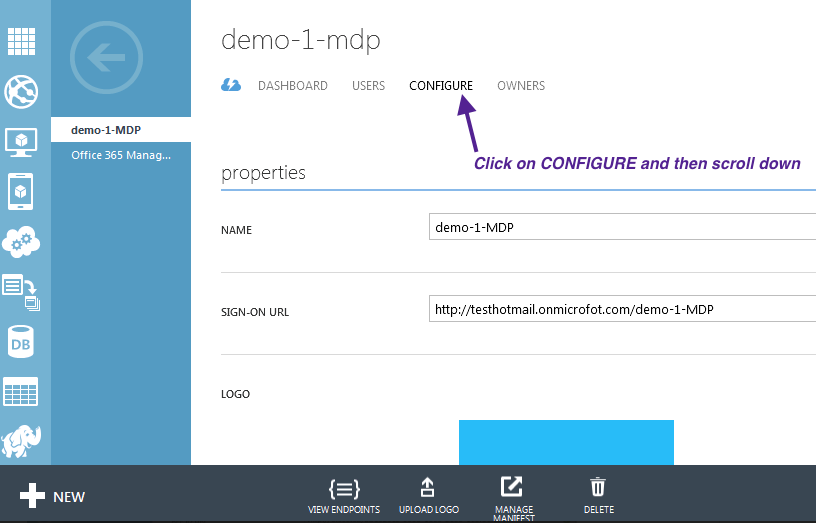
- Select CONFIGURE
- Locate the section for Single Sign On and, in there, the REPLY URL
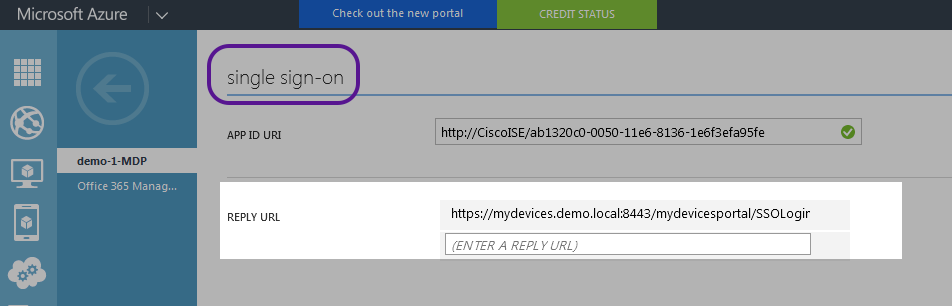
- Update it with the Location values of AssertionConsumerService that has the hostname of the load balancer, if one configured, or the FQDN, if one configured (as shown in the case). If not using either, then enter all location values one entry at a time. For example,
- Click Save at the bottom of the page.

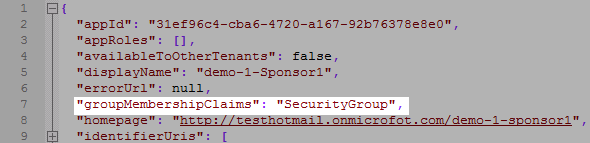
- (For Sponsor Portal or Guest Portal requiring "groups") Need to update groupMembershipClaims in the manifest for the app
- Download Manifest
- Use a text editor to open the download .json file, search groupMembershipClaims, change it to "All" or "SecurityGroup" (enclosed in quotations), and save the file
- Upload it back to AzureAD for the application.
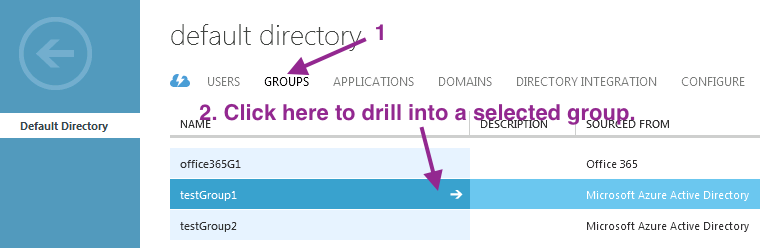
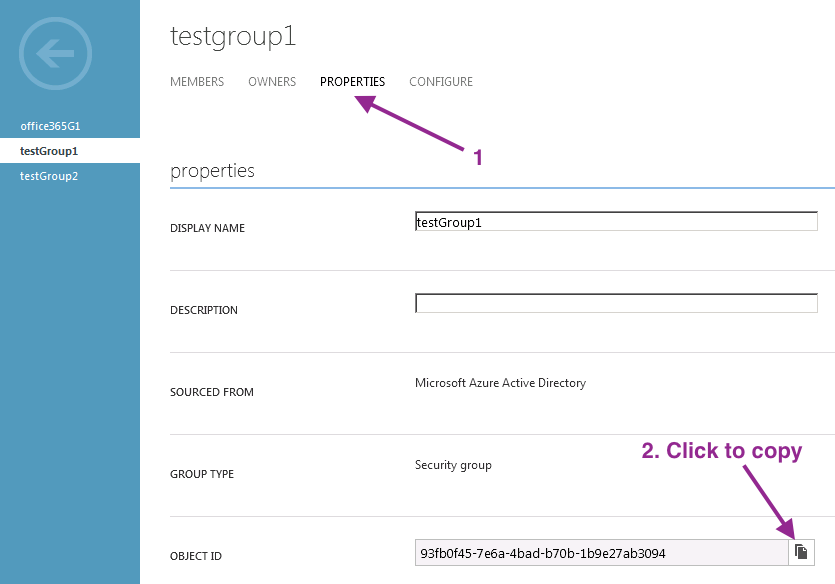
- AzureAD groups are by their object IDs but not by their names so we need to get the IDs and map them in ISE.
- Download Manifest


- Step 7. Configure attribute mappings and group attributes at the 3rd-party SAML IdP. (See the group object ID info above for AzureAD).
- Step 8. Export the metadata from the 3rd-party product. (DONE above already)
- Step 9. Return to ISE admin, import the IdP metadata from the the 3rd-party product, and add groups and attributes in the IdP instance.
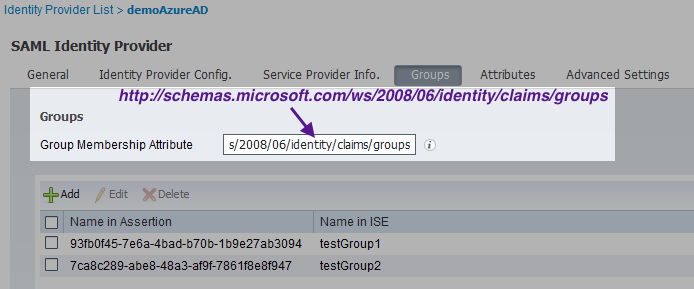
- (For sponsor or guest portal in need of group membership mapping)
- Tab [ Groups ] and define as below
- Group Membership Attribute http://schemas.microsoft.com/ws/2008/06/identity/claims/groups (Note: The URI is an XML namespace but not an actual website.)
- Add the groups
Name in Assertion Name in ISE <object-ID-for-testGroup1-copied-from-AzureAD> testGroup1 <object-ID-for-testGroup2-copied-from-AzureAD> testGroup2
- Group Membership Attribute http://schemas.microsoft.com/ws/2008/06/identity/claims/groups (Note: The URI is an XML namespace but not an actual website.)
- Tab [ Groups ] and define as below
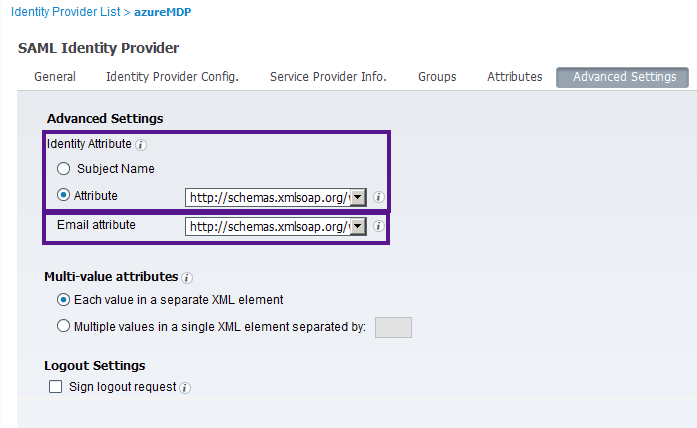
- In case the 3rd-party product (e.g. Azure AD) returning SAML subject name in persistent or transient formats, there is a needs to define attribute assertion as identity attribute (advanced setting tab)
- Azure AD seems using different attributes depending on Azure instances. In my Azure AD example, the best user identifier is the email address so I define the attribute as below. In some cases (e.g. MDJ-network's and our test Azure AD account), it uses http://schemas.xmlsoap.org/ws/2005/05/identity/claims/name instead. (The URI is an XML namespace but not an actual website.)
- (For sponsor or guest portal in need of group membership mapping)
---------------------------------------------------------------------------------------
Use ISE debug to locate a proper Azure AD attribute as username. Most of Microsoft cloud services let users logins with their email addresses so the email address is the best identifier as the "username". As said before, Azure AD is not consistent in naming this field. To overcome this, we need to turn DEBUG on saml and use ISE admin CLI "show logging application ise-psc.log" and search for the logged-in user's email address. For example, the line below contains a logged-in user's email so we set the corresponding attribute as the subject name.
... DEBUG [http-bio-10.1.100.21-8443-exec-1][] cpm.saml.framework.impl.SAMLAttributesParser -::::- [parseAttributes] Delimeter not configured, Attribute=<http://schemas.xmlsoap.org/ws/2005/05/identity/claims/emailaddress> add value=<employee1@demo.local>
------------------------------------------------------------------------------
-
Name in Assertion Type Name in ISE http://schemas.xmlsoap.org/ws/2005/05/identity/claims/emailaddress String email 
- Then, in the Advanced Settings, I map both Identity Attribute and Email attribute to it.
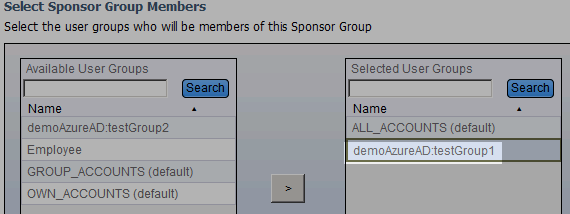
- Step 11. (For ISE Sponsor Portal SSO only) Add AzureAD groups to sponsorGroup(s)
- Step 12. Perform ‘Portal test URL’ in the relevant ISE web portal.
Find answers to your questions by entering keywords or phrases in the Search bar above. New here? Use these resources to familiarize yourself with the community: