- Subscribe to RSS Feed
- Mark as New
- Mark as Read
- Bookmark
- Subscribe
- Printer Friendly Page
- Report Inappropriate Content
- Subscribe to RSS Feed
- Mark as New
- Mark as Read
- Bookmark
- Subscribe
- Printer Friendly Page
- Report Inappropriate Content
on
10-18-2016
07:10 AM
- edited on
04-02-2020
05:37 AM
by
VIVEK - vkulanda
![]()
Workviews can be defined for multiple purposes: for Cisco partners to create customer specific workviews that group all projects pertaining to a specific customer. Or it might also be useful to create workviews grouping projects for a particular technology or to sub-divide an overarching program, ...
There are two types of Workviews:
- Private Workview: These workviews are only visible to you and allows you to organize your many projects in logical groupings.
- Shared Workview: These workviews can be shared with peers and/or with your Cisco contacts. This is most used to collaborate in team within a particular context defined by a grouping of projects.
This article explains how to create your own Workviews: private or shared.
Managing workviews
To access the Workview Management area, 1) from the expansion when you mouse over the workview icon in the Left Pane Filter (LPF) or 2) when fully expanding the LPF, click on the cog wheel. This will list all workviews, either created by you, or created by others where you are invited. To leave the Workview Management area, 3) click on the 'back' arrow left from the 'WorkView Management' header.
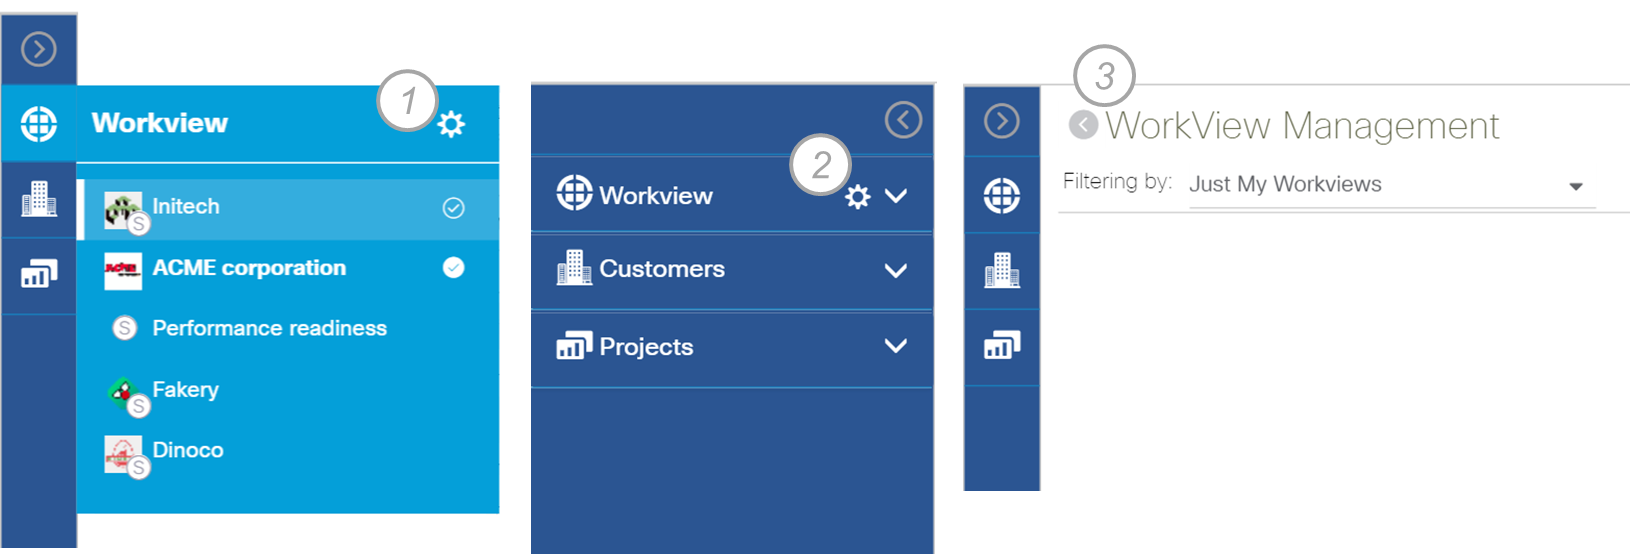
Once you are in the 'Workview management' area, you will by default see all the workviews that are either created by you or shared with you (where you are invited). The Workview management listing has 2 'Filter by' Preset Table Configurations to choose from. Custom Table configurations are not enabled in this functional area. Further column filtering is allowed as well. The Left Pane Filter is disabled when in the Workview Management area.
Among other data elements, the workview listing will show you the workview name, who the owner is (or Single Point of Contact - SPOC), how many projects it includes. When you pause your mouse over the number of projects for more than 2 seconds, it will also list the projects in a pop-up.
Just as in any other table grid, a single click opens the properties pane for the selected workview and the corresponding actions are listed in the action pane: actions that are applicable to you per your relation against the selected workview.
Following actions are available to you :
| Clone Workview with Folders | For any workview, both workviews you own or others. It will duplicate the workview as a 'private' workview, including the project list and folder structure. | |
| Clone workviews without Folders | For any workview, both workviews you own or others. It will duplicate the workview as a 'private' workview, including the project list but without folder structure. | |
| Archive Workview |
For any 'private' workview you own, or 'shared' workviews of which you are the SPOC or Admin. It removes the workview from the Left Pane Filter and cannot be applied anymore. For 'shared' workviews, the workview is removed for all the members. It can be restored with the 'Restore' action. Note: any records (documents or other) are not archived with it. It is merely the grouping context that is archived. |
|
| Restore Workview | To restore an archived workview that you originally owned. Archived workviews can only be listed if the status column is explicitly filtered on 'Archived' | |
| Delete Workview | For any 'private' workview you own, or 'shared' workviews of which you are the SPOC or Admin. It removes the workview from the Left Pane Filter and cannot be applied anymore. For 'shared' workviews, the workview is removed for all the members. It can also not be restored. Note: any records (documents or other) are not deleted with it. It is merely the grouping context that is removed. |
|
| Opt out as a Member | For any shared workview that you are a member of. You can opt out as a member. If you are the SPOC of the workview, the action will not be available.The SPOC/Admins will be notified. |
When opening up the properties pane of a workview, it will open up in read-only mode or in editable mode. If you are the owner of a 'private' workview or if you are the SPOC or Admin of a 'shared' workview, the properties pane opens up in editable mode. Properties are organized in 3 tabs: Essentials, Projects and Members. The latter only appears if it is a 'shared' workview.
Creating a new Workview
To create your own workview, click on the 'Add' icon, in the top-left corner, just above the table grid.

An empty row will be added on top of the listing in the table grid with the properties pane open in editable mode on the 'Essentials' tab.
Following fields are available for you to complete, while creating the workview :
| Title | This is the title of the workview that will be visible in the Left Pane Filter |
| Owner/SPOC | Your name by default and cannot be changed here. Note that an Owner/SPOC has edit rights over the workview. Owner is the term used for 'private' workviews, SPOC for 'shared' workviews. Membership of a 'shared' workview is managed in the 'Members' tab. The Members tab allows also to change the SPOC to someone else if required. |
| Description | (optional) This will show at mouse-over on the Workview Header, when applied. |
| Shared Workview (checkbox) | This distinguishes if the workview is 'private' for your own use or 'shared' with other members. Once 'shared', it can not be changed back to 'private'. |
| Workview Logo | (optional) Allows you to add a logo for further customization. As a Cisco partner, this can be useful for instance when creating a workview per customer, by adding the customer company logo for easier identification. Use the handles to crop the image to the desired size. A separate 'upload' button is provided to upload the logo. |
Once the title is filled in and the auto-save is triggered, the workview is created. Refresh the table grid to see your new workview appear with full details.
At any time after that the workview is created, the field values can be changed, except 'Owner' and the flag that indicates if a workview is 'shared'; once shared the workview cannot be made 'private' anymore.
The 'Projects' tab allows you to list the projects that will be grouped in the workview. 2 preset Table configurations are available and column filtering is possible as well. Custom Table configurations are not enabled. When changing preset or applying some column filtering, it is sometimes necessary to click the 'refresh' ![]() button.
button.
From the projects made available to you, simply check the projects that you want to be part of the workview. It is possible to select projects that are already part of another workview. Trigger the auto-save to effectively add the projects to the workview.
The 'Members' tab only becomes visible when your workview is tagged as a 'Shared' workview'. 3 sections are available on this tab: SPOC, Admin, and Members. A SPOC is considered to 'go-to' person for any questions on the Workview. The SPOC has full edit rights on the workview. A SPOC is mandatory and can never be emptied. Admins have also full edit rights but are optional. Members are part of the workview, however they cannot edit the Workview. Once you are a SPOC, Admin or Member of a workview you will find the workview listed in your Left Pane Filter for your usage.
To add a person to the workview, use the user-selection component.
You can search for a user from your aggregated contact-list, by user id, email address or name. Hit enter to trigger the search. From the Search results, check the correct person to add to your workview.
Note: The aggregated contact-list is created and managed in the Contact management module and is explained in Create a List of Contacts.
When adding a person to a workview, the person will be added by default as a regular member, however you can also already identify him as Admin or SPOC.
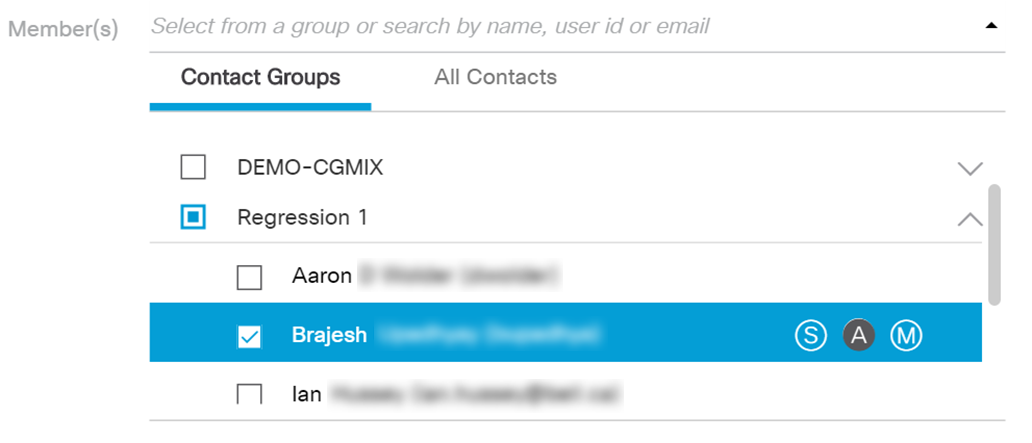
Alternatively, rather than searching and probably easier, you can also choose the person from your aggregated contact-list or from the contact-groups. Click the arrow-down, right from the search input field to expand your contact-list and contact-groups. Further expand the appropriate section and/or contact-group and select one or multiple persons at once. You can also select a contact-group as a whole. Click outside the user-selection component to effectively add the selected person to the member list.
Once your users are added, you can always still change their role by dragging and dropping the user to the appropriate section: SPOC, Admin or Member. The SPOC can not be dragged, however any other member can be dragged and dropped in the SPOC section. This will replace the SPOC and the old SPOC is automatically moved to the Admin section.
You can also remove individual users or clear all. Only the SPOC can not be removed.
Trigger the auto-save to effectively add the members to the workview.
At any time on any tab, if you change some values in error, you can undo the changes by clicking on the 'undo' ![]() button in the top right corner of the properties pane, which will revert the values to the last saved values.
button in the top right corner of the properties pane, which will revert the values to the last saved values.
Once your workview is created and/or other management functions are applied, leave the Workview management area by clicking the 'back' arrow left from the 'WorkView Management' header. From the Left Pane Filter you will now find the new created Workview in the list.
![]() Tips
Tips
A shared workview is the same concept as an account page. It is an easy and customized way to collaborate with your Cisco contacts and as a Cisco partner to collaborate with your customer contacts. You can Create a 'shared' workview, add Cisco contacts and your peers as members. You can even customize it with the company logo.
As you will read in the next article, you can also create a folder hierarchy under a workview for easy navigation of documents.
Related articles :
Find answers to your questions by entering keywords or phrases in the Search bar above. New here? Use these resources to familiarize yourself with the community: