- Cisco Community
- Additional Communities
- Delivery Collaboration Portal (DCP2)
- Delivery Collaboration Portal (DCP2) External Knowledge Base
- Create your own Custom Table Configuration
- Subscribe to RSS Feed
- Mark as New
- Mark as Read
- Bookmark
- Subscribe
- Printer Friendly Page
- Report Inappropriate Content
- Subscribe to RSS Feed
- Mark as New
- Mark as Read
- Bookmark
- Subscribe
- Printer Friendly Page
- Report Inappropriate Content
on
11-24-2017
02:48 AM
- edited on
04-02-2020
04:42 AM
by
VIVEK - vkulanda
![]()
Several preset Table Configurations are provided by default to choose from. A Table Configuration combines one or more filter criteria, a sort order and what columns are displayed and in what order.
It is also possible to create your own custom Table Configurations. A custom Table configuration allows you to create your own filter criteria. It also allows you to reveal columns that are not provided by default. Also the column order can be configured as well as the sort order.
How to define your own Custom Configurations is explained in this article.
Create your own Custom Table Configuration
To create your own Custom Table Configuration, you need to access the configurator. To do so, click on the configurator icon, right from the 'Filter by' Table Configurations menu ![]() .
.
Once opened, it looks like this :
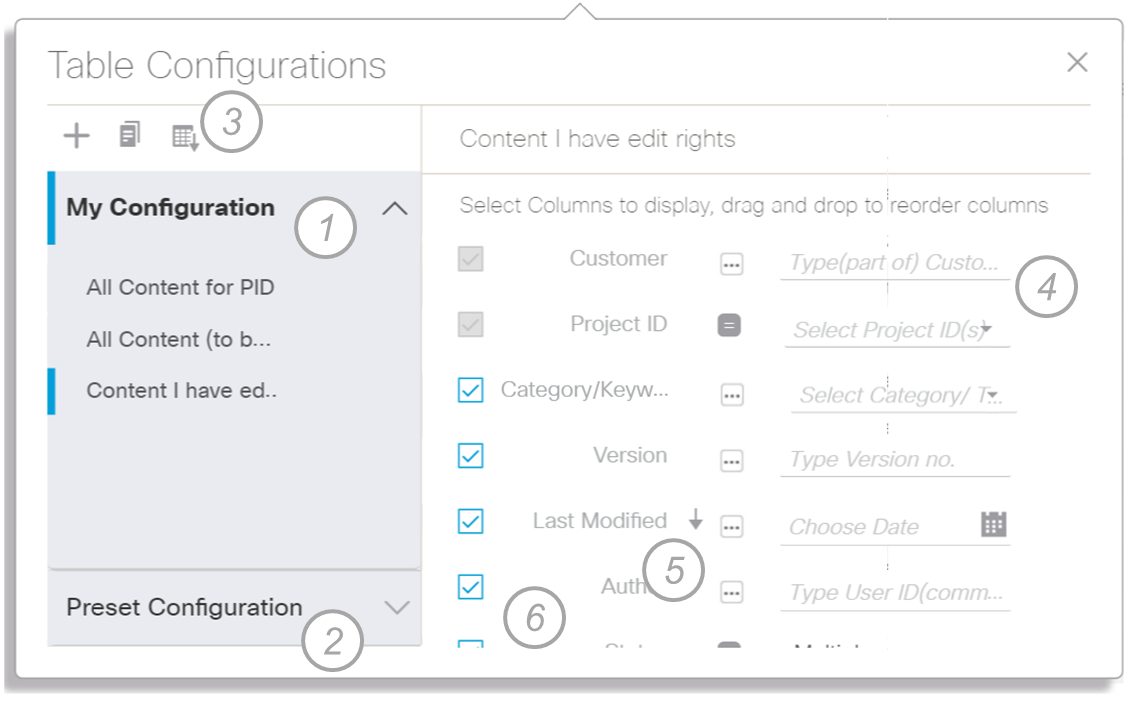
The configurator left column allows you to select a custom or preset table configuration :
- My configuration section lists all custom defined configurations. Click on the down arrow to expand this section. Click the up arrow to collapse it again. DCP allows a maximum of 10 Custom Table Configurations. You will not be allowed to create/copy/import additional configurations once you have 10 Custom Configurations.
- Preset configuration section lists all preset configurations. It allows you to understand in detail how a preset configuration is defined but these are not editable. Click on the down arrow to expand this section. Click the up arrow to collapse it again.
- To create a new custom configuration, you can:
- create from scratch by clicking the 'add'
 icon
icon - create by copying an existing preset or custom configuration. Select any of your existing Preset or Custom Configuration and click the 'copy'
 icon.
icon. - create by importing a custom configuration from someone else. Click on the 'import'
 icon and type in a cisco.com user id from any contact of your aggregated contact list (*). Hit the enter key to trigger the search. It will list the Custom Table Configurations from the user. Select the appropriate Custom Configuration from the list and click 'Import'.
(*) The aggregated contact list is the list of contacts that is created by you in the Contacts management module. This is explained in more detail in List of Contacts for easy reference.
Once the new Custom Configuration is added in your left column with its default name, you can rename the configuration at that moment or at any time by double-clicking the name in the left column of the configurator. Type in the new name and hit the 'enter' key. Only Custom Table Configurations can be renamed. Preset Table Configurations can not be renamed.
- create from scratch by clicking the 'add'
The right column provides additional details from the selected preset or custom configuration from the left column :
- It lists the different criteria. This is where you define you filter criteria.
- A filter criteria is defined by combining a data element, an operator and a value. You can have multiple filter criteria per table configuration.

- The available operators differ per data element. The possible values, also differ per data element. Data elements are input as free text, chosen from a list of values, using a calendar date picker.
Yet, for some data elements a combination is provided of a list of values and free text. E.g. 'Category/Keyword': you can chose the category from the list of values or type in any Keyword. - Some filter criteria are dependent on each other. E.g. 'Action taken' and 'Date range (on action taken)'. In such case, the latter will only enable if a value is set for the former.
- A filter criteria is defined by combining a data element, an operator and a value. You can have multiple filter criteria per table configuration.
- A table can be sorted ascending or descending by one data element (=column). Click on the area between the data element and the operator and an arrow up will appear to indicate that the table will be sorted per that data element in ascending order. Click again to reverse the order.
- Check the check-boxes to define which columns are shown and which columns are hidden.
- Some key identifier columns can not be removed: 'Project ID', 'Customer', 'Content Name', 'Content ID' are mandatory. These cannot be removed from table listing view. They can be rearranged though.
- Some columns are permanently hidden and cannot be made visible in the table grid, e.g. 'Action Taken' and 'Date Range' are hidden columns which do not appear in the table listing view. These fields are additional criteria you can select to refine the documents listed.
- You can select the order of the columns in which they will appear in the table listing view by dragging & dropping a column to the appropriate location – use the column handle
 to drag & drop the column.
Note: The column order and column width can also be changed from the table grid itself. Just place your cursor on any of the column headers and start dragging to the place you want to have it. Drop the column and the order will change.
Similarly place your cursor on a column divider and start dragging to change the column width.
Changes in column order and width are automatically saved with the applied Table configuration (both preset or custom).
All changes are auto-saved.
Apply Custom Table Configuration from the Table Configurator
It is also possible to apply a Table configuration from the Table Configurator.
To apply a Table configuration, from the left column, select the 'check' icon next to the configuration you wish to use. Close the Table Configurator and your applied Table configuration will render in the table grid.
Delete a Custom Table Configuration
To delete a Custom Table configuration, from the left column, select the 'delete' icon next to the configuration you wish to delete.
In case you accidentally deleted the wrong Custom Table configuration, you can click 'Undo' from the success message. It will revert your deleted configuration.
![]()
Related articles :
Find answers to your questions by entering keywords or phrases in the Search bar above. New here? Use these resources to familiarize yourself with the community: