- Cisco Community
- Technology and Support
- Security
- Security Knowledge Base
- Configuring Cisco Mobility Express AP with ISE
- Subscribe to RSS Feed
- Mark as New
- Mark as Read
- Bookmark
- Subscribe
- Printer Friendly Page
- Report Inappropriate Content
")
")
- Subscribe to RSS Feed
- Mark as New
- Mark as Read
- Bookmark
- Subscribe
- Printer Friendly Page
- Report Inappropriate Content
04-20-2018 12:53 PM - edited 08-10-2018 09:48 AM
- Introduction
- Prerequisites, assumptions, and caveats
- Configuration Overview
- IP addressing and other network ID used in the document
- Mobility Express AP
- Bootstrap
- Add ISE as RADIUS server
- Add Guest (OPEN) WLAN
- Add Employee/BYOD (SECURED) WLAN
- ISE
- Add Mobility Express AP as Network Access Device (NAD)
- (Optional) Add test user
- Modify BYOD profile
- Modify Authorization profile
- Modify Policy Set
Introduction
This document describes steps to configure Cisco Mobility Express AP (ME-AP) running version 8.7 to work with ISE 2.4 for guest access (CWA) and BYOD (Single-SSID). Mobility Express version 8.7 is the first version to support RADIUS CoA, RADIUS based URL-Redirect, and DNS based ACL which allows users to use advanced use cases with ISE. ME-AP 8.7 also automatically configures redirect ACL as well as advanced WLAN settings to work with ISE, thus simplifying the configuration process. This document will leverage smart default policy settings present in the ISE where possible.
For more information about Cisco Mobility Express, please go to Mobility Express - Fast Wireless LAN Solutions for SMBs - Cisco
Prerequisites, assumptions, and caveats
- ME-AP capable of running 8.7 (This document uses CLI to bootstrap ME-AP and continues after there is IP connectivity to the ME-AP GUI)
- ISE 2.4 (Using 2.4, but should also work with previous version of ISE though UI will look different) with default settings
- Underlying network elements have been configured, including VLAN, DNS, DHCP, Routing, etc.
- ISE Secure Access Wizard does not support ME-AP
Configuration Overview
Mobility Express AP
- Bootstrap
- Add ISE as RADIUS
- Configure CWA WLAN
- Configure BYOD WLAN
ISE
- Add AP as NAD
- Add test employee user
- Modify BYOD profile with SSID name
- Modify default Authorization profiles
- Enable Policy set for CWA and BYOD
IP addressing and other network ID used in the document
| Use | Value |
|---|---|
| ISE | 192.168.201.93 |
| Mobility Express AP Management Interface | 192.168.80.66 |
| Endpoint Subnet | 192.168.80.0/24 |
| Guest SSID | OPEN |
| Employee/BYOD SSID | SECURED |
Mobility Express AP
Bootstrap
If the Mobility Express AP (ME-AP) has not been configured previously, go through the initial configuration either by connecting to the initial SSID or through the console port. Here is sample output from bootstrapping via console port:
| Bootstrap |
|---|
|
Welcome to the Cisco Wizard Configuration Tool Use the '-' character to backup
Enter Administrative User Name (24 characters max): admin Enter Administrative Password (3 to 127 characters): ********* Re-enter Administrative Password : *********
System Name [Cisco-2cd0.2d3f.8a80] (24 characters max): MEAP
Enter Country Code list (enter 'help' for a list of countries) [US]: 7
Management Interface IP Address Configuration [STATIC][dhcp]:
Management Interface IP Address: 192.168.80.66 Management Interface Netmask: 255.255.255.0 Management Interface Default Router: 192.168.80.1 Create Management DHCP Scope? [yes][NO]: Employee Network Name (SSID)?: PSK Employee Network Security? [PSK][enterprise]: Employee PSK Passphrase (8-63 characters)?: ******** Re-enter Employee PSK Passphrase: ******** Enable RF Parameter Optimization? [YES][no]: Client Density [TYPICAL][Low][High]: Traffic with Voice [NO][Yes]:
Configuration correct? If yes, system will save it and reset. [yes][NO]: yes |
Once ME-AP reloads, connect to the Web GUI and login using the credential entered via CLI
Add ISE as RADIUS server
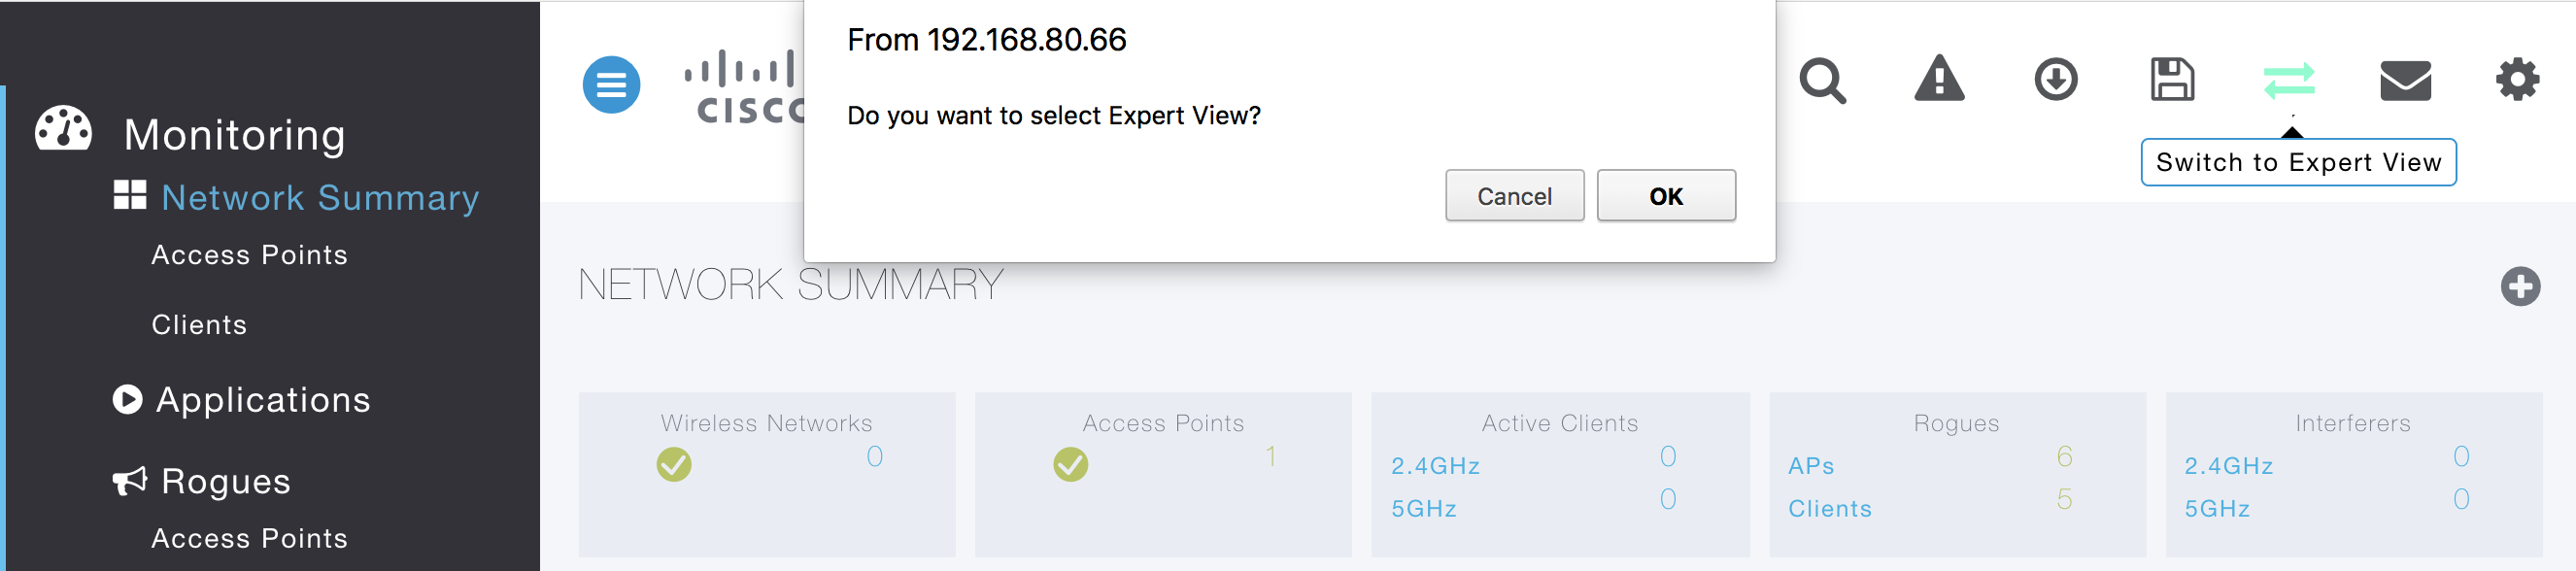
- Switch to Expert View. This enables the UI to allow admin to add RADIUS servers to the ME-AP. Click OK on confirmation pop-up.
- Click on Management > Admin Accounts
- Click on RADIUS
- Scroll down and add RADIUS Authentication Server with ISE IP address and Shared Secret
- Repeat for RADIUS Accounting Server with same IP address and Shared Secret
- (Optional) Once RADIUS servers have been added, the expert mode can be turned off

Add Guest (OPEN) WLAN
- Go to Wireless Settings > WLANs
- (Optional) Delete WLAN created during bootstrap
- Click on Add new WLAN/RLAN
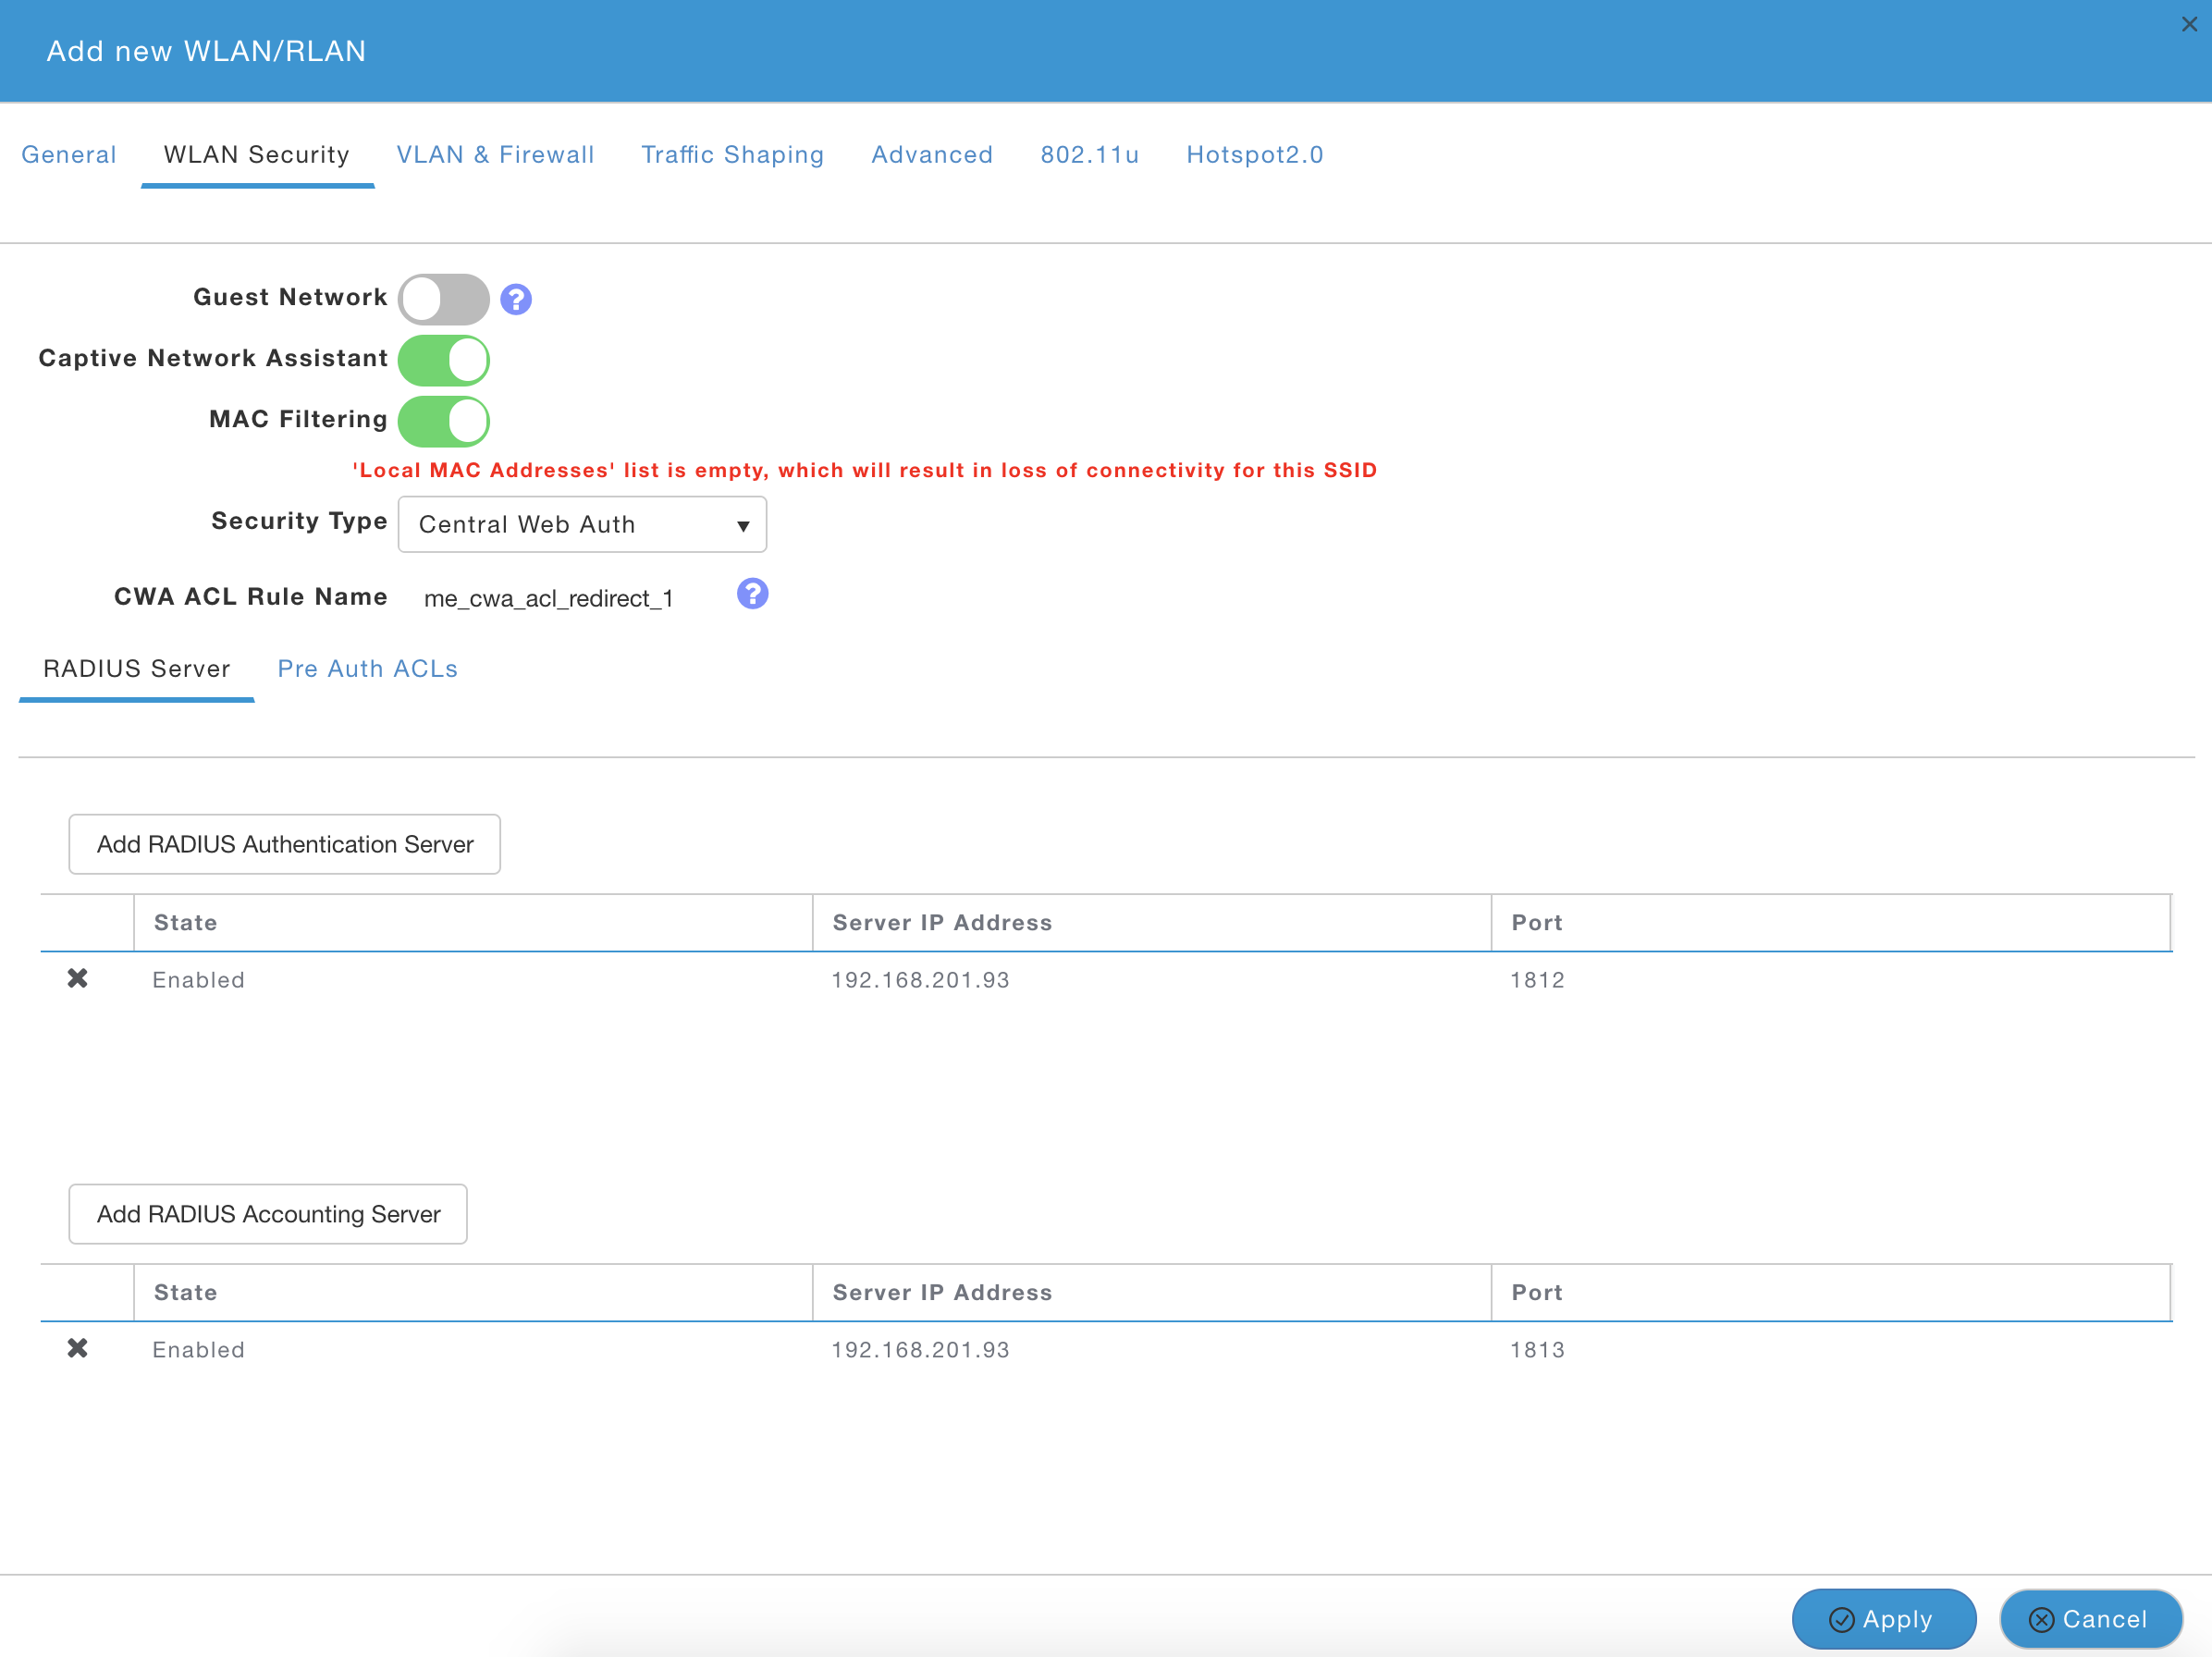
- Create Guest WLAN with following information
- General Tab
- Profile Name/SSID: OPEN
- WLAN Security
- Captive Network Assistant: Enabled
- Security Type: Central Web Auth
- General Tab
- Click on Add RADIUS Authentication Server and ensure ISE IP is shown and click apply.
- Repeat for RADIUS Accounting Server
- Make note of the ACL name shown for ‘CWA ACL Rule Name’. It should read ‘me_cwa_acl_redirect_#’. You will need to use the same ACL name in the ISE AuthZ Profile in later steps
- Click Apply

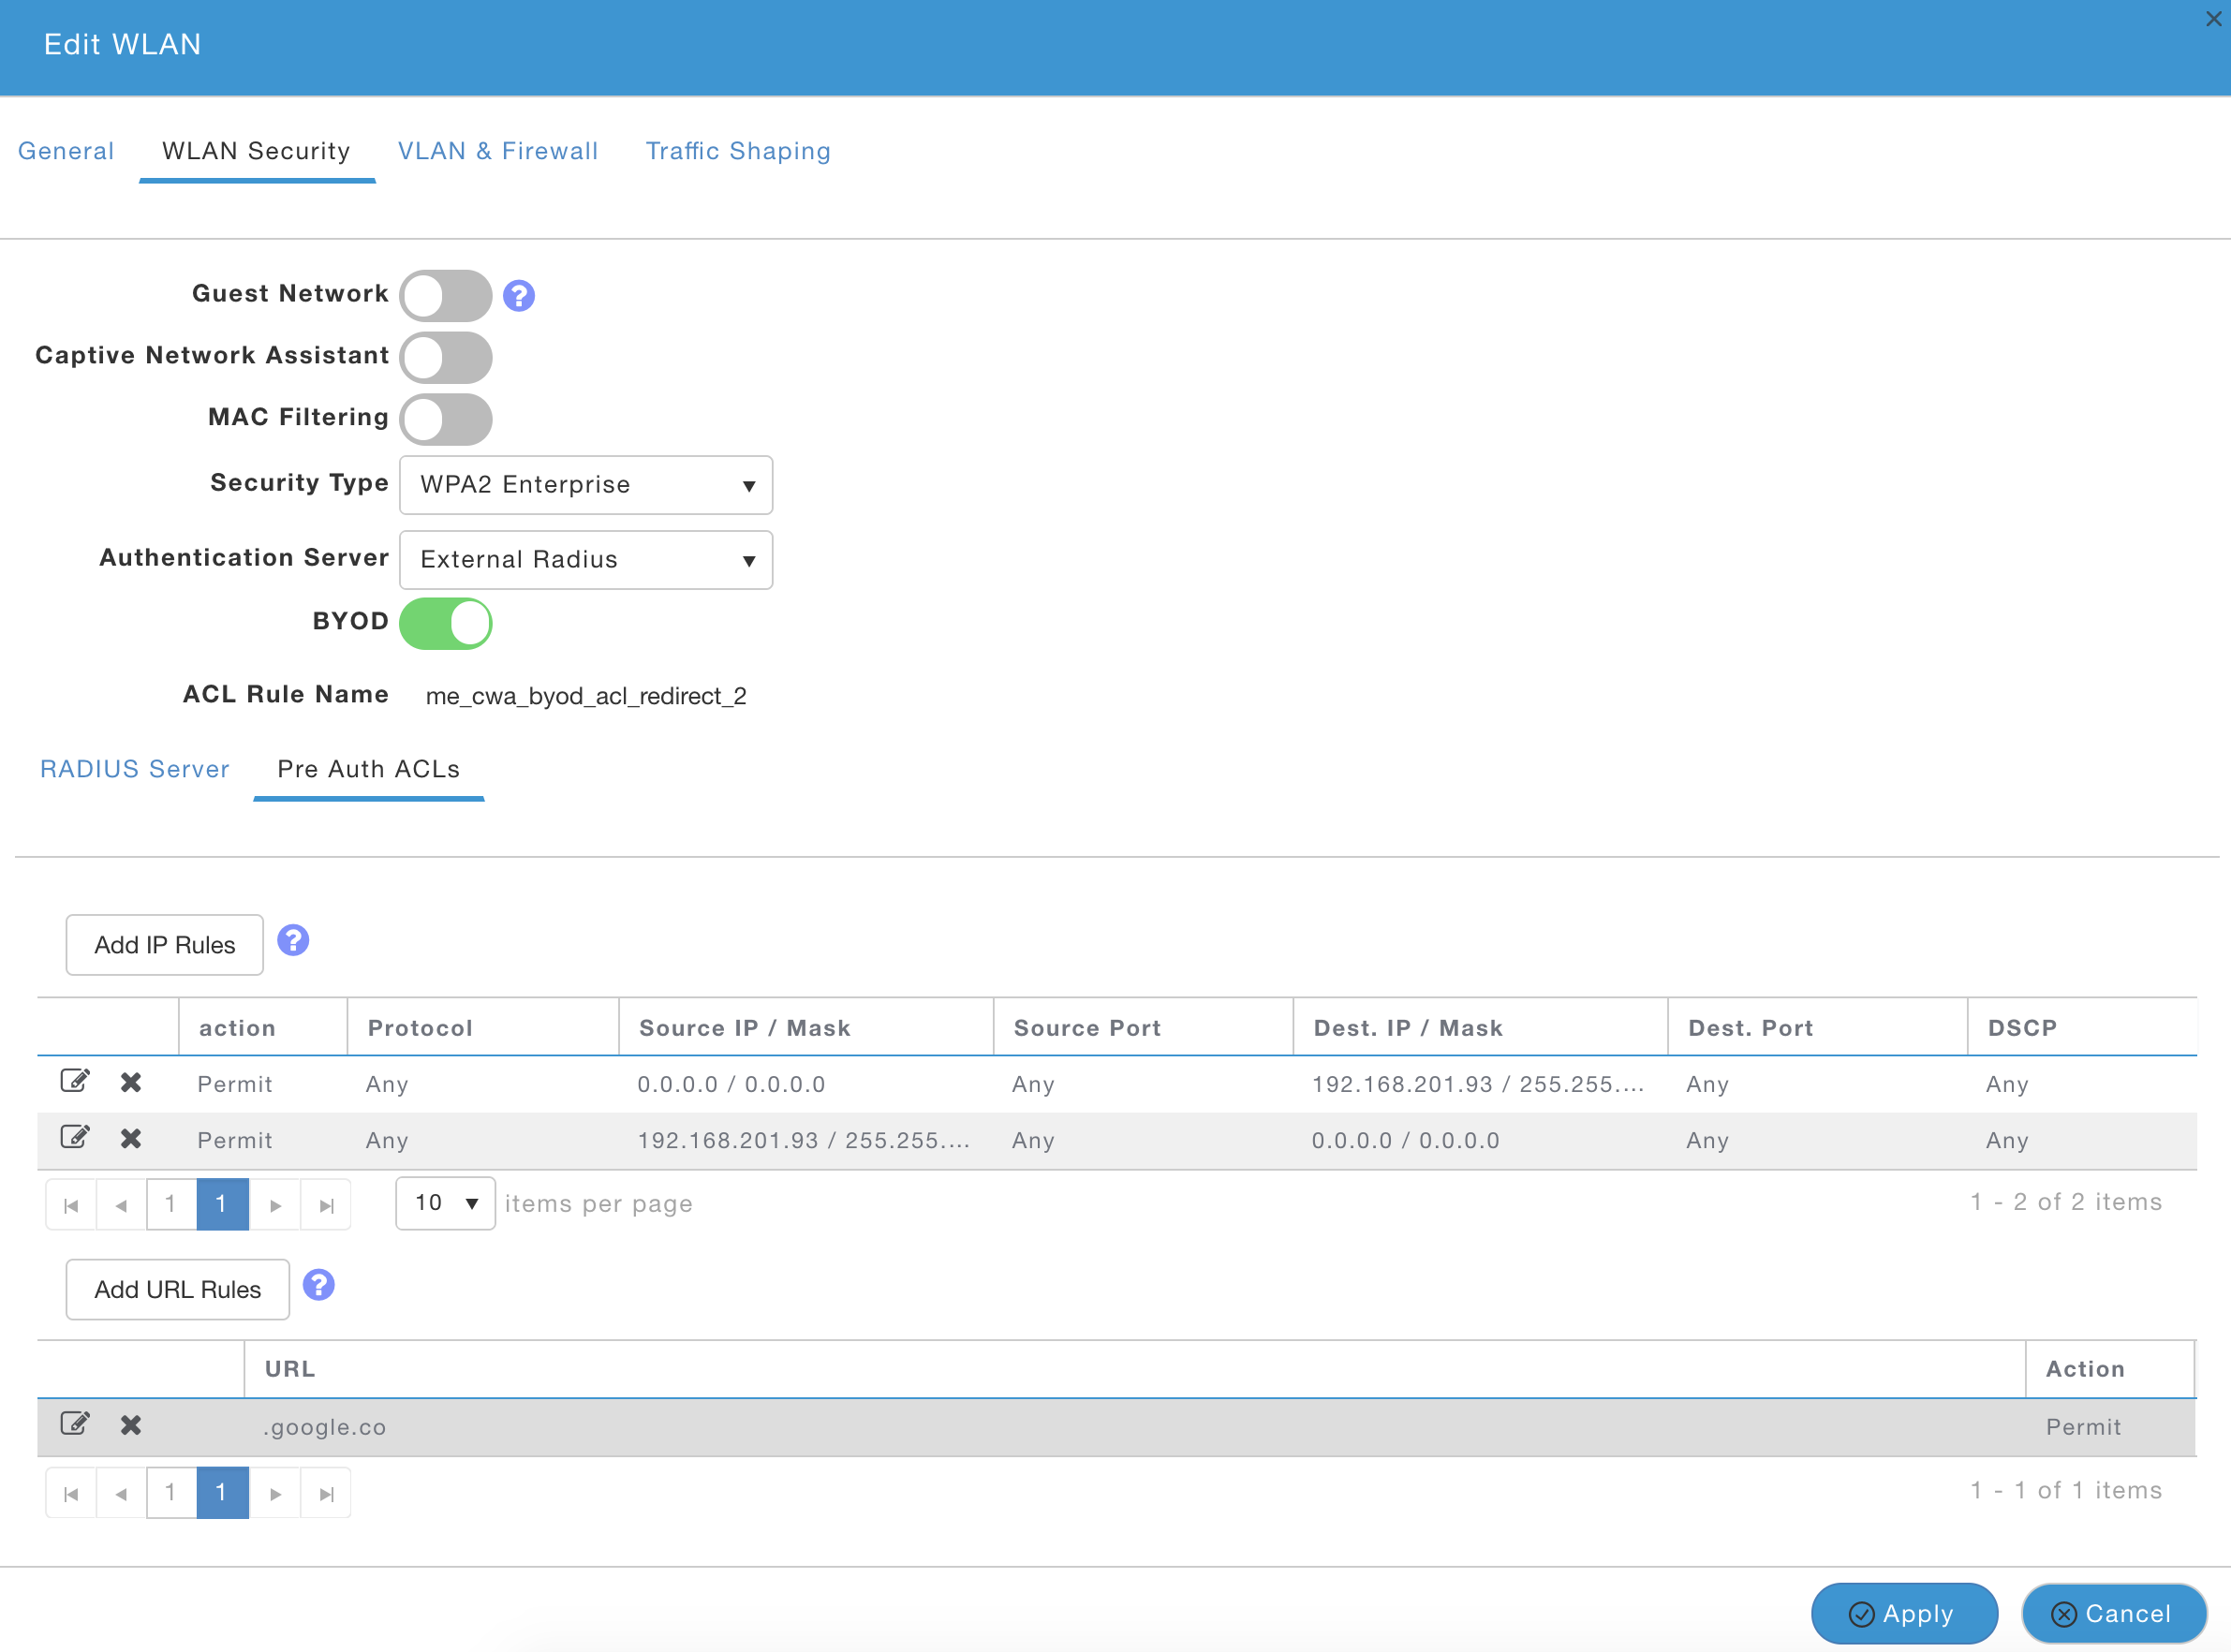
Add Employee/BYOD (SECURED) WLAN
- Click on Add new WLAN/RLAN
- Create Configuring Cisco Mobility Express AP with ISE with following information
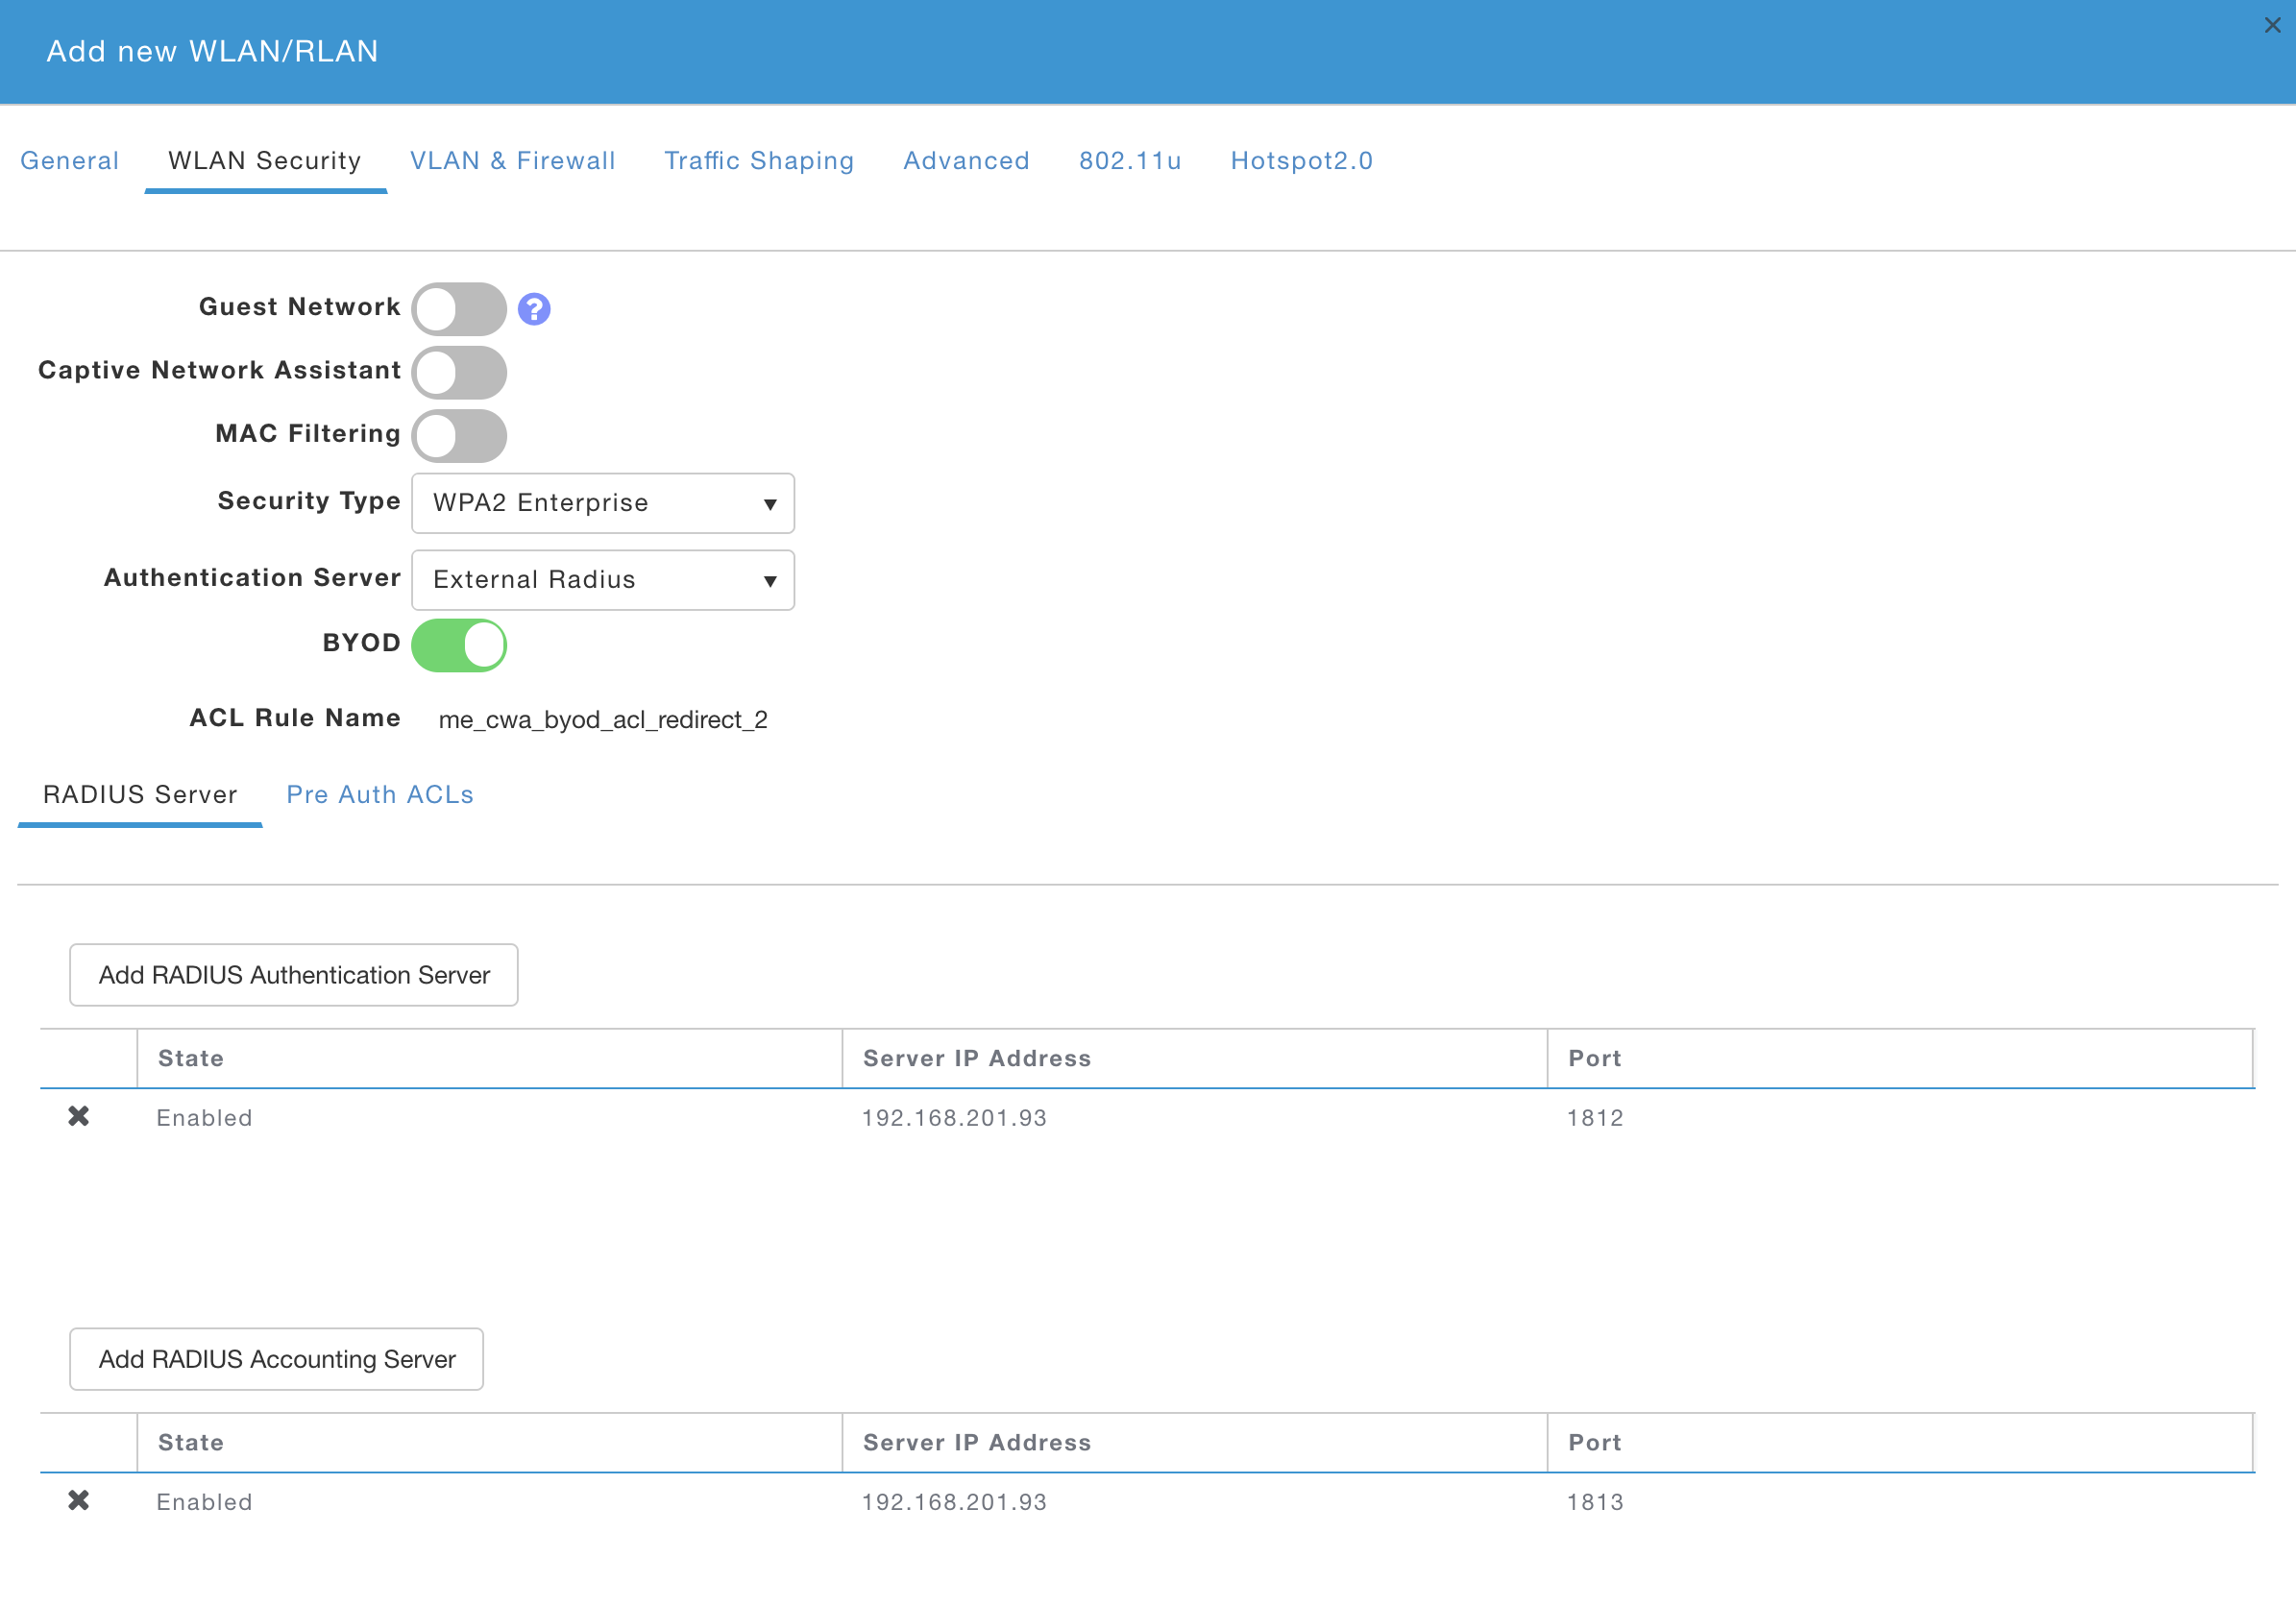
- General
- Profile Name/SSID: SECURED
- WLAN Security
- Captive Network Assistant: Disabled
- Security Type: WPA2 Enterprise
- BYOD: Enabled
- General
- Click on Add RADIUS Authentication Server and ensure ISE IP is shown and click apply.
- Repeat for RADIUS Accounting Server
- Make note of the ACL name shown for ‘CWA ACL Rule Name’. It should read ‘me_cwa_byod_acl_redirect_#’. You will need to use the same ACL name in the ISE AuthZ Profile in later steps
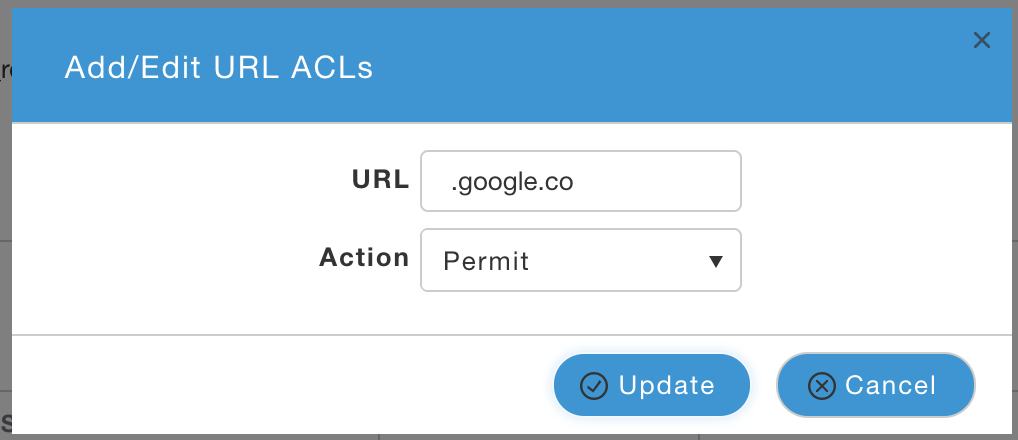
- Click on 'Pre Auth ACLs'
- Click on 'Add URL Rules' and enter following one at a time. This allows Android devices access to Google Play store to download ISE Network Setup Assistant App to assist in BYOD flow:
- .google.co
- accounts.youtube.com
- gstatic.com
- .googleapis.com
- .appspot.com
- ggpht.com
- gvt1.com
- market.android.com
- android.pool.ntp.org
- .googleusercontent.com
- .google-analytics.com
- Click Apply
ISE
Add Mobility Express AP as Network Access Device (NAD)
- Go to Administration > Network Resources > Network Devices, click on Add
- Enter Name, IP address, and check 'RADIUS Authentication Settings'
- Enter matching Shared Secret configured on the Mobility Express AP in the earlier step and Click Submit

(Optional) Add test user
- Go to Administration > Identity Management > Identities, click on Add
- Enter Name and Login Password and click Submit
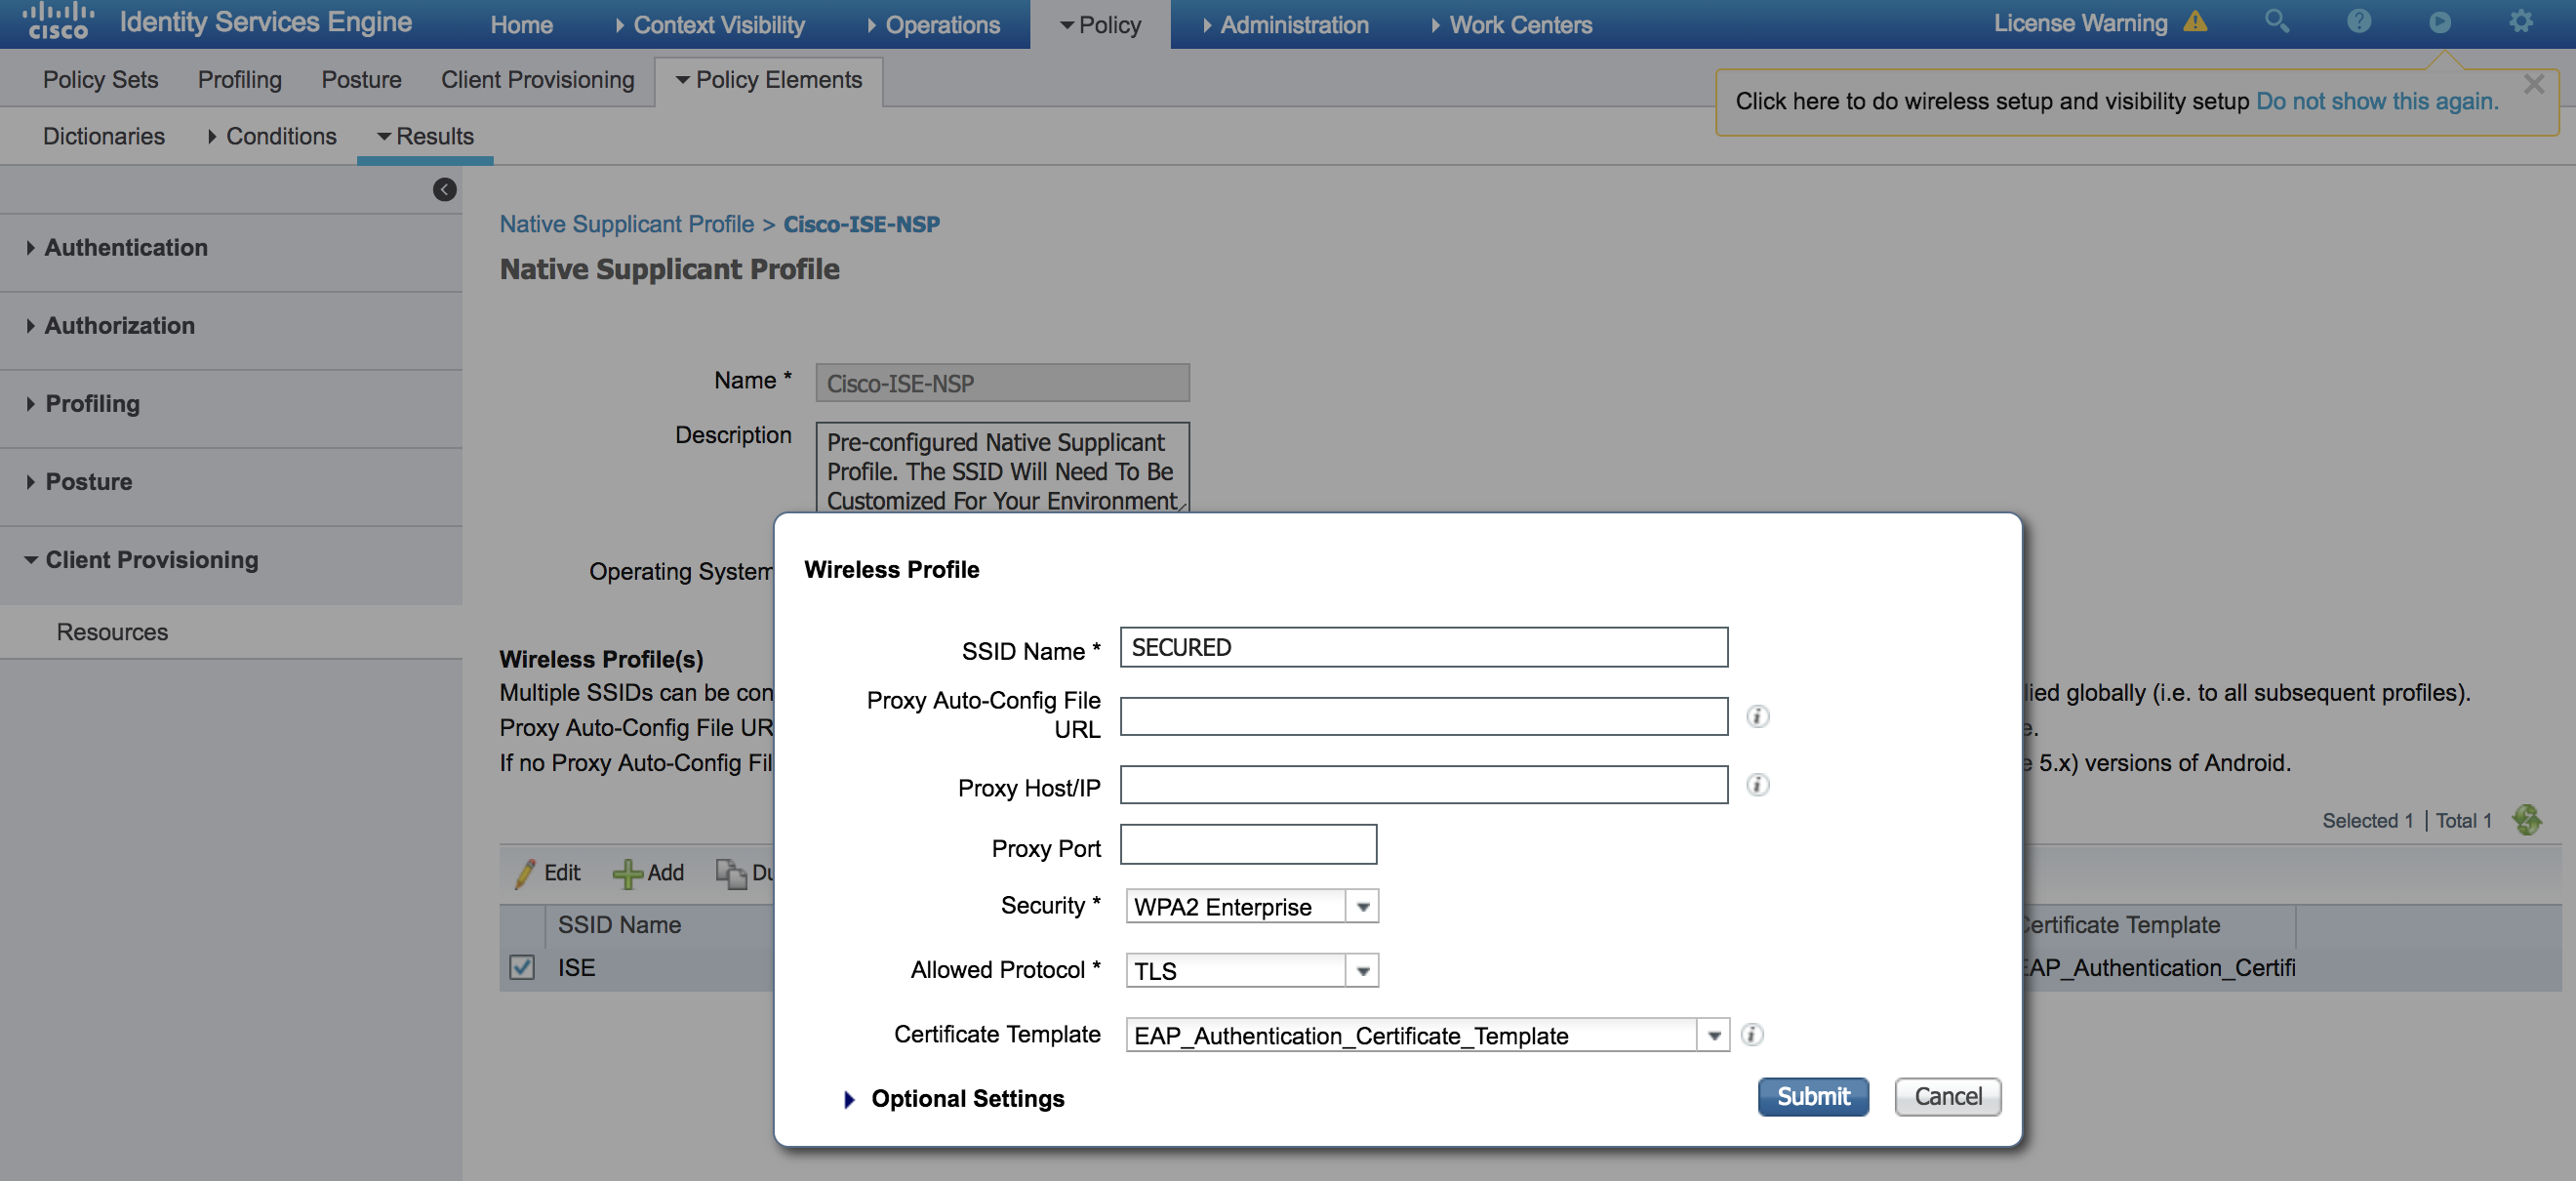
Modify BYOD profile
This step reconfigures default BYOD profile with Employee/BYOD SSID of 'SECURED'. If using different name for employee SSID, then modify the name to match the SSID name used in the deployment.
- Go to Policy > Policy Elements > Results
- Click on Client Provisioning > Resources on the left menu
- Check 'Cisco-ISE-NSP' and click on Edit
- Check 'ISE' SSID Name and click on Edit
- Change 'SSID Name' to SECURED and click Submit
- Click Submit to save the Native Supplicant Profile
Modify Authorization profile
We will be leveraging existing Authorization profile to simplify the steps. If default Authorization profiles are already in use, make a copy before modification. Also, if using copied Authorization profile, ensure that the policy set rules are using the copied Authorization Profile instead of the default ones in the next section.
- Go to Policy > Policy Elements > Results
- Click on Authorization > Authorization Profiles on the left menu
- Check 'Cisco_WebAuth' and click on Edit
- Under 'Common Tasks' area scroll down to 'Web Redirection' and replace the ACL with ACL value auto configured by Mobility Express AP in the previous steps for Guest WLAN
- Click Save
- Click on Authorization Profiles on the left menu
- Check 'NSP_Onboard' and click on Edit
- Under 'Common Tasks' area scroll down to 'Web Redirection' and replace the ACL with ACL value auto configured by Mobility Express AP in the previous steps for BYOD WLAN
- Click Save

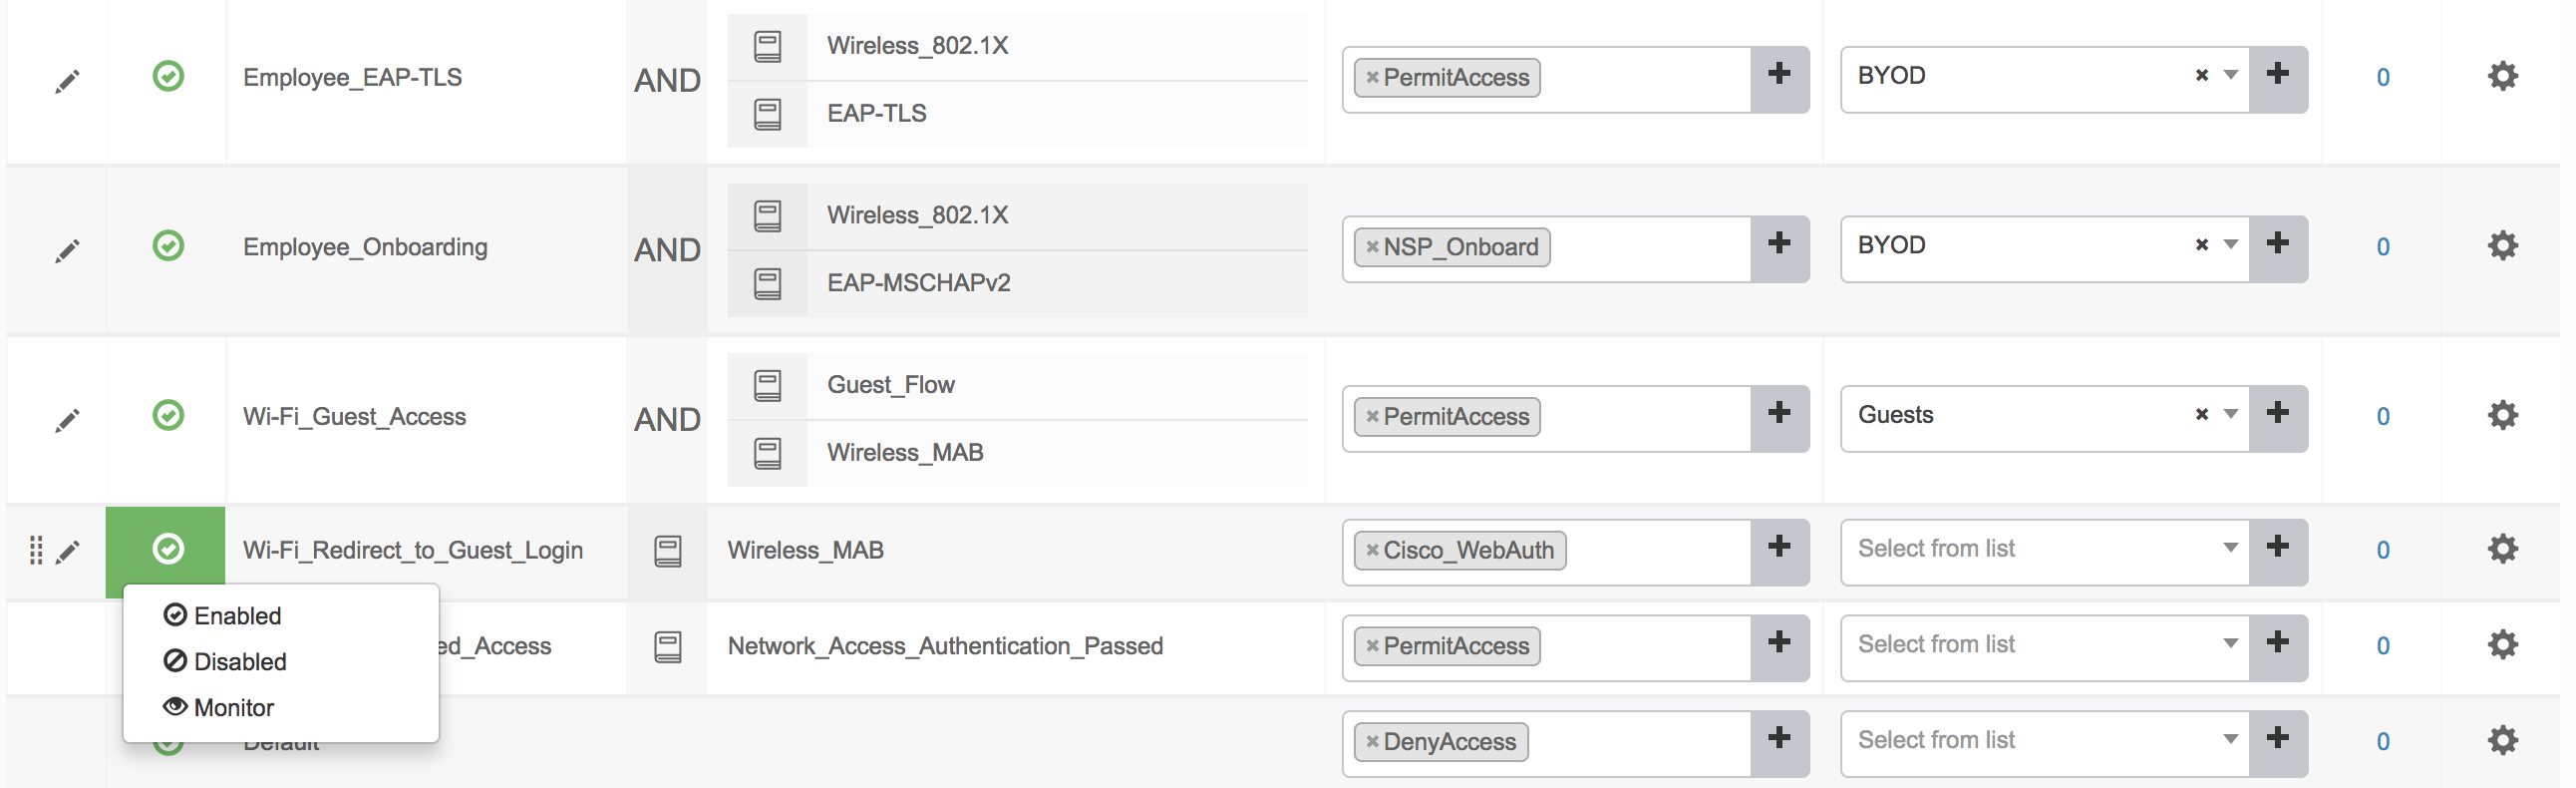
Modify Policy Set
- Go to Policy > Policy Sets
- Click on '>' to expand Default Policy Set
- Expand Authorization Policy by clicking '>'
- Scroll down and Enable following Rules by clicking the 'Status' icon and selecting 'Enabled'
- Employee_EAP-TLS
- Employee_Onboarding
- Wi-Fi_Guest_Access
- Wi-Fi_Redirect_to_Guest_Login
- Click Save
Find answers to your questions by entering keywords or phrases in the Search bar above. New here? Use these resources to familiarize yourself with the community: