- Cisco Community
- Technology and Support
- DevNet Hub
- DevNet Site
- DevNet Sandbox
- Unable to connect to APIC Mini VPN
- Subscribe to RSS Feed
- Mark Topic as New
- Mark Topic as Read
- Float this Topic for Current User
- Bookmark
- Subscribe
- Mute
- Printer Friendly Page
Unable to connect to APIC Mini VPN
- Mark as New
- Bookmark
- Subscribe
- Mute
- Subscribe to RSS Feed
- Permalink
- Report Inappropriate Content
08-09-2016 09:28 AM - edited 06-04-2019 02:25 AM
Hello,
I am having a very hard time connecting to the VPN. I tried APIC-EM__GA_HW-MiniLab-1 first with devnetsb12.cisco.com. It was suggested that I try another lab APIC-EM__GA_HW-MiniLab-3 so I did, but I get the same VPN endpoint and the connection always times out. I had my company IT look at my computer and we disabled antivirus, firewall, etc, but it was no help.
Can you please urgently have a look? See attached wireshark when I tried to connect.
[8/9/2016 12:18:14 PM] Contacting devnetsb12.cisco.com.
[8/9/2016 12:18:26 PM] Connection attempt has failed.
[8/9/2016 12:18:26 PM] Unable to contact devnetsb12.cisco.com.
[8/9/2016 12:20:05 PM] Contacting devnetsb12.cisco.com.
[8/9/2016 12:20:18 PM] Connection attempt has failed.
[8/9/2016 12:20:18 PM] Unable to contact devnetsb12.cisco.com.
Thanks,
Jeremy
- Labels:
-
Connectivity Issues and VPN
- Mark as New
- Bookmark
- Subscribe
- Mute
- Subscribe to RSS Feed
- Permalink
- Report Inappropriate Content
08-09-2016 09:31 AM
can u run an diagnostics test through the Anyconnect application. this can be done by referencing
- Mark as New
- Bookmark
- Subscribe
- Mute
- Subscribe to RSS Feed
- Permalink
- Report Inappropriate Content
08-09-2016 09:40 AM
Not sure I follow. Can you point me to the exact instructions to follow?
Note, I am using Cisco Anyconnect Secure Mobility Client Version 3.1.09013. I tried a later version, but same issue
Jeremy Gerson
- Mark as New
- Bookmark
- Subscribe
- Mute
- Subscribe to RSS Feed
- Permalink
- Report Inappropriate Content
08-09-2016 09:48 AM
please refer too:
RunningDART on Windows
To run the DART wizard and create a DART bundle for Windows, follow these steps:
Step 1![]() Launch the AnyConnect GUI if you are running on a Windows device.
Launch the AnyConnect GUI if you are running on a Windows device.
Step 2![]() Click the Statistics tab and then click the Details button at the bottom of the dialog box. This opens the Statistics Details dialog box.
Click the Statistics tab and then click the Details button at the bottom of the dialog box. This opens the Statistics Details dialog box.
Step 3![]() Click Troubleshoot at the bottom of the Statistics Details window.
Click Troubleshoot at the bottom of the Statistics Details window.
Step 4![]() Click Next at the Welcome screen. This brings you to the Bundle Creation Option dialog box.
Click Next at the Welcome screen. This brings you to the Bundle Creation Option dialog box.
Step 5![]() In the Bundle Creation Options area, select Default or Custom.
In the Bundle Creation Options area, select Default or Custom.
By selecting Default, and then clicking Next at the bottom of the dialog box, DART immediately begins creating the bundle. The default name for the bundle is DARTBundle.zip, and it is saved to the local desktop.

Tip By selecting Custom, you could accept the default files to include in the bundle and then only specify a different storage location for the file.
Step 6![]() If you want to encrypt the DART bundle, in the Encryption Option area check Enable Bundle Encryption; then, enter a password in the Encryption Password field. Optionally, select Mask Password and the password you enter in the Encryption Password and Reenter Password fields will be masked with astericks (*).Step 7
If you want to encrypt the DART bundle, in the Encryption Option area check Enable Bundle Encryption; then, enter a password in the Encryption Password field. Optionally, select Mask Password and the password you enter in the Encryption Password and Reenter Password fields will be masked with astericks (*).Step 7![]() Click Next. If you selected Default, DART starts creating the bundle. If you selected Custom, the wizard continues to the next step.Step 8
Click Next. If you selected Default, DART starts creating the bundle. If you selected Custom, the wizard continues to the next step.Step 8![]() In the Log File Selection dialog box, select the log files and preference files to include in the bundle. You have an option to include the Network Access Manager, Telemetry, Posture, and Web Security logs. Click Restore Default if you want to revert to the default list of files typically collected by DART. Click Next.Step 9
In the Log File Selection dialog box, select the log files and preference files to include in the bundle. You have an option to include the Network Access Manager, Telemetry, Posture, and Web Security logs. Click Restore Default if you want to revert to the default list of files typically collected by DART. Click Next.Step 9![]() In the Diagnostic Information Selection dialog box, select the diagnostic information to include in the bundle. Click Restore Default if you want to revert to the default list of files typically collected by DART. Click Next.Step 10
In the Diagnostic Information Selection dialog box, select the diagnostic information to include in the bundle. Click Restore Default if you want to revert to the default list of files typically collected by DART. Click Next.Step 10![]() In the Comments and Target Bundle Location dialog box, configure these fields:
In the Comments and Target Bundle Location dialog box, configure these fields:
- In the Comments area, enter any comments you would like included with the bundle. DART stores these comments in a comments.txt file included with the bundle.
- In the Target Bundle Location field, browse for a location in which to store the bundle.
Step 11![]() In the Summary dialog box, review your customizations and click Next to create the bundle or click Back to make customization changes.
In the Summary dialog box, review your customizations and click Next to create the bundle or click Back to make customization changes.
Step 12![]() Click Finish after DART finishes creating the bundle.
Click Finish after DART finishes creating the bundle.
Tip In some instances, customers have reported that DART has run for more than a few minutes. If DART seems to be taking a long time to gather the default list of files, click Cancel and then re-run the wizard choosing to create a Custom DART bundle and only select the files you need.
- Mark as New
- Bookmark
- Subscribe
- Mute
- Subscribe to RSS Feed
- Permalink
- Report Inappropriate Content
08-09-2016 09:53 AM
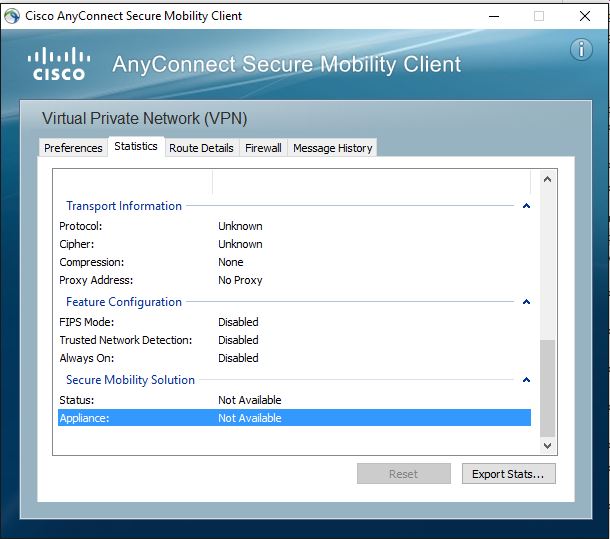
On step 2, I dont have this details button. See below. My connection always times out. Maybe im not getting far enough to get the details you are looking for?
Step 2![]() Click the Statistics tab and then click the Details button at the bottom of the dialog box. This opens the Statistics Details dialog box.
Click the Statistics tab and then click the Details button at the bottom of the dialog box. This opens the Statistics Details dialog box.
- Mark as New
- Bookmark
- Subscribe
- Mute
- Subscribe to RSS Feed
- Permalink
- Report Inappropriate Content
08-09-2016 10:46 AM
Hi,
Any chance we can have a quick session? I am blocked.
Thanks,
Jeremy
- Mark as New
- Bookmark
- Subscribe
- Mute
- Subscribe to RSS Feed
- Permalink
- Report Inappropriate Content
08-09-2016 11:18 AM
go here now please: cisco.webex.com/meet/ecorban
Discover and save your favorite ideas. Come back to expert answers, step-by-step guides, recent topics, and more.
New here? Get started with these tips. How to use Community New member guide