- Cisco Community
- Technology and Support
- Data Center and Cloud
- Data Center and Cloud Knowledge Base
- Upgrade Cisco DCNM from version 11.2(1) to 11.3(1)
- Subscribe to RSS Feed
- Mark as New
- Mark as Read
- Bookmark
- Subscribe
- Printer Friendly Page
- Report Inappropriate Content
- Subscribe to RSS Feed
- Mark as New
- Mark as Read
- Bookmark
- Subscribe
- Printer Friendly Page
- Report Inappropriate Content
06-07-2020 04:28 AM - edited 06-07-2020 04:54 AM
Introduction
The purpose of this document is to share my personal experience upgrading Cisco Data Center Network Manager (DCNM) from version 11.2(1) to 11.3(1) in my lab environment.
The details of this particular setup are:
- DCNM 11.2(1) deployed using the OVA file on a VMware ESXi host
- Two DCNM instances configured in Native HA mode (Active/Standby)
- This Cisco DCNM setup is not in clustered mode
- Network Insights - Resources (NIR) is not running in this setup
- There are no DCNM Compute nodes in this setup
- The upgrade process followed from the documentation was Inline Upgrade for DCNM Virtual Appliance in Native HA Mode
The outputs in this document were taken from devices in a specific lab environment. All devices used in this document started with a cleared (default) configuration. If your network is live, ensure that you understand the potential impact of any command.
NOTE: It is advised to perform DCNM's Inline Upgrade using VMware's Web Console rather than via remote SSH Session. The reason is that the SSH session may timeout and result in an incomplete upgrade of DCNM.
Process
1. Download file dcnm-va.11.3.1.iso.zip from Cisco Software Download site.
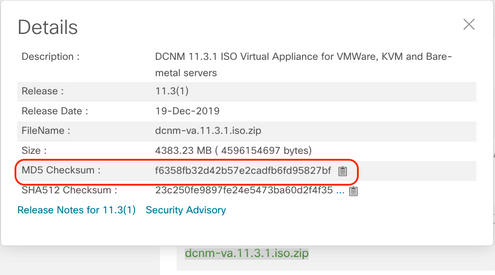
2. Confirm the MD5 hash from the downloaded ISO matches with the official MD5 hash indicated in the Cisco Software Download site. Hover the mouse over the file dcnm-va.11.3.1.iso.zip to make a table appear including this information.
From my Mac OS X laptop, using the Terminal (⌘ + Space bar and type "Terminal"), I moved to the directory where the ISO file was downloaded with the cd command and used md5 command to generate the MD5 hash. Once confirmed the MD5 hash match with the one in Cisco.com we proceed.
$ md5 dcnm-va.11.3.1.iso.zip
3. Log in to the Active DCNM and Standby DCNM instances via SSH using the root username and the password established during the DCNM installation.
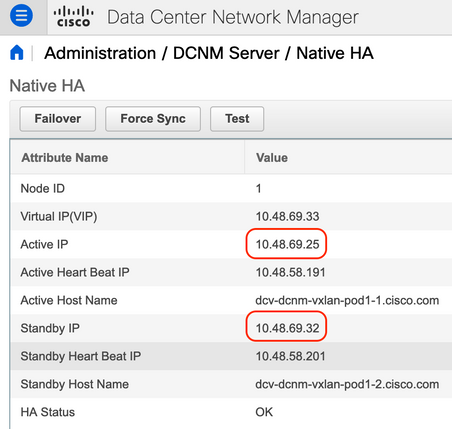
You can have the IP addresses for the Active DCNM and Standby DCNM in the GUI via Administrator > DCNM Server > Native HA as seen in the next figure.
Once logged in via SSH into the DCNM instances, run the command appmgr show ha-role to ensure the roles are correct.
| Active DCNM | Standby DCNM |
 |
 |

HECSERRA-M-82J9:~ hecserra$ scp dcnm-va.11.3.1.iso.zip root@<ACTIVE_DCNM_IP_or_URL>:/root/

Once the ISO file is in the Active DCNM node, you can use SCP from here to transfer it to the Standby DCNM instance. Since both instances are Layer 2 adjacent, it is likely the transfer will be faster.
5. As a good practice, compare the MD5 hash of the ISO files that have been uploaded to the DCNM instances matches with the original one.
| Active DCNM | Standby DCNM |
[root@dcv-dcnm-vxlan-pod1-1 ~]# md5sum dcnm-va.11.3.1.iso |
[root@dcv-dcnm-vxlan-pod1-2 ~]# md5sum dcnm-va.11.3.1.iso |
6. Next, use the screen command on both DCNM instances. This is suggested to allow to execute commands that continue to run even if you get disconnected from the SSH session.
| Active DCNM | Standby DCNM |
[root@dcv-dcnm-vxlan-pod1-1 ~]# screen |
[root@dcv-dcnm-vxlan-pod1-2 ~]# screen |
7. (Optional) It is highly advised to take a backup fo the DCNM deployment and retrieve it from DCNM before proceeding with the upgrade. Taking this backup took around 5 minutes in our lab environment. The size of the generated backup file was of 1.1 GB
| Active DCNM |
[root@dcv-dcnm-vxlan-pod1-1 ~]# appmgr backup Backing up all Process... ========================================================================= DCNM Postgresql Environment . . . |
| Standby DCNM |
[root@dcv-dcnm-vxlan-pod1-2 ~]# appmgr backup Backing up all Process... ========================================================================= DCNM Postgresql Environment . . . |
Using again SCP, we download the backup file to my laptop.
| From my laptop, downloading backup file from the Active DCNM instance |
HECSERRA-M-82J9:~ hecserra$ scp root@10.48.69.25:/root/backup.06_07_2020__01_11_39.tar.gz .
|
| From my laptop, downloading backup file from the Standby DCNM instance |
HECSERRA-M-82J9:~ hecserra$ scp root@10.48.69.32:/root/backup.06_07_2020__01_11_42.tar.gz .
|
8. We will now perform the upgraded on the Active DCNM instance. First step is to stop the HA applications on the Standby DCNM instance with the appmgr stop ha-apps command.
| Standby DCNM |
[root@dcv-dcnm-vxlan-pod1-2 ~]# appmgr stop ha-apps |
The next commands show how to mount the ISO file and run the upgrade script ./inline-upgrade.sh contained in the ISO file.
Run the script and when you are ready, type y to continue and notice that the scrip asks for a password for the the new sysadmin user that will be created.
- The reason of this is that before DCNM version 11.3(1), the root Linux user is used to SSH into DCNM's Linux shell.
- Starting DCNM version 11.3(1), the sysadmin user is now used to SSH into DCNM's Linux shell.
The root user is not allowed to SSH into 11.3(1) by default anymore improving security.
If you wish, you can modify this behavior with the appmgr root-access {permit|deny|without-password} command.
| Active DCNM |
[root@dcv-dcnm-vxlan-pod1-1 ~]# cd /root |
Now sit and relax since this process may take around 30 minutes.
You will see a message similar to the following once the upgrade completes:
| Active DCNM |
 |
The Active DCNM instance should have reloaded by itself and you need to SSH again into it. This time use the sysadmin user.
At this point, the Active DCNM instance should be now running version 11.3(1).
- Ensure that on the Active DCNM instance, the output of the appmgr show ha-role command shows Current role: Active before proceeding with upgrading the Standby DCNM node.
- Also, use appmgr status all to verify the status of DCNM at this point of the process.
Example of the output of these commands at this point of the process next:
| Active DCNM | Standby DCNM |
[sysadmin@dcv-dcnm-vxlan-pod1-1 ~]$ appmgr show ha-role |
[root@dcv-dcnm-vxlan-pod1-2 ~]# appmgr show ha-role |
Note that insecure access via HTTP is disabled. You must use HTTPS to log into the WebGUI.
| Active DCNM |
[sysadmin@dcv-dcnm-vxlan-pod1-1 ~]$ appmgr status all |
| Standby DCNM |
[root@dcv-dcnm-vxlan-pod1-2 ~]# appmgr status all |
9. If the previous outputs looks correct, proceed with upgrading the Standby DCNM instance before proceeding with the normal operation of DCNM. Note the same commands used to mount the ISO file and run the upgrade script but this time with the --standby parameter is used as seen in the ./inline-upgrade.sh --standby line next:
| Standby DCNM |
[root@dcv-dcnm-vxlan-pod1-2 ~]# cd /root |
Again, sit and relax since this process may take around 10 minutes. Yes, faster than the upgrade of the Active DCNM instance.
When done, the Standby DCNM will reboot by itself as well.
| Standby DCNM |
 |
SSH again into the Standby DCNM instance using the sysadmin user.
For comparison, here the output of appmgr show ha-role and appmgr status all at this point of the process:
| Active DCNM | Standby DCNM |
[sysadmin@dcv-dcnm-vxlan-pod1-1 ~]$ appmgr show ha-role |
[sysadmin@dcv-dcnm-vxlan-pod1-2 ~]$ appmgr show ha-role |
| Active DCNM |
[sysadmin@dcv-dcnm-vxlan-pod1-1 ~]$ appmgr status all |
| Standby DCNM |
[sysadmin@dcv-dcnm-vxlan-pod1-2 ~]$ appmgr status all |
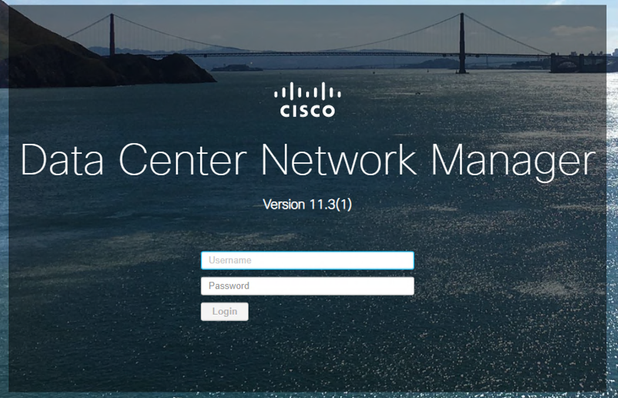
10. Login to DCNM via WebGUI, it is now running version 11.3(1)
https://<DCNM_VIP>. Ensure it is https and not http.
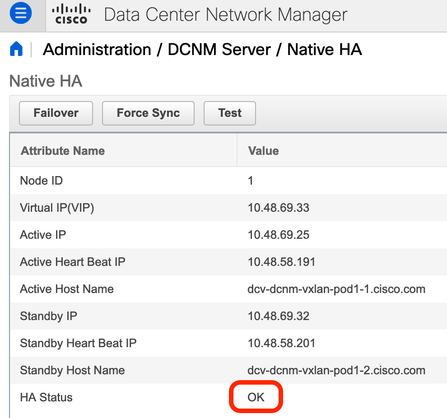
Once logged into the WebGUI, go to Administrator > DCNM Server > Native HA to confirm the Native HA is OK.
Conclusion
Following the documented Inline Upgrade for DCNM Virtual Appliance in Native HA Mode process (link below) was simple and straightforward. As any process of this nature, it is advised to perform it during a maintenance window. While the upgrade process itself can take around 1 hour, additional time must be accounted for downloading the ISO file from Cisco.com, transferring it to DCNM and downloading the backup files that are advised to be taken on DCNM before proceeding with the upgrade.
If your DCNM setup is in clustered mode and includes DCNM Compute nodes and/or Network Insights, there are a couple of additional steps that can be found in the official documentation guide.
Cisco DCNM Installation and Upgrade Guide for Classic LAN Deployment, Release 11.3(1)
Chapter: Upgrading Cisco DCNM
Inline Upgrade for DCNM Virtual Appliance in Native HA Mode
The steps to upgrade the DCNM Standalone Mode are part of this same document and are pretty much the same.
Finally, you may need to restore the certificates after upgrading. This is a disruptive process. More information via:
Cisco DCNM Installation and Upgrade Guide for Classic LAN Deployment, Release 11.3(1)
Chapter: Certificates
Restoring the certificates after an upgrade
Find answers to your questions by entering keywords or phrases in the Search bar above. New here? Use these resources to familiarize yourself with the community:


